WWW.POLKAUDIO.COM/AMPS
13
12
POLK/MOMO: CHAMPIONSHIP PERFORMANCE
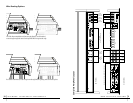
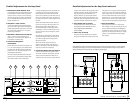
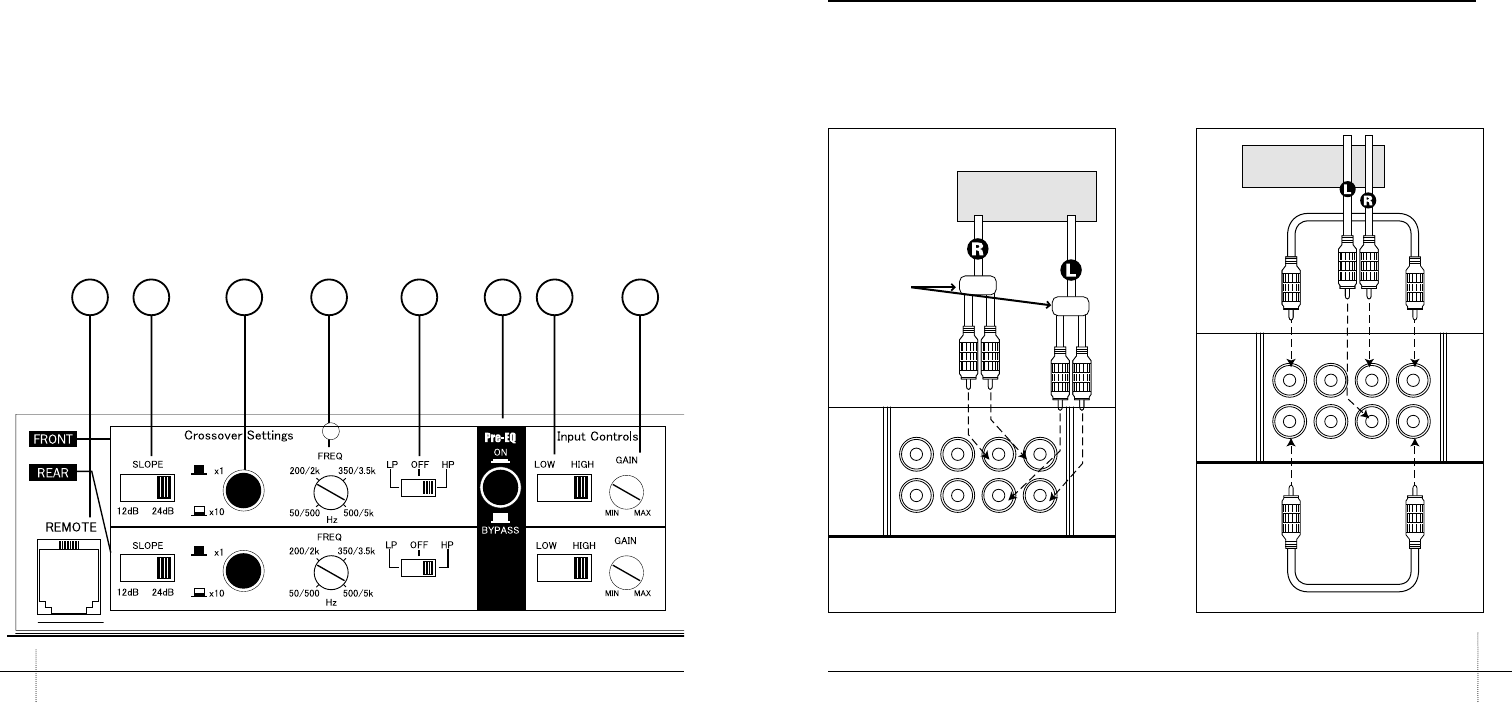
1 REMOTE BASS GAIN MODULE JACK
Accepts telephone jack input connection from the remote
bass gain module (only works on REAR channel when
crossover is set to LP). Set GAIN (8) to max when using
the remote. Remote bass gain module is sold separately.
See your Authorized Polk AutoSound Dealer or visit the
webstore at polkaudio.com.
2 FREQUENCY SLOPE TOGGLE
Use this switch to determine the grade of the frequency
slope over which the amplifier "rolls off" the frequencies
for better blending between highs and lows. Choose either
steep crossover slope (24dB/Octave) or a more gentle
crossover slope (12dB/Octave).
3 FREQUENCY MULTIPLICATION SWITCH
Choose "x1" for lower crossover frequencies(50 to
500Hz), choose “x10” and the crossover frequency will
be multiplied by 10 (500Hz to 5kHz).
4 CROSSOVER FREQUENCY
ADJUSTMENT
When the FREQUENCY MULTIPLICATION SWITCH is set
to “x1,” the crossover frequency can be adjusted between
50 to 500Hz. When the FREQUENCY MULTIPLICATION
SWITCH is set to “x10,” the crossover frequency can be
adjusted between 500Hz to 5kHz.
The crossover frequency adjustment filters out frequen-
cies that you don't want the speaker to reproduce. When
the CROSOVER MODE is set to LP it filters out the
midrange and high frequencies from the subwoofer. If it
is set too high, you’ll hear voices and other midrange
sounds coming from the subwoofer and the bass will
seem to come only from the rear of the vehicle. If it is set
too low, you’ll miss the “kidney punch” kick of the mid-
bass. Set the control to 80Hz – 120Hz and adjust it by ear
from there.
When the CROSSOVER MODE is set to HP it filters out
bass from your midrange or full range speakers. That
takes strain off the speakers, allowing them to play
louder with less distortion. Set the Frequency Control
to around 80Hz – 100Hz. If it sounds like you’re losing
too much mid-bass punch, turn the Frequency Control
down to 50Hz.
Most of the time you should set the LP and HP filters to
around the same frequency setting, but always let your
ears be the final judge. Experiment and go with the
settings that sound best.
When the CROSSOVER MODE is set to OFF, the
Frequency Control does nothing. When the Pre EQ
switch is on, the Frequency Control does nothing (the
crossovers are preset by the Pre EQ feature).
5 CROSSOVER MODE SELECTOR SWITCH
A] set to the LP position when the amplifier is used to
drive a woofer or subwoofer. The frequencies above the
crossover point will be attenuated at 12dB/Octave or
24/Octave. B] set to OFF (“Full Pass”) position when the
Detailed Adjustments for the Amp Panel
1
2876
5
43
Single output
from headunit
RCA "Y"
adapters
R
L
R
L
R
L
R
L
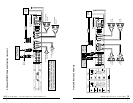
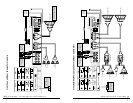
Most applications of the four channel amp require two sets of RCA inputs (Front and Rear). If your head unit
only has one RCA output, you may use a short RCA cable to connect from PRE-OUT Front to INPUT Rear as
shown in the diagram. You may also use a Y-adapter to split the signal.
Single output
from headunit
R
L
R
L
R
L
R
L
amplifier will be used to drive full range speakers with no
subwoofer in the system. The full frequency bandwidth
will be output to the speakers with no high or low
frequency attenuation. C] set to HP position when the
amplifier is used to drive full range speakers with a sub-
woofer in the system. The frequencies below the crossover
point will be attenuated at 12dB/Octave or 24/Octave.
6 POLK/MOMO PRE-EQ SWITCH
One-button preset crossover and EQ optimization for
the best performance from Polk/MOMO Component
systems. Using this will override all other
crossover settings.
7 INPUT TYPE SELECTOR
This switch allows you to select the type of connection
being made. The default for the average head unit is the
LOW position, as the most popular head unit output con-
nections are low voltage. To use HIGH level speaker wire
inputs, simply splice an RCA connector onto your speaker
wire, then set this switch to HIGH. If you have a higher
output head unit, a 4V or 8V head unit output (see your
head unit’s owner’s manual), set this selector to HIGH
because you will have high voltage coming into the amp.
8 GAIN ADJUSTMENT
Begin with gain set at about the 11 o’clock position.
Once all settings are made, turn this setting up until your
source JUST BEGINS to distort, then back off slightly to
cut distortion and operate at optimum gain. The voltage
range for the RCA audio inputs is 200mV to 8V. Anything
greater may cause audible distortion and/or damage
to the amplifier.
Detailed Adjustments for the Amp Panel continued


