


POLK AUDIO / MOMO DESIGN
10
POLK/MOMO: CHAMPIONSHIP PERFORMANCE
11
7.
If the factory speaker had three screw holes, you’ll
need to drill additional screw holes to accommodate
the four screw pattern of the Polk/MOMO
mid/woofer.
8. Using the hardware retained from the factory speaker
or the screw clips supplied with the Polk/MOMO
speaker, secure your new speaker to the car panel.
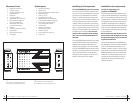
Installing the Mid/Woofers
in Non-Factory Locations
If you have decided to install your
Polk/MOMO Series mid/woofers in
locations other than those provided
by the automobile manufacturer,
make certain that the location you
choose is clear of all obstructions,
both in front of and behind the
panel, before you proceed. Pay
particular attention to window
mechanisms and any body panels
critical to the structural integrity of
the vehicle. The mounting depths
and cutout diameters of your
Polk/MOMO Series mid/woofers
are listed with all the other impor-
tant specifications at the end
of this manual.
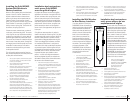
1. Cut a hole in the panel (5-7/8 inch or
148 mm hole for the MM6).
2. Use the speaker grille as a template
for marking the locations of the
four screw holes.
3. Drill the holes with a 1/8" bit.
4. Attach the screw clips to the car
panel at the hole locations.
5. Cut the supplied driver wire (the heavier
gauge of the two sets of wire) in half.
6. Remove the yellow crossover cover by squeezing the
cover at the tabs. Attach speaker wires to the
crossover “woofer” terminals. Attach the wire with
the white stripe to the positive (+) terminal screw,
and the un-striped wire to the negative (-) terminal
screw.
7. Route the driver wire from the crossover location
through grommets to the mid/woofer location.
8.
Strip 1/8" – 1/4" (4-6 mm) of plastic insulation from
the cut ends of the driver wire.
7.
Si le haut-parleur d'origine n'a que trois trous de vis,
vous devrez percer d'autres trous pour accommoder
les quatre trous du haut-parleur Polk/MOMO.
8. Utilisant la quincaillerie du haut-parleur d’origine ou
les agrafes à vis fournies avec votre haut-parleur
Polk/MOMO, fixez le nouveau haut-parleur au
panneau de la voiture.
Installation des haut-parleurs
méd.-graves ailleurs qu’aux
emplacements d’origine
Si vous avez choisi d’installer vos
haut-parleurs méd.-graves ailleurs
dans votre voiture qu’aux emplace-
ments d’origine, assurez-vous que
ces endroits sont libres d’obstruc-
tions, autant à l’avant qu’à l’arrière
du panneau, avant de procéder.
Portez une attention particulière au
mécanisme des fenêtres et à tout
panneau de carrosserie essentiel à
l’intégrité structurelle de la voiture.
La profondeur de montage et la cir-
conférence des trous nécessaires
au montage des haut-parleurs
Polk/MOMO, de même que toutes
leurs spécifications importantes,
sont inscrits sur la fiche technique
située à la fin de ce manuel.
1. Faites un trou dans le panneau—
127 mm (5") pour le MM455 ou
150,9 mm (5 15/16") pour le MM465).
2. Utilisez la grille comme gabarit
pour marquer l’endroit des
quatre trous pour les vis.
3. Percez les trous à l’aide d’une
perceuse avec foret de 30 mm (1/8").
4. Fixez les agrafes à vis au panneau autour des trous.
5. Coupez le fil de h.p. (le fil ayant le
plus gros calibre) en deux.
6. Retirez le couvercle jaune du séparateur en appuyant
sur les languettes du couvercle. Connectez le fil de
h.p. aux bornes «woofer» du séparateur—le con-
ducteur rayé blanc à la borne positive (+) et
l’autre conducteur à la borne négative (-).
7.
Passez le fil de haut-parleur à partir du sépar-
ateur jusqu’à l’emplacement du méd.-graves.
8.
Dénudez 6 - 12 mm (1/8"-1/4") d’isolation
de plastique des bouts du fil de h.p.
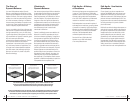
Installing the Polk/MOMO
System Mid/Woofers in
Factory Locations
Most cars have speaker grilles that blend with
the rest of the car’s interior. Sometimes it is
difficult to determine how to remove these
grilles to gain access to the speaker that you
intend to replace. If you have one of these
grilles, you may want to consider using a profes-
sional installer. On some cars, the grilles are
held by screws or spring clips. The screws will
be obvious, the spring clips won’t.
If there are screws, remove them, put them in
a safe spot, and remove the grilles. To remove
a clip-on grille, use your flat-blade screwdriver
to gently pry up the grille. If it resists, back off
and think again about the professional install.
The cost of one of these can sometimes be less
than the cost of new door panels. Some grilles
are integral parts of the door panel and are not
removable. In these cases you will need to
remove the entire door panel to gain access
to the speaker location.
This will usually require removal of door han-
dles, window mechanisms, and other parts such
as door pulls and lock buttons.
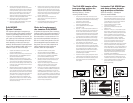
1. Once you get the grille off, remove the factory speak-
ers. Save the hardware. You may be able to reuse it
to mount your new speaker.
2. Cut the supplied driver wire (the heavier gauge
of the two sets of wire) in half.
3. Remove the yellow crossover cover by squeezing the
cover at the tabs. Attach speaker wires to the
crossover “woofer” terminals. Attach the wire with the
white stripe to the positive (+) terminal screw, and the
un-striped wire to the negative (-) terminal screw.
4. Route the driver wire from the crossover location
through grommets to the mid/woofer location.
5. Strip 1/8" – 1/4" (4-6 mm) of plastic insulation
from the cut ends of the driver wire.
6. Unscrew the binding post thumbnuts on the
mid/woofers to fully expose the hole
in the terminal shaft and slip the other end of the wire
into the holes in the input terminals. Tighten the
thumbnuts finger-tight (do not over-tighten the nuts as
you may strip the threads). Be sure to attach the wire
with the white stripe to the positive (red) terminal, and
the un-striped wire to the negative (black) terminal.
Installation des haut-parleurs
méd.-graves Polk/MOMO
sous une grille d’origine
La plupart des voitures sont munies de grilles
appariées à leur intérieur. Il est parfois difficile
de savoir comment retirer ces grilles pour avoir
accès au haut-parleur que l’on veut remplacer.
Si votre voiture est munie de ce type de grilles,
vous devriez peut-être consulter un installateur
professionnel. Selon la voiture, ces grilles sont
parfois retenues par des vis ou des agrafes à
ressort. Les vis sont apparentes, les agrafes ne
le sont pas.
Si la grille est retenue par des vis, retirez-la,
mettez-la de côté puis retirez la grille. Si la grille
est retenue par des agrafes à ressort, utilisez un
tournevis à tête plate ou un couteau à mastic
comme levier et dégagez délicatement la grille.
Si elle ne se dégage pas facilement, consulter
un installateur professionnel—cela pourrait
vous coûter moins cher que de devoir remplacer
un panneau de porte. Certaines grilles font par-
tie intégrale du panneau de porte et ne sont pas
amovibles; dans un tel cas, vous devez retirer
le panneau de porte pour accéder au haut-
parleur— et cela vous oblige normalement à
retirer les poignées de porte, les mécanismes
de fenêtre et autres pièces comme les boutons
de serrure et les manettes de porte.
1. Après avoir retiré la grille, retirez le haut-parleur
d’origine. Conservez la quincaillerie. Vous devrez peut-
être l’utiliser pour installer votre nouveau haut-parleur.
2. Coupez le fil de h.p. fourni (le fil ayant le plus
gros calibre) en deux.
3. Retirez le couvercle jaune du séparateur en appuyant
sur les languettes du couvercle. Connectez le fil de
h.p. aux bornes «woofer» du séparateur - le conducteur
rayé blanc à la borne positive (+) et l’autre conducteur
à la borne négative (-).
4. Passez les fils de h-p à partir du séparateur
jusqu’à l’emplacement du méd.-graves.
5. Dénudez 6 - 12 mm (1/8" - 1/4") d’isolation
de plastique des bouts du fil de h.p.
6.
Dévissez les écrous des bornes du haut-parleur méd.-
graves pour exposer les trous dans la tige des bornes
puis insérez les fils dans les trous. Resserrez les écrous
avec les doigts (mais pas trop pour éviter d’écraser le
filetage). Assurez-vous d’insérer le conducteur rayé
blanc dans la borne positive (rouge) et l’autre
conducteur dans la borne négative (noire).
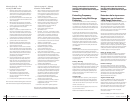
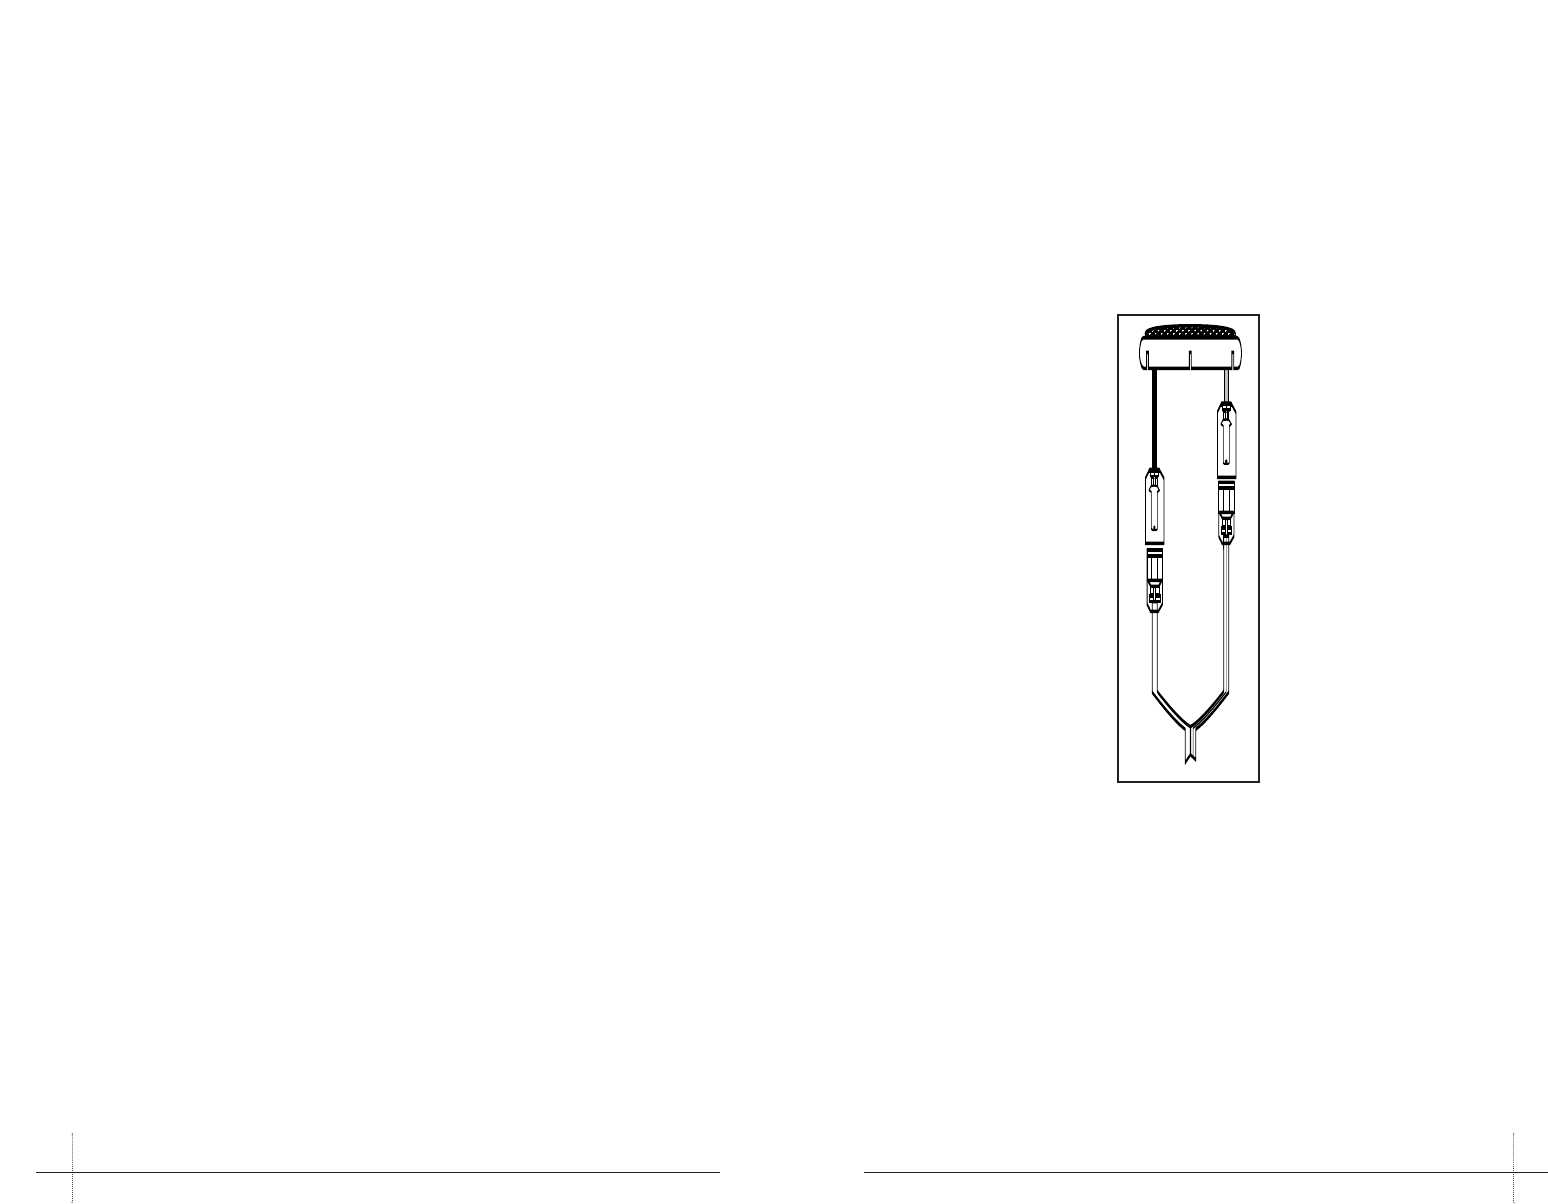
Figure 2