


POLK AUDIO / MOMO DESIGN
14
POLK/MOMO: CHAMPIONSHIP PERFORMANCE
15
Damage to the tweeter from thermal over-
load will result without the protection
provided by a crossover and will void your
warranty.
Extending Frequency
Response Using Mid-Range
Extension
The Polk Audio/MOMO Crossover features a Mid-Range
Extension option. When placed in the “ON” position, this
removes the low pass crossover filter from the mid/bass dri-
ver, allowing it to run full-range. This may be helpful in get-
ting a better “blend” between mid/driver and tweeter when
the two are placed some distance from each other.
It works like this: Normally the crossover rolls off the high
frequency response of the driver in a steep slope. But when
a great distance separates a tweeter from the driver (for
example, the driver is on the bottom of the door panel, and
the tweeter is on the top of the door panel or dash) getting a
good driver-to-tweeter blend may be difficult. The Mid-
Range Extension feature bypasses the driver’s crossover,
extending the response of the driver to better meet that of
the tweeter. Experiment to find the setting that best suits
your installation.
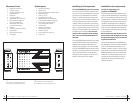
Tweeter Level
The slide switch on the side of the crossover box adjusts the
level (volume) of the tweeter relative to the mid/woofer.
Start with the switch in the bottom position and listen. If you
want a “brighter” sound, move the switch to the middle posi-
tion and listen again. The “0 dB” setting provides the great-
est amount of tweeter output. -3dB and -6dB reduce output
to a greater degree.
Polarity / Blending
If it seems that the tweeters and mid/woofers are not
“blending” or working together in harmony, try changing the
polarity of both the tweeters by reversing the positive (+) and
negative (-) tweeter wires at the crossover. Reversing the
absolute phase of the tweeters may help the blending or
integration of the system components, particularly if the
tweeters and mid/woofers are on different planes. In your
car, that is, not your plane.
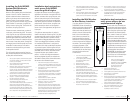
Tweeter Angle
The MM tweeters may be pivoted to get the best high fre-
quency response and soundstage. Generally, pointing the
tweeters toward the listening position will yield the best
results. But don’t be afraid to try other angles. Use the posi
-
tion that sounds best to you.
Pivot the tweeter module by applying firm pressure on the
edge of the tweeter module.
DO NOT APPLY PRESSURE TO THE DOME ITSELF
.
Damage to the tweeter from thermal over-
load will result without the protection
provided by a crossover and will void your
warranty.
Extension de la réponse en
fréquences par la fonction
«Mid-Range Extension»
Le séparateur Polk /MOMO est muni d’un commutateur d’ex
-
tension des médiums. Lorsqu’en position «ON», le filtre
passe-bas du séparateur est désactivé et le haut-parleur
méd.-graves peut ainsi opérer en mode gamme intégrale.
Ceci peut aider à obtenir un meilleur «mélange» entre le
haut-parleur méd.-graves et le tweeter lorsqu'ils sont instal-
lés à une certaine distance l’un de l’autre.
Voici pourquoi: normalement, le séparateur atténue abrupte-
ment les hautes fréquences envoyées au haut-parleur méd.-
graves. Mais lorsque le tweeter et le haut-parleur sont
installés à une certaine distance l’un de l’autre (p. ex. si
le haut-parleur méd.-graves est situé en bas des panneaux
de porte et le tweeter est situé en haut des panneaux ou
sur le tableau de bord) il peut être difficile d’obtenir un bon
mélange méd.-graves - tweeter. La fonction «Mid-Range
Extension» contourne le séparateur, permettant à la gamme
intégrale du méd.-graves de mieux s’harmoniser à la gamme
de fréquences du tweeter. Expérimentez pour déterminer
le meilleur réglage pour votre propre système.
Niveau du Tweeter (Level)
Le commutateur à glissière situé sur le côté du séparateur
ajuste le volume du tweeter en relation au transducteur
méd.-graves. Commencez avec le commutateur dans la posi-
tion inférieure et écoutez. Si vous désirez un son plus «clair»
réglez le commutateur à la position médiane puis écoutez. La
position supérieure procure le niveau maximum du tweeter.
Polarité et mélange
Si le son des tweeters et des méd.-graves ne se mélange
pas de façon harmonieuse, essayez de renverser la polarité
des deux tweeters en inversant les fils positifs (+) et négatifs
(-) des bornes du séparateur. Le fait d’inverser la polarité
absolue des tweeters peut aider au «mélange» ou à
«l’intégration sonore» des composants, particulièrement
si les tweeters et les méd.-graves sont installés à
différents niveaux dans votre voiture.
Angle du Tweeter Angle
Les tweeters MM400 peuvent être pivotés pour obtenir une
meilleure scène sonore et une meilleure directivité des
hautes fréquences. En général, vous obtiendrez les meilleurs
résultats en orientant les tweeters vers votre position d’é-
coute. Mais n’hésitez pas à essayer d'autres angles. Chois-
issez l’orientation qui vous donne le meilleur son global.
Faites pivoter le module du tweeter en appuyant
sur le cadre du module.
N’APPUYEZ JAMAIS SUR LE DÔME OU SUR LA GRILLE.
Mounting Option #2 —Flush
mounting the MM Tweeter
1.
Remove the panel on which you are going to mount
the tweeter and check for proper clearance behind it.
The flush mount kit is 1-3/16 inch deep. Measure to
make sure there is sufficient depth behind the spot
you choose the final location.
2.
Use the hole that is punched into the cardboard pack-
ing insert as a template to mark the location and size
of the mounting hole.
3. Mark the center of the spot and cut a hole with the
2-3/16-inch hole-saw attachment for your power drill.
Go slow. Or you can use a razor knife instead of a drill.
4. Cut the supplied tweeter wire (the lighter
gauge wire) in half.
5. Strip 1/8" – 1/4" (4-6 mm) of plastic insulation from
the cut ends of the tweeter wire. Connect this end
of the wire to the tweeter terminals of the crossover.
Connect the white-striped wire strand to the positive
(+) terminal of the crossover tweeter output and the
un-striped wire to the negative (-) tweeter terminal.
6. Route the tweeter wire from the crossover through
grommets location to the tweeter location.
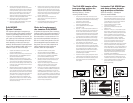
7. Assemble cup, clamp, and machine screw loosely.
8. Route the red and black tweeter wires through the
holes in the bottom of the cup.
9. Slip the male fast-on connector on the red tweeter
wire onto the female connector on the white-striped
wire from the crossover and the black tweeter wire to
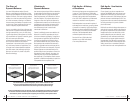
the un-striped wire (Figure 2). Make sure the clear
plastic insulators fully cover the fast-on connectors
otherwise you may short the tweeter leads and
possibly damage your amplifier.
10. Press the assembly into the 2-3/16" hole until the
clamp edge is below the mounting surface, then
tighten the screw. The cup will clamp down to the
surface as the screw is tightened (Figure 3). In the
case of a thick mounting surface, the legs of the
clamp can be bent outward by inserting a screwdriver
through the four rectangular holes in the cup while
still mounted (Figure 4).
11. Snap the tweeter into the mounting cup,
being careful not to pinch the wires.
12. Once the tweeter is mounted and connected,
swivel the tweeter by applying firm pressure to
the edge of the tweeter module. DO NOT apply
pressure to the grille.
13. Connect positive and negative leads to the crossover.
NOTE: to remove the tweeter assembly, place a small screw-
driver into the side slot and pry carefully upwards (Figure 5).
Option de montage #2 —Montage
encastré du Tweeter MM400
1.
Retirez le panneau sur lequel vous désirez monter le
tweeter. Le module du tweeter encastré a une pro-
fondeur de 314 mm (1 3/16 po). Assurez-vous qu’il
y a un dégagement suffisant derrière le panneau à
l’endroit choisi pour le montage.
2.
Utilisez le trou poinçonné sur la boîte de carton
comme gabarit pour marquer l’emplacement et
la circonférence du trou nécessaire au montage.
3. Marquez le centre du cercle et faites un trou avec
une perceuse avec scie-cloche de 5 cm (2 po).
Procédez lentement. Vous pouvez utiliser un
couteau au lieu d’une perceuse.
4. Coupez le fil de tweeter (le fil de plus
petit calibre) en deux.
5. Dénudez 6 - 12 mm (1/8" - 1/4") d’isolation de plas-
tique des bouts du fil de tweeter. Connectez un bout
du fil au tweeter—le conducteur rayé blanc à la
borne positive (+) et l’autre conducteur à la borne
négative (-). Connectez l’autre bout du fil au sépara-
teur—le conducteur rayé blanc à la borne positive (+)
de la sortie tweeter et l’autre conducteur à la borne
négative (-) de la sortie tweeter.
6. Passez le fil du tweeter à partir du séparateur
jusqu’à l’emplacement du tweeter.
7. Assemblez une coupelle, un crampon
et une vis à métaux (sans serrer).
8. Passez les fils noir et rouge pour tweeter à
travers le trou à la base de la coupelle.
9. Accouplez le connecteur mâle du fil rouge du tweeter
avec le connecteur femelle du fil rayé blanc prove-
nant du séparateur, et le connecteur mâle du fil noir
du tweeter avec le connecteur femelle du fil non rayé
(Figure 2). Assurez-vous que l’isolant de plastique
transparent recouvre complètement les connecteurs
pour éviter les risques de court-circuit et de
dommage à votre amplificateur.
10. Poussez l’ensemble dans le trou de 5 cm (2 po)
jusqu’à ce que le rebord du crampon pénètre sous la
surface de montage puis serrez la vis. À mesure que
vous vissez, la coupelle sera graduellement coincée
à la surface (Figure 3). Si la surface de montage est
plus épaisse, les pattes des crampons peuvent être
repliées en insérant un tournevis dans les quatre
trous de la coupelle déjà montée (Figure 4).
11. Enclenchez le tweeter dans la coupelle en faisant
attention de ne pas coincer les fils.
12.
Une fois le tweeter monté et connecté, orientez-le
en appuyant sur le cadre du module du tweeter.
N’appuyez PAS sur la grille.
13.
Connectez les fils positif et négatif au séparateur.
NOTE: pour retirer le module du tweeter, placez un petit
tournevis dans la fente de côté et soulevez délicatement.