


6
GENERAL OPERATION
Note: In this product design, there has
different sound accompanying with every
button pressed and the sound is
designed differently according to the
customers.
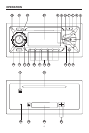
• ON/OFF
Switch on the unit by pressing POWER
button (9). When system is on, press
POWER button (9) again to turn off the
unit.
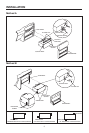
• OPEN THE FRONT PANEL
Press OPEN button (7) to fold down
the front panel.
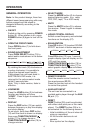
• SOUND ADJUSTMENT
Press PUSH SELECT button (10) to
select audio mode shown in the below
sequence.
By rotating the knob (10) clockwise or
counter-clockwise, it is possible to
adjust the desired sound quality.
If adjustment has not been done in
BAS/TRE/BAL/FAD mode, it is
returned to the volume select mode
(initial) 5 seconds later.
Note: Only in fader version, fader is
effective.
• LOUDNESS
Press the LOUD button (3) to loudness
function and display will show
“LOUD”. Press it again to release this
function.
• DISPLAY
Press the DSP button (15) can switch
between frequency or play time display
and clock display.
To set clock, hold down DSP button
(15) until the clock is shown on display
then press TUNE/TRACK/SKIP
button (17) to change hours or
TUNE/TRACK/SKIP button (16) to
change minutes.
• SELECT MODE
Press the MODE button (6) to choose
desired listening mode. (e.g. radio,
CDP, CDC, tape, TV or AUX mode)
• MUTE
Press the MUTE button (2) to silence
the receiver. Press it again to release
the mode.
• LIQUID CRYSTAL DISPLAY
Exhibit current frequency and activated
functions on the display (27).
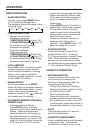
• EQUALIZATION
Press EQ button (12) to select SOUND
EFFECT as shown in below sequence:
Press EQ button (12) over 1 second,
graphic display type will display on the
LCD and then press
TUNE/TRACK/SKIP button (16) or
TUNE/TRACK/SKIP button (17) to
select graphic display type as follows:
• REMOTE SENSOR
Point the remote control handset to
the remote sensor IR (23).
Press the function keys on the handset
to control the system.
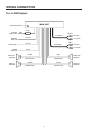
• AUXILIARY INPUT
The unit can be connected to a
portable audio player through the AUX
IN jack (11).
• RESET
RESET button (28) must be activated
with either a ball point pen or thin metal
object. The RESET button (28) is to
be activated for the following reasons:
- Initial installation of the unit when all
wiring is completed.
- All the function buttons do not
operate.
- Error symbol on the display.
OPERATION
VOLUME BASS TREBLE BALANCE FADER
(For Fader Version Only)
NORMAL CLAS POP JAZZ
DNCO1 DNCO2 DNCO3 DNCO4 DNCO5