


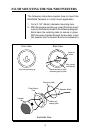


dome.
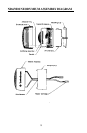
3. Once the replacement Coil/Dome Assembly and
Magnet Enclosure are together, gently pull the
voice coil wires extending out from the bottom of
the Magnet Enclosure until any extra slack has
been eliminated. Wrap the voice coil wires around
the edge of the Magnet Enclosure away from the
metal parts. Make sure that the Coil/Dome Assem-
bly is seated firmly in place by pressing lightly on
the Gasket along its perimeter.
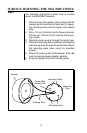
4. Affix the replacement Adhesive Ring around the
Gasket, extending it onto the plastic edge of the
Magnet Enclosure. Press lightly on the Adhesive
Ring along its perimeter to ensure that it is sealed
in place.
5. Place the Enclosure Shell over the Magnet Enclo-
sure and screw it on as far as possible. When it
becomes difficult to continue, insert the Transport/
Tool into the two holes in the Magnet Enclosure
that do not contain wires, and screw the two pieces
together tightly.
6. While holding the voice coil wires against the sides
of the Enclosure shell, insert the positive (coded)
lead of the replacement Wire Harness into the hole
used as "+" in step 2 above. Carefully push the wire
up into the hole as far as it will go. Insert the other
wire into the hole used as "–" in step 2.
7. Once the replacement Wire Harness is in place,
trim off the excess voice coil wire that extends out
of the Magnet Enclosure. Trim the wire as far down
as possible to prevent it from touching any metal
parts or the metal Mounting Cup.
8. Replace the strain relief clip onto the back of the
tweeter to hold the wires in place.
9. Test completed tweeter assembly to verify conti-
nuity and correct operation.
10. Re-connect and re-mount the tweeter assembly.
8