


[ Installation ]
34
[ Installation ]
35
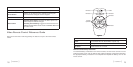
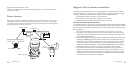
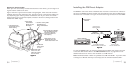
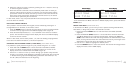
Routing the Antenna Cables
When you have successfully mounted the antennas on the vehicle, you can begin rout-
ing the antenna cables to the tuner.
Figure 12 shows a typical antenna cable routing diagram, where the tuner has been
installed under the front passenger seat. The exact routing of the antenna cables may
vary depending upon where you have installed the tuner in your vehicle. Avoid side
airbag locations on front and back pillars, and above the doors. (Airbag locations are
marked with “SRS” logos.)
1. Feed Cable Under
Rubber Seal Around
Hatch Opening
3. Route Cable
Under Carpet
to Tuner
2. Route Cable Under
Interior Trim, into
Cabin and Towards
Front of Vehicle
4. Route Cable
Under Rubber
Molding Around
Windshield
5. Continue Tucking Cable
Under Molding To
Bottom of Windshield
6. Route Cable Out of Molding
and Into Weatherstripping
Around Door Opening.
Continue to Bottom of
Door Opening
7. Bring Cable out from
Weatherstripping and
Route Under interior Trim
Figure 12Figure 12
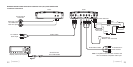
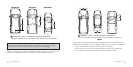
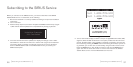
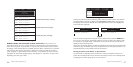
Installing the FM Direct Adapter
The FMDA is used if the vehicle’s headunit does not have a connection for a direct au-
dio input. The FMDA should be located near the headunit as the vehicle’s FM antenna
will need to be connected to it. Figure 13 shows the wiring connections for the FMDA.
VEHICLE AM/FM
ANTENNA
VEHICLE HEADUNIT
FM DIRECT
ADAPTER (FMDA)
SCV1 TUNER
DCU
FROM VEHICLE
AM/FM ANTENNA
TO SCV1 TUNER
FM OUT CONNECTION
TO VEHICLE HEADUNIT
AM/FM ANTENNA CONNECTION
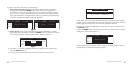
memo
1
2 3 4 5 6
menu
band
disp
a/v
s-seek
To hear the SIRIUS audio, the vehicle’s headunit and the SCV1 will need to be tuned
to the same FM channel. Refer to the FM Transmitter section on page 56 for more
detailed instructions on how to tune the SCV1 to an FM channel.
Note: The FM transmitter in SCV1 is by default set to FM channel 88.1. If you don’t want
to change to a different channel you can simply tune the vehicle’s headunit to 88.1.
Figure 13Figure 13