


10
4. Operation
NOTE: The control button described in this section
is mainly on the remote control unless
speciedotherwise.
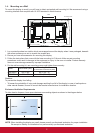
4.1. Watch the Connected Video Source
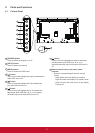
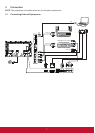
See page 7 for external equipments
connection.
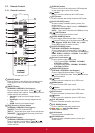
1. Press VIDEO SOURCE button.
2. Press
or button to select a device, then
press SET button.
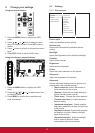
4.2. Change Picture Format
You can change the picture format to suit the video
source. Each video source has its available picture
formats.
The available picture formats depend on the video
source:
1. Press
FORMAT
button.
2. Press
or button to select a picture format,
then press SET button.
• {FULL}:Enlargethepicturetollthescreen.
• {NORMAL}: 4:3 format.
• {CUSTOM}: 16:9 format.
• {REAL}: This mode displays the image
pixel-by-pixel on screen without scaling the
original image size.
• {DYNAMIC}: Auto format.
4.3. Play Multimedia Files
You can play videos, photos, and music on your
display from:
• Your computer and mobile device connected
through your network.
• USB Multimedia Player for Scheduled Playback
of Videos, Photos and Music.
• A USB device connected to this display.
4.3.1. Play files from computer and mobile
device
Toplaylesfromcomputerandmobiledevice,you
will need:
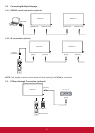
• The CDE4600-L and CDE5500-L features
a RJ45 port to connect directly with PCs
or notebooks via Intranet connection. This
providesfortheefcientloadingofcontentonto
multiple displays through a primary display.
DLNA like mobile devices can also utilize a
wireless hub to push multimedia content directly
to selected displays.
• A wired network, connected with a Universal
Plug and Play (uPnP) router.
• Optional: A LAN cable that connects your
display to your network.
• A media server running on your computer.
• Appropriatesettingsonyourcomputerrewall
to allow you to run the media server.
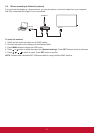
Set up the network
1. Connect your display and the computer to the
same network. See page 9 for connecting
your display to a network.
2. Switch on your computer and the router.
NOTE: If the apparatus does not return to
Network mode due to external electrical
disturbances (e.g. electrostatic discharge),
user intervention is required.
Set up media sharing
1. Install a media server on your computer to
sharemediales.Thesearesomemedia
servers:
• For PC: Windows Media Player 11 (or
higher) or TVersity
• For Mac: Twonky
2. Switch on media sharing on your computer
using the media server. For more information
on how to set up the media server, refer to the
website of the media server.
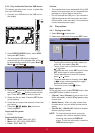
Playles
1. Press
VIDEO SOURCE button.
2. Select [Browse network], then press SET
button.
3. Selectalefromthecontentbrowser,then
press SET button to start playing.
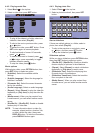
4. Press the Play buttons on the remote control
to control playing.
Tips:
• Selectthetopbartolteryourlesbytype.
• Select [Sort]toarrangethelesbyalbum
name,artist,orotherelds.
• Toclearthelistofofinemediaservers,press
OPTION button, then select [Clearofine
servers] and press SET button.
4.3.2. USB Multimedia Player for Scheduled
Playback of Videos, Photos and Music
With the handy PC-less USB playback feature,
photos, music and 1080p video can be
immediately displayed on-screen from a USB
drive. A user-friendly on-screen scheduling
interface also lets you select time and date, as well
asrepeatandshufesettings,orchoosespecic
content to play from the attached USB source. (See
page 14 USB scheduling)