


Vincent
3938
Vincent
Burn in/ Warm up
Your audio components need a certain time
period until they reach maximum performance.
The duration of this “warm up” time is very diffe-
rent for the various elements of your audio system.
Higher and homogeneous sound quality is achie-
ved while keeping the device switched on.
Your audio specialist dealer has enough experi-
ence to give you more information.
Net frequency noise
Some audio source devices may in combination
with the amplifier cause a humming noise at power
line frequency audible from your speakers. Usually,
its volume varies with the volume setting of the
amplifier. This is no sign of a defect or fault of your
audio products but has to be eliminated.
Generally, every wall-powered device connected
to the ground wire of the power plug can cause this
problem when connected to the amplifier.
Experience shows that this problem is mainly cau-
sed by antenna-connected components (as TV-sets
or Tuners), personal computers, electrostatic loud-
speakers, subwoofers, record players or headpho-
ne amplifiers that are connected to the audio
inputs of the amplifier. Another possible reason for
humming noise is electromagnetic interference of
other components’ power supplies with pick-up-
systems of record players (change the place of the
record player for a test).
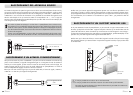
In most electric devices the ground potentials of all
signals are connected to each other at one central
point, where they have one common connection.
If the device uses the protective conductor of the
wall outlet, the corresponding wire of the line cord
is connected intractably to the metal housing of
the device. This is the mostly the point where the
central grounding point is attached to. By doing
this the housing is able to shield all signals from
external radiated noise. Some main amplifiers are
equipped with a “Ground Lift”-switch. If it is acti-
vated, ground potential of the chassis and the pro-
tective ground wire are being separated from the
central signal ground point. The protective ground
wire keeps its function. Sometimes this helps pre-
vent noise caused by errors in grounding.
If the problem occurs and cannot be solved by
yourself your audio specialist dealer will help you.
Quality of MP3 audio files
You can produce MP3 files on personal computers
yourself. The programs that handle the conversi-
on/encoding offer various settings here. The scan-
ning frequency and resolution selected should be
similar to the relevant audio CD properties of
44.1 kHz and 16 bit. A data rate of 128 kbit/s
(kbps) and higher should be used so as to at least
come close to CD sound quality. The choice of the
encoding algorithm used by the program also
affects the sound quality.
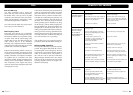
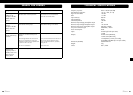
TIPS SEARCH FOR ERRORS
Symptom
Possible Cause
Countermeasure
Unit does not
work after pressing
the power button
Mains cable is not connected to a suitable
mains wall outlet.
Mains cable has not been firmly inserted into
wall power socket and the device’s socket.
Otherwise it may be defective.
Unit fuse or unit is defective.
Connect to a functioning socket using a
suitable mains voltage.
Check the power cable. If necessary, ex-
change it with a suitable mains cable and
push its plug firmly into wall socket and the
device's power connector.
Contact your dealer.
No sound on both
channels although
the unit is ready
for use (LED in
the VOLUME knob
is illuminated)
The currently selected audio source (3)
is giving no signal.
One of the audio settings of a connected
DVD player (analogue/digital) has not been
correctly selected.
The output of the source device is not
connected or is wrongly connected e.g. not
connected to the selected input channel
terminal of the preamplifier.
Wrong input channel has been selected at
the amplifier.
Volume setting is set too low.
The amplifier is muted (MUTE-Function).
Main amplifier(s) has/have not been connec-
ted correctly to the preamplifier, is/are
switched off or is/are faulty.
The speaker cable is not properly connected
to the main amplifier's terminals or is defective.
Switch on the source unit and begin playback.
Correct the settings in the player’s setup.
Correct the connection.
Set the amplifier (3) to the input that your
desired source is connected to.
Carefully increase the volume (2).
Deactivate the MUTE function (17) after,
as a precaution, reducing the volume level.
Check the connection and ready status of
the main amplifier(s) and whether it is/they
are working.
Check and tighten the speaker cables at the
main amplifier and the speakers.
No audio playback
on one channel
The source equipment is giving signal on only
one channel.
One of the signal cables between audio
source and preamplifier inputs has not yet
been plugged in or is defective.
One of the loudspeaker cables or one of
the signal cables between pre and main ampli-
fier is not correctly connected or it is faulty.
Check the audio source. You can try to use it
at a different amplifier for a test.
Check the cable connections, tighten them
if necessary.
Check all the connections of the main
amplifiers and whether the loudspeakers are
working.