


pg. 6 of 13 P1005089 Rev. C
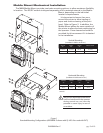
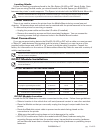
QL 420 P4T
QLn420
DIM. “A”
5.82 in.
[14,78 cm)
5.92 in.
[15,04 cm)
7.00 in.
[17,78 cm]
DIM “B”
2.80 in.
[7,11 cm]
4.05 in.
[10,28 cm]
2.75 in
[6,98 cm]
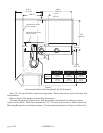
Figure 2
Horizontal and Vertical Mounting Details (QL 420 illustrated)
Use a 1/4” (6 mm) drill bit to make mounting holes. Secure the mount with nuts, bolts, and
lock washers.
Refer to Figure 2 for details on mounting dimensions.
The mounting bracket (Figure 3) can also be used as a template for locating mounting
holes on the vehicle. Note that a clearance of .31” (7.8 mm) must be left on either side of the
Mounting Bracket for mounting hardware. The mounting dimensions in Figure 1 reflect this.
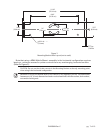
11.50”
29.21 cm
8.72 in.
22.15 cm
DIM. “A”
2.35 in.
5.97 cm
9.83”
24.97 cm
2.50 in.
6.35 cm
Minimum clearance for
Printer controls
9.83 in.
24.97 cm
Allowance for media
cover opening
DIM. “B”