4
3.1 Local Console
3. Network Setup - IP Address Determination
After the local console has been connected and the B064-Series KVM Switch 1.
turned on, a login prompt appears on the console monitor:
Log in using the default Username: administrator and Password: password. For 2.
security purposes, it is strongly recommended that you change these to a
unique Username and Password. (See the Owner’s Manual CD for details)
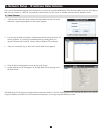
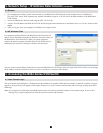
After you successfully log in, the Local Console Main Screen appears:3.
Click the Device Management icon at the top of the screen.4.
On the notebook screen that appears on the right-hand side of the page select 5.
the Network tab.
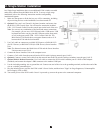
The B064-Series KVM Switch is designed with two network interfaces. The NIC Setting section of the Network tab allows you to assign
a single IP Address and DNS Server for both network interfaces, or to assign a separate address for each.
If you are an administrator logging in for the first time, you need to access the B064-Series KVM Switch in order to give it an IP address
that users can connect to. There are four methods to choose from; Local Console, IP Installer, Browser and AP Windows Client.