


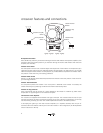


speaker installation
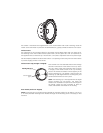
Woofer installation
The woofer will fit into many standard factory mounting locations using the existing mounting holes in
the automobile. Remove the trim panels and inspect the installation locations before you cut and drill the
holes required to mount the woofer. Removing the panel will also make it much easier to route wiring
inside the door. Look for original equipment speaker installation cutouts that can be used to install the
woofers with little or no modifications. Use the supplied template to help you locate and mark the holes
needed to install the speakers.
If the planned installation location is in a door panel be sure the speaker will not interfere with the
window lowering mechanism. Ensure that the speaker wires are positioned to clear all moving parts inside
the door.
For each woofer you will need to cut one large hole and drill small holes around the circumference. If the
mounting surface is covered by carpet or fabric, use a knife or razor to cut the material away from the
holes to be cut. This prevents material or fibers from becoming tangled in the drill bit or cutting blade. If
you are using the packaged metal screws provided in the hardware kit, drill the four speaker mounting
screw holes with a 1/8"(3 mm) drill.
Clean the work areas of all filings and shavings with a vacuum cleaner before you proceed with woofer mounting.
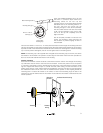
Woofer mounting
Route the speaker wire from the woofer installation locations to the crossovers. Pull the wire through the
installation hole and attach the terminals on the ends to terminals connections on the speakers. Refer to
the speaker wiring section of this manual and the wiring diagrams. Push the wire back into the area
behind the installation location and be sure it will not interfere with the speaker or get snagged by any
mechanisms in the area.
Attach the supplied foam gasket strip to the mounting surface of the speaker. This will ensure an air tight
seal, which is required to achieve the best bass performance.
Install the speakers by gradually tightening each mounting screw. Tighten the screws until the speaker is
well seated, but take care not to over-tighten.
tweeter installation
This speaker system is supplied with five different tweeter mounting options, coaxial, surface, angled
surface, flush, and angled flush mount. After you decided which option is best suited to you installation,
refer to the following sections for specific details on mounting the tweeter.
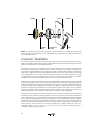
Coaxial mount
These components have the unique ability to also be used as a coaxial speaker in specific applications.
This allows the tweeter to be placed directly in the center of the woofer without obstructing the voice coil
or the function of the woofer.
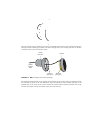
CAUTION: Use caution to not damage the speaker cone in the procedure described in the next steps.
Unscrew and remove the center bullet from the threaded mounting post by turning the bullet
counterclockwise as shown in the following illustration. Retain the bullet for future use.
6