


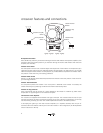
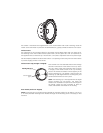


The tweeter is mounted at and angled relative to the woofer. Before final woofer mounting, rotate the
woofer so that the tweeter is pointed in the desired direction, typically towards the listener’s ear location.
Surface mount
The preparation of the mounting surface for the tweeter involves drilling three holes. Two holes are for
the mounting screws. Their centers must be spaced 15/16” (24 mm) apart. Use a 1/8" (3 mm) drill bit for
the supplied screws to mount the cup. The third 1/4” (7 mm) hole is required for the wire to pass through.
Use the template provided to locate the hole centers. Cut carpeting or fabric away from the hole locations
to prevent tangling of fibers in the drill bit.
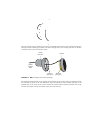
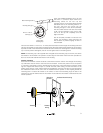
Surface mount cup (Straight or Angled)
Insert two #6 x 3/4" flat head sheet metal screws through
the holes in the bottom of the surface mount cup. Screw
the cup in place. Ensure the mounting screws are driven
in straight, so the heads sit flush on the cup mounting
surface. This ensures the tweeter will seat properly in the
surface mounting cup. The tweeter is then slid into the
mounting cup (tabs aligned with the mounting slots), and
turned counterclockwise to lock in place.
NOTE: The mounting cup is also supplied with an angled
surface mounting cup (not shown). This allows the
tweeter to be mounted at an optimum acoustic angle for
the listener. Follow the same procedure as above to
mount and assemble the tweeter in this housing.
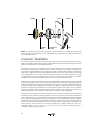
Flush mount (Surface or Angled)
NOTE: Ensure that there is enough clearance behind the mounting surface for the M4-0.7 X 4-1/2 cm
(1.77 inches) flat head mounting screws. Reduce the length of the mounting screw as necessary to meet
clearance.
Mounting slots (qty 4)
#6 x 3/4" screws
(qty 2)
Mounting slots (qty 4)