


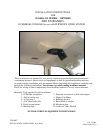


8. Remove and retain mounting bracket and screws
(items 5&3 pg2) from console (item 6 pg2). Use
rubbing alcohol to clean sheet metal in the cut–
out area in headliner. Wipe surface dry with a
clean cloth. Remove protective tape from
adhesive strips on mounting bracket (item 5 pg2).
Make sure bracket is centered prior to
pressing tape against roof surface. Once the
tape is applied to the roof, DO NOT REMOVE
AND REPOSITION or the tape will not stick
properly. Install using (2) two O.E. screws in
original holes and (2) two # 10 x 1/2" TEK screws
(item 2 pg2). See Figure 7.
FIGURE 7
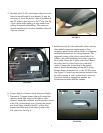
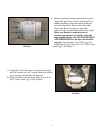
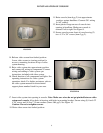
9. Install A/C switch into rear of console (item 6 pg2)
and O.E. bracket over A/C switch. Make sure control
snaps securely into bracket. See Figure 8.
10. Secure bracket to console brace using (2) two # 8 x
9/16" screws (item 1 pg 2). See Figure 8.
FIGURE 8
5