


77
77
7
OPEROPER
OPEROPER
OPER
AA
AA
A
TT
TT
T
ING INSTRUCING INSTRUC
ING INSTRUCING INSTRUC
ING INSTRUC
TT
TT
T
IONSIONS
IONSIONS
IONS
operation and remain on the selected frequency.
Pressing and holding the button for longer than 2
seconds will activate the Auto-Store Tuning feature
which will automatically scan and enter up to 6
stations into the 6 pre-set memories on the band in
use. After entering the stations into the memories,
the unit will automatically stop at each station for 5
seconds so each can be heard. If you have already
set the pre-set memories to your favorite stations,
activating the Auto-Store Tuning feature will erase
those stations and enter the new ones. This feature
is most useful when travelling in a new area where
you are not familiar with the local stations.
br STATION PRE-SET MEMORIES
To set any of the 6 pre-set memories in each band,
use the following procedure:
1. Turn the radio on and select the desired band.
2. Select the first station to be pre-set using the
Manual Up/Down bm, or Automatic Seek bn Tuning
Controls.
3. Press the pre-set button to be set and continue to
hold it in for approximately 2 seconds. The pre-set
number will appear on the display panel indicating
that the station is now set into that pre-set memory
position. The station can now be recalled at any
time by pressing that button.
4. Repeat the above procedure for the remaining 5
pre-sets on that band and for the other 4 bands
on the unit.
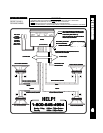
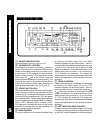
bs LIQUID CRYSTAL DISPLAY PANEL
The Liquid Crystal Display (LCD) panel displays the
frequency, time, and activated functions.
NOTE: It is a characteristic of LCD panels that, if
subjected to cold temperatures for an extended
period of time, they may take longer to illuminate
than under normal conditions. In addition,
the visibility of the numbers on the LCD may
slightly decrease. The LCD read-out will return
to normal when the temperature increases to
a normal range.
bt CASSETTE DOOR
Hold the cassette with the exposed tape edge to the
right and insert it fully into the cassette door until the
cassette is engaged and begins playing (“PLY” will
appear on the display panel). When the cassette
reaches the end on the side of the tape being played,
the unit will automatically change direction of play as
shown by the arrow indications on the display panel.
NOTE: Observe cassette operation cautions in Care
and Maintenance section of this manual.
bu & cl FAST-FORWARD/REWIND BUTTONS
( / )
These buttons cause the tape to move rapidly in the
direction indicated by the arrows. For example, if the
button is pushed when the tape is moving from left
to right ( on the display panel), the tape will fast-
forward. If the button is pressed while the tape is
moving from right to left ( on the display panel), the
tape will rewind. To stop fast tape movement, lightly
push the opposite button. If the tape is allowed to
fast-forward or rewind all the way to the end, play will
automatically begin again from that point.
cm PROGRAM SELECTOR
To manually reverse tape direction and play the other
side (program) of the cassette, lightly push both the
Fast-Forward and Rewind buttons bu and cl at the
same time. The change of direction will be shown by
the arrows on the display panel.
cn EJECT BUTTON ( )
Tape playback is stopped and the cassette is ejected
by pressing this button. Radio operation will
automatically resume when the cassette is ejected.
NOTE: Never leave a cassette engaged in the player
when not in use. Doing so can cause damage
to the cassette and/or mechanism of the unit.
Always press the eject button and remove
the cassette before removing the detachable
front panel.
co CD CHANGER MODE SELECTOR (CD)
During radio, or tape play, press this button to select
operation of the optional CD changer as shown by
“CD-C” and “CdC” on the display panel. Refer to the
CD Changer Controls section on page 10 for specific
operating instructions.
If the button is pressed when there is no CD changer
connected to the unit, the “CD-C” and “CdC”
indications will briefly appear on the display panel.
The unit will then return to radio operation. To return
to the tape operation (if a tape is loaded in the unit),
press the button again. Durning tape play, press this
button to change to radio operation without ejecting
the tape.
cp TIME/FREQUENCY SELECTOR (T/F)
This unit can be set so that either the clock time or radio