


88
88
8
OPEROPER
OPEROPER
OPER
AA
AA
A
TT
TT
T
ING INSTRUCING INSTRUC
ING INSTRUCING INSTRUC
ING INSTRUC
TT
TT
T
IONS / SETIONS / SET
IONS / SETIONS / SET
IONS / SET
TT
TT
T
ING THE CLOCKING THE CLOCK
ING THE CLOCKING THE CLOCK
ING THE CLOCK
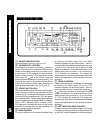
SETTING THE CLOCK
frequency/tape/CD changer functions will normally
appear on the display panel. Pressing the Time/
Frequency Selector button when the radio frequency,
tape or CD changer indication is shown will change
the display to show the time. The time will then be the
priority setting and the display will automatically
return to time display 5 seconds after any other radio,
tape, CD changer, or audio function display.
If the unit is set to time display priority, pressing the
Time/Frequency Selector button will change the
display to show the radio frequency/tape/CD changer
indication and this will then become the priority
setting to which the display automatically returns 5
seconds after any other function is activated.
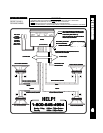
cq THEFT-DETERRENT L.E.D.
Located on the chassis behind the front panel, a
light-emitting diode (L.E.D.) will flash when the panel
is removed. The flashing light serves as a visual
warning to the would-be thief that the unit has been
disabled by removal of the front panel.
cr RE-SET BUTTON
A Re-Set button is located on the front of the chassis
(front panel must be removed to access the button).
The re-set circuitry is provided to protect the
microprocessor circuitry and should only be activated
under the following circumstances as it will erase the
time and pre-set memories.
1. Upon initial installation after all wiring is completed.
2. After the position of the CD changer selector switch
on the bottom of the chassis has been changed.
3. If there is a malfunction of any of the switches on
the unit, pressing the Re-Set button may clear
the system and return to normal operation.
cs FRONT PANEL RELEASE BUTTON
This button is used to release the mechanism that
holds the front panel to the chassis. To detach the
front panel, press the button so that the left side of the
panel is released. Grasp the released side and pull
it off of the chassis. To re-attach the panel, position
the right side of the panel in place first and then press
the left side of the panel until the mechanism locks
it into place.
NOTES ON USE OF FRONT PANEL
1. Make sure the front panel is right-side-up when
attaching it to the chassis as it cannot be attached
when up-side down.
2. Do not press very hard on the front panel when
attaching it to the chassis. No more than light to
moderate pressure should be needed.
3. When attaching the front panel, make sure the
right side is correctly engaged before pressing the
left side to lock it into position.
4. When taking the front panel with you, please use
the supplied carrying case to protect the panel from
dirt and damage. Make sure there is no dust or dirt
on the electrical terminals on the back of the panel as
this could cause intermittent operation or other
malfunctions.
1. Switch the vehicle ignition and radio “on”.
2. If necessary, momentarily press the Time/Frequency Selector button cp so that the time is shown on the
display panel.
3. Press and hold the Time/Frequency Selector until the time display begins flashing. While the display is
still flashing, press the Down Tuning ( ) button to adjust the hours and then the Up Tuning ( ) button
to adjust the minutes to the correct time.
4. Five seconds after the last hour or minute adjustment is made, the time will be set in the unit and the display
will return to the normal indication.