


7
VRX765VD
5
VRX765VD
6
VRX765VD
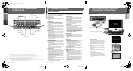
English Owner’s manual
280-8358-00 280-8358-00 280-8358-00
English Français Español
English
Owner’s manual
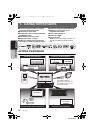
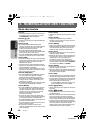
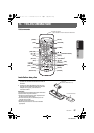
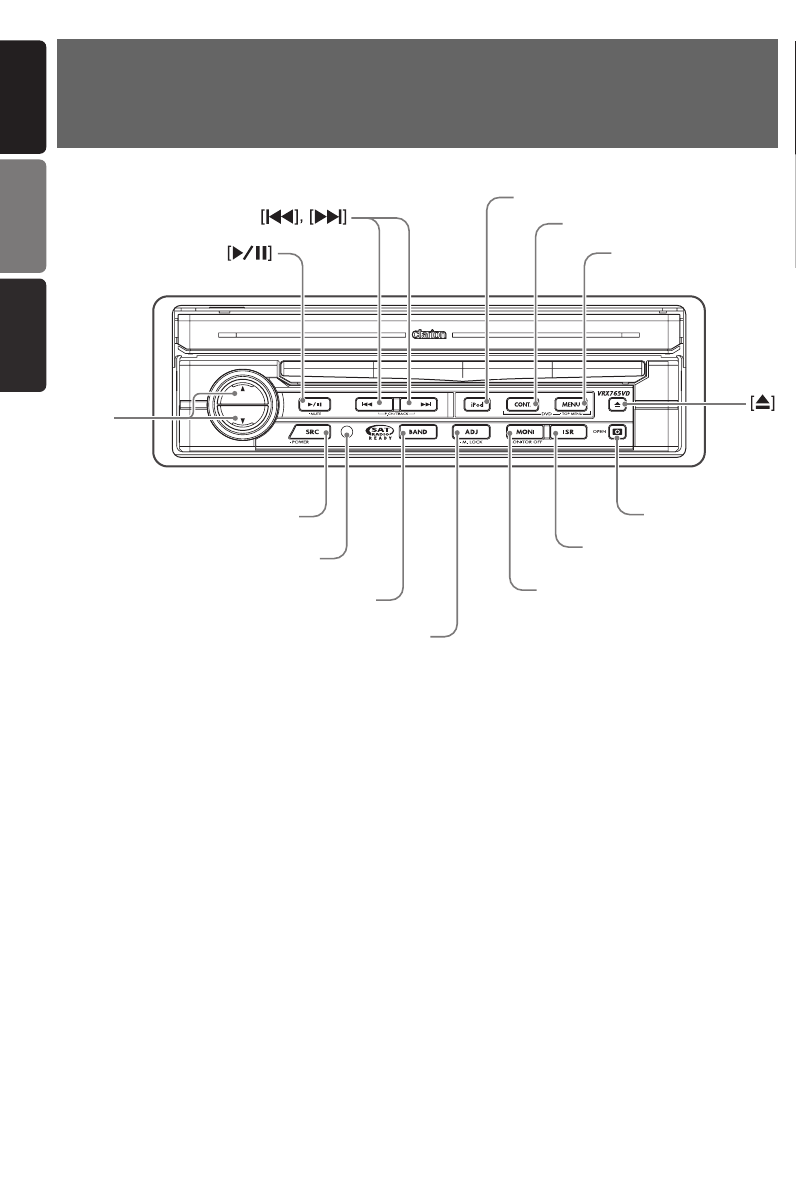
3. CONTROLS/COMMANDES/
CONTROLES
[
BAND
]
[
E
][e]
[
ISR
]
Sensor
[
P
]
[
ADJ
]
[
SRC
]
[
MONI
]
[
iPod
]
[
MENU
]
[
CONT.
]
Note: Be sure to unfold this page and refer to the front diagrams as you read each chapter.
*The control panel can be detached to prevent theft. For details, see the pages entitled “7. DCP”.
Remarque: Veuillez déplier cette page et vous référer aux schémas quand vous lisez chaque chapitre.
* Le panneau de commande peut être détaché de l’unité pour éviter tout vol. Pour plus d’informations,
reportez-vous au chapitre “7. CLAVIER DE COMMANDE AMOVIBLE”.
Nota: Cuando lea los capítulos, despliegue esta página y consulte los diagramas.
* Puede extraer el panel de control para evitar que lo roben. Para obtener más información, consulte las páginas
del a
p
artado “7. Panel de CONTROL DESMONTABLE (DCP)”.
4. NOMENCLATURE
Names of Buttons
Note:
• Be sure to read this chapter while referring to the
front diagrams for chapter “3.CONTROLS” on
page 5 (unfold).
[E], [e] buttons
• Use these buttons to increase/decrease the
volume.
[p] button
• Press this button to enter the play pause
mode in the DVD PLAYER/iPod/changer
modes. Press the button again to resume
playback.
• Keep pressing this button more than 1 second
to mute the sound in the DVD PLAYER/iPod/
changer modes.
• Press this button to mute the sound in the
TUNER/Satellite Radio/TV/VISUAL modes.
[SRC] button
• Press this button to turn on the power. Keep
pressing this button more than 1 second to
turn off the power.
• When the liquid crystal panel closed, press
this button to change to the next mode such
as TUNER mode.
• When the liquid crystal panel open, press this
button to display the Source menu screen to
switch the mode.
[R], [F] buttons
• Use these buttons to change to the previous/
next preset station in the TUNER/Satellite
Radio/TV modes.
• Use these buttons to select a track in the CD,
Video CD, MP3/WMA, iPod and CD changer
modes.
• Use these buttons to select a chapter in the
DVD video and DVD changer modes.
[BAND] button
• Press this button to switch the receiving
bands for TUNER/Satellite Radio/TV modes.
Keep pressing this button more than 1 second
to switch the Seek/Manual tuning modes.
• Use this button to move to the first track in the
CD, Video CD and iPod modes, or the first
chapter in the DVD video mode.
• Use this button to move to the next folder in
the MP3/WMA mode.
• Use this button to switch to the next disc in the
changer modes.
• Keep pressing this button more than 1 second
to play all tracks in the iPod mode.
[iPod] button
• Press this button to switch to the iPod mode.
[CONT.] button
• Press this button to show/hide the key pad on
the menu screen of DVD video/Video CD.
[MENU] button
• Press this button to show the menu screen of
DVD video/Video CD. Keep pressing this
button more than 1 second to show the top
menu screen of DVD video.
[ADJ] button
• Press this button to enter/exit the ADJUST
mode to change the settings.
•
Keep pressing this button more than 1 second
switches the liquid crystal panel to a composite
screen to lock the monitor (To enable this
function, go to the GENERAL menu (within the
ADJUST menu), and use the [
CONNECT
] key
to select “
NAVI
” or “
OTHER
”).
[MONI] button
• Press this button to enter/exit the Monitor
Adjust mode.
• Keep pressing this button more than 1 second
to turn off the back light of the liquid crystal
panel.
[ISR] button
• Use this button to enter/exit the ISR (Instant
Station Recall) standby mode.
• Keep pressing this button more than 2
seconds to store the current station into ISR
memory in the radio mode.
* The [ISR] button is disabled when the SUB
zone is selected in the 2-ZONE mode.
[o] (EJECT) button
• Use this button to eject the disc set in this unit.
[P] (OPEN) button
• Use this button to open/close the liquid crystal
panel.
• Keep pressing this button more than 2
seconds so that the liquid crystal panel is
positioned horizontally when the liquid crystal
panel is open (Air Conditioner Operation
mode).
• When the liquid crystal panel closed, Keep
pressing this button more than 5 seconds to
perform the panel calibration function to
memorize the maximum angle of the liquid
crystal panel.
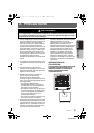
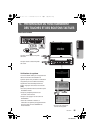
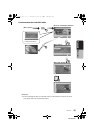
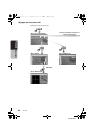
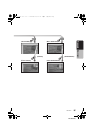
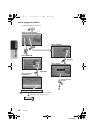
5. OUTLINE OF BUTTON AND
TOUCHKEY OPERATION
Turing the power on
∗1
∗2
(OPEN)
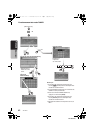
System check
The CeNET format utilized on this unit is
provided with a system check function. When
the system check function is performed
under the following conditions, the power is
automatically turned off. Press the [SRC]
button again.
•When power is first turned on after initial
installation.
•When an external device is connected or
disconnected.
•When Reset button is pressed.
∗In addition to the above conditions, the
system check function can be performed
from the GENERAL menu in the ADJUST
mode.
∗You can change the media
sources.
Engine ON
position
When the liquid crystal panel closed
When the liquid crystal panel open
or
ori.fm Page 5 Tuesday, December 27, 2005 2:42 AM