


32
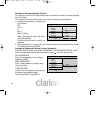
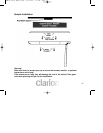
Installation Procedure
1. Identify the polarity of the dome light circuit and set the switch on the bottom of the
overhead monitor housing.
2. Test fit the overhead monitor system on the ceiling of the vehicle, verifying it is not going
to interfere with the safe operation of the vehicle.
3. Once the mounting location of the overhead monitor system has been determined,
carefully mark the location with masking tape.
4. Lower the vehicle’s headliner down to see if a roof support beam is available to screw
the mounting bracket to. If a support beam is not available to screw into, use a ¾”
piece of plywood cut to the appropriate size. Attach the plywood to the roof of the
vehicle using silicone allowing adequate drying time.
5. Screw the mounting bracket in the vehicle. DOUBLE CHECK THE LENGTH OF THE
SCREWS PRIOR TO MOUNTING THE BRACKET.
6. Cut a 1” hole in the headliner along the backside of the mounting bracket for the cables
to pass through.
7. Route cables through the hole to the predetermined location of the AV source(s).
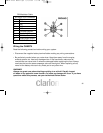
8. Identify the dome light wires in the vehicle and connect them to the corresponding
dome light wires on the overhead monitor system.
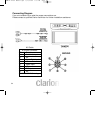
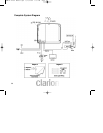
9. Plug in the AV cables and power harness into the overhead monitor system.
OHMD74 Final Manual.qxd 6/17/2004 5:33 PM Page 32