


www.clarksynthesis.com
TA1501C Amplier
14
SETTING UP YOUR AMPLIFIER
CAUTION: Before connecting any wires or input/output lines, insure all equipment is
off and no signals are being sent from the input device.
In order to reduce the chances of accidentally damaging the amplier or transducer, please set the
amplier controls to the safety positions described and shown below:
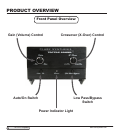
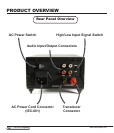
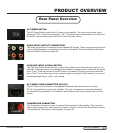
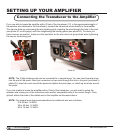
Set the • AC Power Switch on the back of the amplier to the “Off” position (see photo #1)
Set the • Gain (Volume) Control to “Min” (completely counter-clockwise, see photo #2)
Set the • Input Signal Switch on the back of the amplier to the “High” position (see photo #3)
If you are placing the amplier on a at surface (not including mounting the amplier on a
Clamping Rackshelf), you must install the feet supplied with the amplier. Installing these feet will
help provide sufcient cooling to the bottom plate of the amplier.
To install the feet, follow the steps listed below:
Gently place the amplier on a non-abrasive surface with the bottom of the amplier •
facing up.
Hand thread one of the feet into a receiving hole, insuring the threads do not crossthread.•
When properly threaded, tighten the foot by hand until it is snug.•
CAUTION: Do not overtighten the feet. The bottom plate of the amplier is made of soft metal
and the threads can easily be stripped if the feet are improperly threaded or overtightened.
CAUTION: The bottom of the amplier can get hot. Do not place anything directly under the
amplier that is ammable or can be damaged by heat. Failure to install the feet may result in
damage to the amplier and/or the surface upon which it is sitting (not including a Rackshelf).
CAUTION: Insure there are two (2) inches of clearance around the sides and top of the amplier.
DO NOT block the top or side air vents.
Photo #3
Photo #1
Photo #2
!
!
!
!
!
Initial Settings Prior to Making Connections
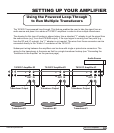
Placing/Mounting the Amplier