


Commercial Audio Series Business Music System
page 15
Operation Manual
INSTALLING THE ANTENNA
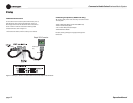
1. Connect the antenna.
Connect the included XM antenna to the XM antenna input on the back of
the 180MAx.
You will be mounting the antenna near a south-facing wall. The antenna
comes with 20 feet of cable. If that is not suffi cient to reach the 180MAx,
purchase a 50-foot cable extension kit. Up to two extensions can be used
together for up to 120 total feet of cable. Alternatively, you can use custom
lengths of 50 ohm RG58U, or obtain extension kits from third-party
sources. For outdoor antenna installation options, go to
www.xmradio.com
2.Turn on the 180MAx.
Verify the power indicator is illuminated and the display backlight is on.
If the message “CHECK ANTENNA” appears, check that the antenna
con nector is tightly connected and that the antenna cable is not shorted.
3. Align the antenna.
For indoor installation on a fl at surface:
Set the antenna on its base on a fl at horizontal surface, ideally near a
south-facing wall, and near a window if possible.
Turn the base of the antenna so that the XM logo is facing to the south if
you are in the eastern half of the U.S. and to the south/southeast if you are
in the western half of the U.S.
For outdoor installation:
See www.xmradio.com for third-party outdoor installation options.
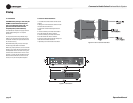
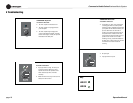
For indoor wall mounting:
You will mount the antenna near a south-facing wall, and near a window if
possible.
1. Insert four screws (not supplied) in the wall so they align with the
holes in the base of the antenna.
2. Tilt the antenna fully back on the base.
3. Place the antenna base on the four screw heads with the antenna pivot
at the top.
4. Pull down the base approximately 1/4 inch until the base is fi rmly
secured. The XM logo will be upside down when the antenna is properly
installed.
4. Optimize the signal strength.
Have someone hold the antenna as you optimize the signal strength
(described next).
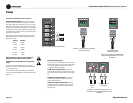
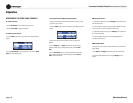
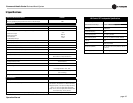
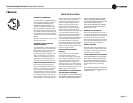
A display will appear similar to the one below:
OPERATING THE XM TUNER
You can control the XM tuner by the 180MAx front-panel buttons or by the
included remote control. If the power fails, the tuner will automatically
return to its state before power loss.
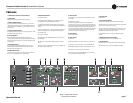
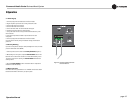
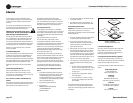
The XM tuner display and controls are shown below.
• The LCD display shows channel information.
• The Menu button selects Direct, Preset, or Category mode (explained
later).
• The Category < > buttons select Categories (rock, country, jazz,
news, etc.)
• The Scroll knob lets you scroll through the XM channels and select
them (explained later).
3 Operation
XM
XM
Direct
Direct
Signal-strength indicator
At the bottom right of the screen is a small box that indicates signal
strength. Orient the antenna to achieve maximum signal strength (fi ll the
box as much as possible).
If the antenna does not have a clear path to the satellites, the display will
read “NO SIGNAL”.
5. Set the listening volume.
Turn up the XM input volume control until you hear the XM radio signal at
a low volume. If the system is working, you will hear XM programming on
channel 1 and you can proceed to activate the 180MAx.
6. Activate your XM account.
After verifying channel 1 audio, you must activate your XM account to
access all XM channels. Commercial accounts must sign up for and
acti vate under the terms of XM’s Commercial Service.
First obtain the XM Radio ID number of your unit. Turn the Scroll knob
until you see channel 0 on the LCD display and press the Scroll knob to
select this channel, or press Direct Entry then 0 and OK on the remote
control. The 8-digit XM Radio ID will appear in the top section of the
dis play.
Record the 8-character ID in the space below, noting that letters I, O, S and
F are not used and that the number zero has a line running diagonally
through it.
XM Radio ID: _________________________
Activate your XM radio service by calling XM at 1-800-XM RADIO
(1-800-967-2346). Commercial accounts cannot be activated via the
Internet. A listener care representative will help you activate your unit.
Customers should have their Radio ID ready; the Radio ID can be found by
selecting channel 0 on the tuner with the Scroll Knob to the right of the
LCD Display.
LCD display
Scroll knob
Infrared remote sensor
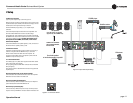
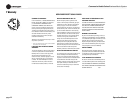
Default Display
The default display shows the current channel number, channel name,
Category name, artist name and song title. The word “Direct” appears at
the bottom left of the screen. That means the tuner is in Direct mode: you
can select channels directly from the remote control if you wish. You can
also select channels using the front-panel controls.
XM124
XM124
Artist Song title
Artist Song title
Direct Category name
Direct Category name
Channel Name
Channel Name