


2200
© 2004 Directed Electronics, Inc
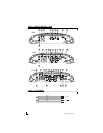
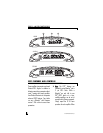
LED TUBE INSTALLATION (OPTIONAL)
This Directed Audio amplifier has been designed with a custom heat sink that can
accommodate two (optional—not supplied) VARAD LED tubes.
1. Before installing the LED tubes, remove and discard the mounting feet from the
VARAD LED tubes.
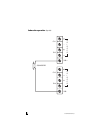
2. Slide each LED tube assembly into your Directed Audio amplifier heat sink. Ensure
that the LEDs are facing out for optimal visibility. The wires from the LED tube
assembly should be on the signal input end of the amplifier. The Black wire from
the LED tube is ground and the Black/White wire from the LED tube is power.
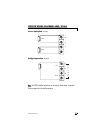
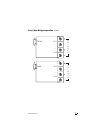
4. Run the two wires from the tube assembly and connect them to the 4-pin
LED/FAN input connector. Refer to the LED/FAN harness diagram given earlier in
this manual.
NNOOTTEE::
If the optional fan IS NOT being used, it is recommended that the second LED tube be wired to this circuit. If the optional
fan is being used, it is recommended that the second LED tube be wired in parallel with the first LED tube.
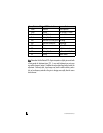
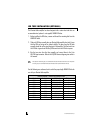
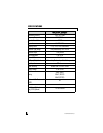
Directed Amplifier—VARAD Cross Reference Chart
Directed Part Number Directed Model VARAD Model QTY Required
45120 A502 HLX6, HL6, HLW9 2
45125 A802 HLX6, HL6, HLW9 2
45150 A404 HLX6, HL6, HLW9 2
45155 A1004 HLX12, HL12, HLW15 2
45095 D600 HLX6, HL6, HLW9 2
45100 D800 HLX6, HL6, HLW9 2
45105 D1200 HLX6, HL6 2
45110 D2400 HLX12, HL12 2
45165 D2205 (2) HLX12, (2) HL12
2 or 4
Use the following cross reference chart to select the proper length VARAD LED tube for
use with your Directed Audio amplifier.