


55
© 2004 Directed Electronics, Inc
INSTALLATION GUIDELINES
1. Please read this owner's manual care-
fully before installing this amplifier.
2. Disconnect the battery ground
terminal prior to making any elec-
trical connections.
3. Check for any hazards or obstruc-
tions such as gas tanks, fuel or
brake lines, and wiring harnesses
before mounting the amplifier.
4. Pick a mounting location that will
provide adequate access and venti-
lation and protect the amplifier
from heat, moisture, and dirt.
5. Avoid sharp metal areas when
routing cables to the amplifier, and
run RCA cables away from the
power cables and other potentially
noisy car harnesses.
6. The amplifier should be grounded
with a short, heavy gauge wire
connected directly to the car at a
bare metal surface, preferably
scraped body sheet metal. Do not
use factory grounded locations,
seat bolts, or brackets that are
spotwelded.
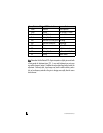
7. Always fuse your power connection
within in 8 to 10 inches of the
battery terminal. Use a fuse or
circuit breaker rated slightly more
than the on-board fuse(s) of the
amplifier(s). The gauge of power
wire used should take into account
the total current draw of the
system, and the length of the wire
used. IASCA and other auto sound
competition organizations have
charts available for this; you can
also find a chart in the MECP study
guide. Minimum wire gauge recom-
mendations for the individual ampli-
fiers are listed on the specification
Prior to servicing your vehicle ensure
that the alarm system is
ddiissaarrmmeedd
. Due
to the amplifier’s anti-theft feature (if
enabled), amplifier operation is disabled
when the main power to the amplifier is
removed while the alarm is armed. The
amplifier operation must then be reset.
If the alarm is replaced with another
ESP2 alarm system, ensure that the
amplifier goes through a learn routine
(using the Bitwriter
®
) prior to re-
enabling the anti-theft feature.
NOTE