


XDVD1002CM OPERATION
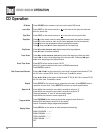
General Operation
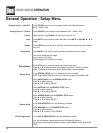
To turn on the unit, press the power button on the main unit or on the remote. Press
again to turn the unit off.
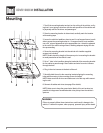
Pressing the screen release lock will unlock the LCD screen, and it will drop down
slightly. Move the screen to the desired viewing angle, and the internal hinge
assembly will hold the screen in position. Remember to turn the unit off and move
the LCD Screen into the closed position when not in use.
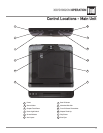
The lights integrated into the main unit are controlled by a push-button switch.
Do
not leave the vehicle unattended with the dome light switch
on, as this could result in
a discharged battery.
There is an Infrared sensor located on the front of the main unit. This transmitter
sends audio wirelessly to the included IR Headphones.
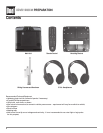
Two pair of Infrared wireless headphones include built-in sensors to receive audio
signals sent from theIR transmitter located on the main unit. These headphones are
designed to operate within line of sight from the transmitter as infrared transmis
-
sions, like visible light travel only in a straight line, Headphone power and volume
controls are located on the bottom of the right ear cup.
NOTE: The headphone will auto power off after 2 minutes.
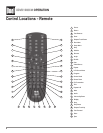
This unit is equipped with an RF Modulator that allows you to listen to an audio sig
-
nal through your existing FM radio. You can do this by tuning your vehicle's FM radio
to any frequency between 88.3 and 90.1. Press the FMTX button on the remote con-
trol to select the frequency at which the unit will transmit to your FM radio.
NOTE: The current frequency that is being transmitted will appear in the lower left
of
the LCD screen as you press the FMTX button on the remote. This frequency must
match the frequency on your FM radio to receive audio signal.
There are two sets of auxiliary inputs on this unit, both of which can be used to dis
-
play an external audio/video source onto t
he main unit. Hook the external source up
through the RCA jacks located on the back of the unit (AUX1), or on the installation
wire harness (AUX2). Accessing these inputs is easily done by pushing SOURCE on
the main unit, or by pressing SOURCE on the remote control.
There is one set of audio/video outputs located on the installation wire harness.
These can be used to get an audio/video signal from the main unit to external LCD
monitors or video displays.
Power On/Off
Monitor Open/Close
Overhead Dome Lights
IR Transmitter
Wireless Headphones
FM Transmitter
Auxiliary Inputs
Audio/Video Outputs
9