


DTP HDMI 230 & 330 D Transmitter and Receiver • Installation and Operation 14
Ground Loops
When installing the DTP HDMI 230 and 330 D series products, be sure to avoid scenarios
where the ground potential differs greatly between the locations where the DTP transmitter
and DTP receiver are installed. Such situations can cause ground loops, which can result in
image drops, no image, or damage to the units. If such installations cannot be avoided, it is
necessary to isolate the ground between the DTP transmitter and receiver.
NOTES:
• Grounding DTP series units will disable analog audio transmission and the remote
power feature.
• Both DTP transmitter and receiver will need to be powered locally.
To eliminate a ground loop:
1. Remove all screws on the left, right, and top of both the DTP transmitter and receiver
units.
2. Remove the rear enclosure of each unit.
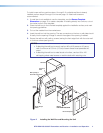
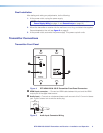
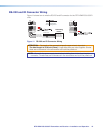
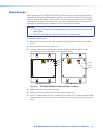
3. Locate and remove shunt jumpers at locations labeled JMP2 and JMP3 on both
transmitter and receiver (see figure 13 for jumper locations).
JMP 3
JMP 2
JMP 1
DTP HDMI 230/330 D Tx DTP HDMI 230/330 D Rx
JMP
3
JMP
2
JMP
1
Figure 13. DTP HDMI 230/330 D Internal Jumper Locations
4. Replace the rear enclosures and screws.
5. Install units with an external power supply placed at each end.
6. Use UTP cable between the DTP transmitter and receiver. If STP cable has already been
installed and terminated, disconnect the shielding at one end to discontinue the ground
path.