


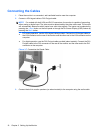


Mounting the Monitor
HP provides an HP Flat Panel Monitor Quick Release (purchased separately) that installs to the back
of the monitor panel and allows you to quickly and securely attach the panel to a wall or swing arm
mounting fixture. To install the HP Quick Release:
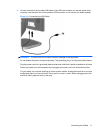
1. Remove the monitor panel from the pedestal base. Refer to
Removing the Monitor Pedestal Base
on page 16 steps in the previous section.
CAUTION: This monitor supports the VESA industry standard 100 mm mounting holes. To attach
a third-party mounting solution to the monitor, four 4 mm, 0.7 pitch, and 10 mm long screws are
required (not provided with the monitor). Longer screws should not be used because they may
damage the monitor. It is important to verify that the manufacturer’s mounting solution is compliant
with the VESA standard and is rated to support the weight of the monitor display panel. For best
performance, it is important to use the power and video cables provided with the monitor.
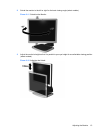
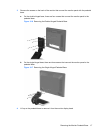
2. Set the monitor panel down on a flat, soft, protected surface.
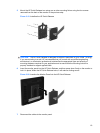
3. Place the optional HP Quick Release onto the back of the monitor. Line up the holes on the HP
Quick Release with the mounting holes on the back of the monitor.
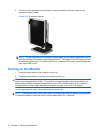
Figure 3-18 Mounting the HP Quick Release
4. Insert four 10mm screws into the mounting holes and tighten.
18 Chapter 3 Setting Up the Monitor