


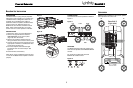

BASSLINK II DISASSEMBLY
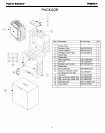
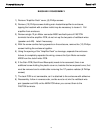
1) Remove “Amplifier Dock” cover; (8) Phillips screws.
2) Remove (10) Phillips screws holding main heatsink/amplifier to enclosure,
tapping the heatsink with a rubber mallet may be necessary to loosen it. Pull
amplifier from enclosure
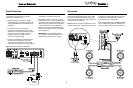
3) Remove single 12 pin Molex connector M300 and both pairs of FASTON
terminals from the amplifier PCB; do not mix up the two pairs of red/black wires
(speaker and A/B). Label if necessary.
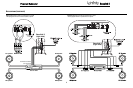
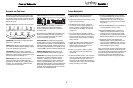
4) With the screw cavities facing upwards on the enclosure, remove the (12) Phillips
screws holding the enclosure together.
5) Using the opening of the “Amplifier Dock” as leverage, separate the enclosure
halves; to completely separate the wiring, remove the 8 pin Molex connector
M200 from the Jack/Limiter PCB.
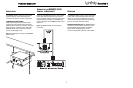
6) If the Gain PCB (Gain/Xover/Base pots) needs to be accessed, there is an
additional screw holding the plastic cover on, besides the two exposed ones, that
must be removed and is visible after removing the 10" passive radiator (8 Phillips
screws)
7) The Jack PCB is not serviceable, as it is attached to the enclosure with adhesive.
8) Reassembly: follow in reverse order, and be sure to not mix the red/black wire
pair (speaker and A/B) on the MAIN PCB when you connect them to the
FASTON terminals.
9
Powered Subwoofer Basslink II