


CD6111
5
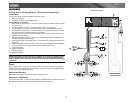
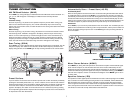
Treble
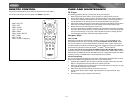
Press PUSH (4) three times until “TRB” appears in the display. Within five seconds, rotate the
volume control (3) clockwise or counter clockwise to adjust Treble from “-10” to “+10”. “00”
represents a flat response. The treble level is shown on the display for five seconds or until
another function is activated.
Balance
Press PUSH (4) four times until “BAL” appears in the display. Within five seconds, rotate the
volume control (3) clockwise (or counter clockwise) to adjust Balance between the right and left
speakers from “BAL 10R” (full right) to “BAL 10L” (full left). “BAL L=R” represents an equal
balance level between the right and left speakers. The balance position is shown on the display
for five seconds or until another function is activated.
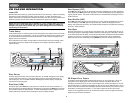
Fader
Press PUSH (4) five times until “FAD” appears in the display. Within five seconds, rotate the
volume control (3) clockwise or counter clockwise to adjust balance between the front and rear
speakers from “FAD 10R” (full rear) to “FAD 10F” (full front). “FAD F=R” represents an equal
balance level between the front and rear speakers. The fader position is shown on the display
for five seconds or until another function is activated.
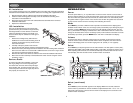
iX-BASS (BAND)
Press BAND (5) for two seconds to activate the iX-BASS feature. When listening to music at
low volume levels, this feature will boost the bass and treble ranges to compensate for the
characteristics of human hearing. When this feature is activated, “LOUD ON” will appear in the
display for five seconds. Press BAND again for two seconds to deactivate this feature. “LOUD
OFF” appears in the display for five seconds.
Audio Mute (MUTE)
Press (6) to mute the audio volume. “MUTE” flashes on the display. Restore volume to the
previous setting by pressing the mute button again, adjusting the volume control, or by
pressing any other button on the unit.
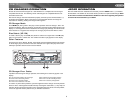
Liquid Crystal Display (LCD)
The liquid crystal display (LCD) panel (8) displays the frequency, time and activated functions
of the unit, including a combination audio level/disc indicator, which appears as dual disc icons
with circular bar graphs depicting the audio signal. In addition, the display contains a receive
signal indicator that depicts the relative strength of the incoming broadcast frequency.
NOTE: LCD panels may take longer to respond when subjected to cold temperatures for
an extended period of time. In addition, the visibility of the numbers on the LCD may
decrease slightly. The LCD display will return to normal when the temperature increases
to a normal range.
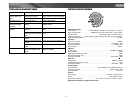
Display (DISPLAY)
When the unit is off, the LCD displays the time of day. When the unit is on, the LCD
automatically shows the tuner, CD or CD changer display, depending on which mode of
operation is currently activated.
Display Clock
During tuner, CD or CD changer operation, press DISPLAY (9) to display the time of day. After
five seconds, the display reverts to tuner, CD or CD changer display.
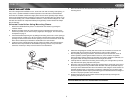
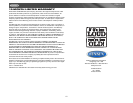
Set Clock
1. To set the clock, turn the radio on in tuner mode (or any other mode).
2. Press DISPLAY. The time appears on the display.
3. Press and hold DISPLAY until the time display begins flashing.
4. While the display is flashing, press the Up Tuning button (14a) to adjust hours and the “A”
(AM) or “P” (PM) indication. Press the Down Tuning button (14b) to adjust minutes.
5. After five seconds, the time will set and the display will return to tuner, CD or CD changer
display.
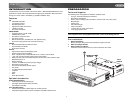
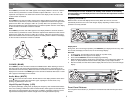
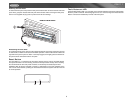
Front Panel Release
The front panel release button (10) releases the mechanism that holds the front panel to the
chassis.
VOL
VOL
BAS
TRB
BAL
FAD
P
U
S
H
S
E
E
L
C
T
B
B
S
L
E
T
A
A
A
D
F
R
P
U
S
H
S
E
E
L
C
T
B
B
S
L
E
T
A
A
A
D
F
R
P
U
S
H
S
E
E
L
C
T
B
B
S
L
E
T
A
A
A
D
F
R
P
U
S
H
S
E
E
L
C
T
B
B
S
L
E
T
A
A
A
D
F
R
HOURS
MINUTES