


➔
➔➔➔
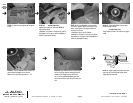
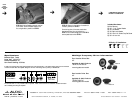
STEP 23: Apply a supplied flat washer, lock wash-
er and nut onto the three socket sup set screw.
Tightly secure all three nuts. .
Cont.
From
Previous
Page
Continued on Next Page ➔
➔
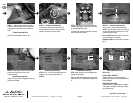
STEP 17: Remove the wax square and run speak-
er wire.
STEP 21: Place the Stealthbox/center console into
vehicle. Attach the speaker wire to terminal.
Back out the three socket cup screws to 1-1/4:”.
➔
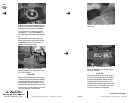
STEP 22: Place Stealthbox/center console upright
and into the proper position. Carefully guiding the
threaded rods through the three drilled holes.
Pop in the four supplied black plastic push rivets,
into the screw holes on each side of the center con-
sole.
STEP 20: Place the Stealthbox into the center
console, outside of vehicle .
*Double Cabs Only*
The permanent removal of the rear seat 12v plug is
neded.
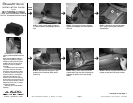
STEP 18: *Access Cabs Only*
Replace the modified A/C ducts from STEP 10,
back into the vehicle.
(Stealthbox is only shown in the picture for position
purposes.You do not have to have the Stealthbox in
location to accomplish this step)
STEP 19: With the Stealthbox and the modified
A/C ducts in position. Place the front section of the
center console back into the proper location. Do
not secure at this time.
*Remember to plug in the 12v sockets.*
(Stealthbox is only shown in the picture for position
purposes.You do not have to have the Stealthbox in
location to accomplish this step)
SB-T-TUNCNSL2/10W3v2, JL AUDIO, Inc 2005
Sheet SKU#011180 Revision 4/6/2005Page 4
www.jlaudio.com
STEALTHBOX WALL
THREADED INSERT
VEHICLE SHEET METAL
FENDER WASHER
SOCKET CUP SET SCREW
LOCK WASHER
FLAT WASHER
HEX NUT