


• !"#
!"
!
!"
!
!
• !"#$%&'($
!"#$%&'()*+,6mm !"#$%&' !"()*+,-#
!TOYOTA !"#$%&'()*+,-.)/012&3456
! (M5 x 6 mm)*
* !"#$
*
*
! (M5 x 6 mm)*
!"#$
!"#$%&'(
!"#$%&'()
!"#$%&'()*
!
!"#$%&
!" !"
!=(M5)
=(ø5)
!=(M5 x 20 mm)
!
hpJcuTNN
!"
!"#$%&'()*+,#-./01
!"#$%&'()*+,-./012
!"#$%&'()*+,-./01#
!"#$% 12V !"#$%&'
!"#$%&'()*+,-./'0(
!"#$%JVC !"#$%&'(
• !"#$%&'()* !+,-
!"#$% JVC !"#$%&'
• !"#$
!"#$%&'()*+,-./0 1
!"#$%&&'()*+,-./01
!"#$%&'()*+,-./0(1
!"#$%&'()*+ !"
!"#$%& !"#$%&'()
JVC !"#$%&'
• !"#$%&'()*+,%- 45
!"#$%&'45 !"#$4 – 8
• !"#$%&'()
• !"#$%&'(%)*+#,-.
!"#$%&'()
!
!
• !"#$%&!"'()*+,-.(/
1
!"#$
2
!"#
3
!"#$%&'()*+,-."/
!"#$%&'#()*+,-./
!"#$%&'()*+,-.
!
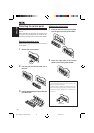
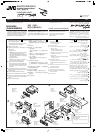
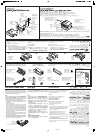
• When installing the unit without using the sleeve
• ‡¡◊ËÕµ‘¥µ—Èß™ÿ¥ª√–°Õ∫‚¥¬‰¡Ë„™Èª≈Õ°ÀÿÈ¡
•
w«u« qJON« «b²Ý« ÊËbÐ “UN'« Vdð UbMŽ w«u« qJON« «b²Ý« ÊËbÐ “UN'« Vdð UbMŽ
w«u« qJON« «b²Ý« ÊËbÐ “UN'« Vdð UbMŽ w«u« qJON« «b²Ý« ÊËbÐ “UN'« Vdð UbMŽ
w«u« qJON« «b²Ý« ÊËbÐ “UN'« Vdð UbMŽ
In a Toyota for example, first remove the car radio and install the unit in its place.
µ—«Õ¬Ë“߇™Ëπ „π√∂¬πµÏ‚µ‚¬µÈ“ „ÀÈ∂Õ¥«‘∑¬ÿµ‘¥√∂¬πµÏÕÕ°°ËÕπ·≈–µ‘¥µ—Èß™ÿ¥ª√–°Õ∫π’ȇ¢È“‰ª·∑π
ŽKv ݳOq «*¦U‰¨ w ÝOU—« ½uŸ ðu¹uðU¨ «½eŸ —«œ¹u «OU—… «Ëô ÐFb –p —ÒV «'NU“ w JU½tÆ
Sleeve
ª≈Õ°ÀÿÈ¡
w«u« qJON«
32
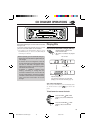
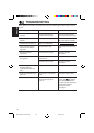
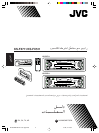
Removing the unit
• Before removing the unit, release the rear
section.
1
Remove the control panel.
2
Remove the trim plate.
3
Insert the 2 handles into the slots, as shown.
Then, while gently pulling the handles away
from each other, slide out the unit. (Be sure
to keep the handles after installing it.)
1
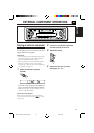
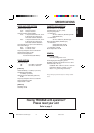
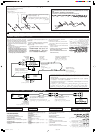
ELECTRICAL CONNECTIONS
To prevent short circuits, we recommend that you
disconnect the battery’s negative terminal and make
all electrical connections before installing the unit. If
you are not sure how to install this unit correctly, have
it installed by a qualified technician.
Note:
This unit is designed to operate on 12 V DC, NEGATIVE
ground electrical systems. If your vehicle does not
have this system, a voltage inverter is required, which
can be purchased at JVC car audio dealers.
• Replace the fuse with one of the specified rating. If
the fuse blows frequently, consult your JVC car
audio dealer.
• If noise is a problem...
This unit incorporates a noise filter in the power
circuit. However, with some vehicles, clicking or
other unwanted noise may occur. If this happens,
connect the unit’s rear ground terminal (see
connection diagram) to the car’s chassis using
shorter and thicker cords, such as copper braiding
or gauge wire. If noise still persists, consult your
JVC car audio dealer.
• Maximum input of the speakers should be no more
than 45 W at the rear and 45 W at the front, with an
impedance of 4 Ω to 8 Ω.
• Be sure to ground this unit to the car’s chassis.
• The heat sink becomes very hot after use. Be careful
not to touch it when removing this unit.
√“¬°“√Ë«πª√–°Õ∫”À√—∫µ‘¥µ—Èß·≈–‡™◊ËÕ¡µËÕ°—π
Ë«πª√–°Õ∫µËÕ‰ªπ’È„ÀÈ¡“°—∫™ÿ¥ª√–°Õ∫π’È À≈—ß®“°µ√«®Õ∫·≈È«
ª√—∫µ—È߇§√◊ËÕß„ÀÈ∂Ÿ°µÈÕß
qOu²«Ë VOd²« ¡«eł« WLzUqOu²«Ë VOd²« ¡«eł« WLzU
qOu²«Ë VOd²« ¡«eł« WLzUqOu²«Ë VOd²« ¡«eł« WLzU
qOu²«Ë VOd²« ¡«eł« WLzU
Æ“UN'« l …œËe WOU²« ¡«ełô«
qJAÐ rN³Odð vłd¹ ¨¡«ełô« Ác¼ h× bFÐ
Æ`O×
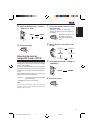
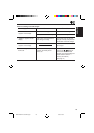
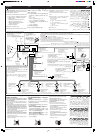
Parts list for installation and connection
The following parts are provided with this unit.
After checking them, please set them correctly.
Control panel
·ºß§«∫§ÿ¡
rJײ« WŠu
Trim plate
·ºËπ‚≈À–¢Õ∫·µËß
WM¹e« WŠu
Handles
§—π∫—ߧ—∫
UU*«
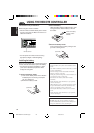
Note: When installing the unit on the mounting bracket, make sure to use the 6 mm-long screws. If longer screws are
used, they could damage the unit.
À¡“¬‡Àµÿ : ‡¡◊ËÕµ‘¥µ—Èß™ÿ¥ª√–°Õ∫≈ß„π·∑Ëπ√Õß√—∫‰«È „ÀÈ„™È°√Ÿ¬“«¢π“¥ 6 ¡‘≈≈‘‡¡µ√ ∂È“„™È°√Ÿ¬“«°«Ë“π’ÈÕ“®∑”„ÀÈ™ÿ¥ª√–°Õ∫‡’¬À“¬‰¥È
∫W?EŠö∫W?EŠö
∫W?EŠö∫W?EŠö
∫W?EŠöw?ž«d?Р«b??²?Ý« W?U?Š w? Ær?K ∂ ‰uÞ wž«dÐ Âb²Ý« s bQð ¨XO³¦²« WOH² vKŽ “UN'« VOdð bMŽ
Æ“UN'« —d{ Ë« nKð V³¹ Ê« sJ1 p– ÊU ¨rK ∂ s ‰uÞ«
Hard case/Control panel
≈—ß∫√√®ÿ/ÀπÈ“ª—¥
rJײ«WŠË«Ø‚ËbM
Sleeve
ª≈Õ°ÀÿÈ¡
w«u« qJON«
Trim plate
·ºËπ‚≈À–¢Õ∫·µËß
WM¹e« WŠu
Heat sink
·ºËπ√–∫“¬§«“¡√ÈÕπ
…—«d(« iHš W×OH
Washer
ª√–‡°Áπ«ß·À«π
ŠKIW «ŠJUÂ
«²uOq
Fire wall
ºπ—ß°—π‰ø
s W¹UL(« —«bł
o¹d(«
Mounting bolt
≈—°µ‘¥
VOd²« —UL
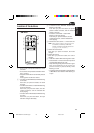
• When using the optional stay
• ‡¡◊ËÕ„™Èµ—«¬÷¥·∫∫‡≈◊Õ°‰¥È (“¡“√∂‡≈◊Õ°‡ª‘¥§È“߉«È‰¥È)
•
XO³¦²K wU{« bM «b²Ý« bMŽXO³¦²K wU{« bM «b²Ý« bMŽ
XO³¦²K wU{« bM «b²Ý« bMŽXO³¦²K wU{« bM «b²Ý« bMŽ
XO³¦²K wU{« bM «b²Ý« bMŽ
Stay (option)
µ—«¬÷¥ (‡≈◊Õ°‰¥È)
XO³¦ð bM
©wU{«®
Lock nut
πÕµ≈ÁÕ§
XO³¦²« WuL
Screw (option)
°√Ÿ (‡≈◊Õ°‰¥È)
©wU{«® wždÐ
Dashboard
·ºßÀπÈ“ª—∑¡Ï
…—UO« uKÐUð
Flat type screws (M5 x 6 mm)*
°√ŸÀ—«‡√’¬∫ (M5 x 6 ¡‘≈≈‘‡¡µ√)*
® …bŽUI« W¹u² wž«dÐM5 x©rK ∂ *
Bracket*
·∑Ëπ√Õß√—∫*
XO³¦²« WOH²*
* Not included with this unit.
* ‰¡Ë√«¡°—∫™ÿ¥ª√–°Õ∫π’È
*
Ëe dOžÒÆ“UN'« «c¼ l œ
Flat type screws (M5 x 6 mm)*
°√ŸÀ—«‡√’¬∫ (M5 x 6 ¡‘≈≈‘‡¡µ√)*
® …bŽUI« W¹u² wž«dÐM5 x©rK ∂ *
Bracket*
·∑Ëπ√Õß√—∫*
XO³¦²« WOH²*
Pocket
°–‡ª“–
VOł
Handle
§—π∫—ߧ—∫
WU*«
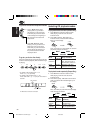
Power cord
“¬‡§‡∫‘≈°”≈—ß (Power Cord)
WOzUÐdNJ« WUD« pKÝ
Lock nut (M5)
πÕµ≈ÁÕ§ (M5)
® XO³¦ð≤‰« WuLM5©
Washer (ø5)
ª√–‡°Áπ«ß·À«π (ø5)
©µ dD® qOu²« ÂUJŠ« WIKŠ
Rubber cushion
¬“ß°—π°√–·∑°
WOÞUD*« …uA(«
Mounting bolt (M5 x 20 mm)
≈—°µ‘¥ (M5 x 20 ¡‘≈≈‘‡¡µ√)
® VOd²« —ULM5 x©rK ≤∞
…—UO« uKÐUð s “UN'« Ÿe½…—UO« uKÐUð s “UN'« Ÿe½
…—UO« uKÐUð s “UN'« Ÿe½…—UO« uKÐUð s “UN'« Ÿe½
…—UO« uKÐUð s “UN'« Ÿe½
•ÆwHK)« ¡e'« —dŠ ¨“UN'« Ÿe½ q³
±±
±±
±ÆrJײ« WŠu Ÿe½«
≤≤
≤≤
≤ÆWM¹e« WŠu Ÿe½«
≥≥
≥≥
≥5³ u¼ UL ¨‚uIA« qš«œ 5²U*« qšœ«
5²U*« V×Ý ¡UMŁ« ¨p– bFÐ ÆqJA« w
V?×?Ý« ¨Èd?šô« s?Ž …b?Š«u?« «b?OFÐ WUDKÐ
Æ×U)« v« “UN'«
VOdð bFÐ 5²U*UÐ pþUH²Š« s bQð®VOdð bFÐ 5²U*UÐ pþUH²Š« s bQð®
VOdð bFÐ 5²U*UÐ pþUH²Š« s bQð®VOdð bFÐ 5²U*UÐ pþUH²Š« s bQð®
VOdð bFÐ 5²U*UÐ pþUH²Š« s bQð®
©“UN'«©“UN'«
©“UN'«©“UN'«
©“UN'«
°“√∂Õ¥™ÿ¥ª√–°Õ∫
• °ËÕπ®–∂Õ¥™ÿ¥ª√–°Õ∫ „ÀȪ≈¥ÀπÈ“µ—¥Ë«π∑È“¬°ËÕπ
1
∂Õ¥·ºß§«∫§ÿ¡
2
∂Õ¥·ºËπ‚≈À–¢Õ∫·µËß
3
„˧—π∫—ߧ—∫ 2 Õ—π≈ß„π√ËÕß”À√—∫„™Èæ—π≈«¥ ¥—ß¿“æ
®“°π—Èπ„Àȇ≈◊ËÕπ™ÿ¥ª√–°Õ∫ÕÕ° „π¢≥–∑’˧ËÕ¬ Ê
¥÷ߧ—π∫—ߧ—∫∑—ÈßÕßÕ—πÕÕ°®“°°—π (¥Ÿ„ÀÈ¥’«Ë“§—π∫—ߧ—∫∑—ÈßÕßÕ—
πÕ¬ŸË„πµ”·ÀπËß∑’ˇÀ¡“–¡À≈—ß®“°µ‘¥µ—Èß·≈È«)
CR2025
Only for KS-FX711
”À√—∫√ÿËπ KS-FX711
q¹œuLKq¹œuLK
q¹œuLKq¹œuLK
q¹œuLK
KS-FX711
Remote controller
√’‚¡µ§Õπ‚∑√≈
bFÐ sŽ rJײ« …bŠË
Battery
·∫µ‡µÕ√’Ë
U¹—UD³«
WOzUÐdNJ« öOu²«WOzUÐdNJ« öOu²«
WOzUÐdNJ« öOu²«WOzUÐdNJ« öOu²«
WOzUÐdNJ« öOu²«
¨W?O?zU?Ðd?N?J?« d?z«Ëb?« w? d?O?B?I?ð ÀËb?Š l?M?*
qLŽ rŁ VU« W¹—UD³« ·dÞ qBHÐ wu½
w Æ“UN'« VOdð q³ WOzUÐdNJ« öOu²«
qJAÐ “UN'« VOdð WOHOJÐ p²dF ÂbŽ WUŠ
hA “UN'« VOdð WOKLŽ „dð vłd¹ ¨`O×
Æ…eNłô« Ác¼ q¦ VOd² q¼RË h²
∫WEŠö∫WEŠö
∫WEŠö∫WEŠö
∫WEŠö
—U??O??ð W??D??Ý«u??Ð q??L??F??O?? “U??N??'« «c??¼ r?L? b?I?
dýU³ wzUÐdN dýU³ wzUÐdN
dýU³ wzUÐdN dýU³ wzUÐdN
dýU³ wzUÐdN
DC
WOzUÐdN WLE½« ¨Xu ±≤ ¨WOzUÐdN WLE½« ¨Xu ±≤ ¨
WOzUÐdN WLE½« ¨Xu ±≤ ¨WOzUÐdN WLE½« ¨Xu ±≤ ¨
WOzUÐdN WLE½« ¨Xu ±≤ ¨
V?U?Ý i?¹—Q?ðV?U?Ý i?¹—Q?ð
V?U?Ý i?¹—Q?ðV?U?Ý i?¹—Q?ð
V?U?Ý i?¹—Q?ð«c?¼ q?¦? œu?łË Âb?Ž W?U?Š w Æ
‰u??×?? «b???²?Ý« V?−?¹ ¨p?ð—U?O?Ý w? ÂU?E?M?«
…eNłô« ¡öË s ‰u;« «c¼ ¡«dý sJ1Ë ¨ÃU²u
W—U «—UOK WOðuB«
JVCÆ
•UÝUOI« fH½ qL×¹ dšPÐ “uOH« ‰b³²Ý«
v?łd?¹ ¨“u?O?H?« ‚«d?²?Š« —d?J?ð «–« ÆW?uu*«
«—U?OK WOðuB« …eNłô« ¡öË …—UA²Ý«
W—U
JVCÆ
•ÆÆÆWKJA*« u¼ ZO−C« ÊU «–«
…dz«œ qš«œ ZO−{ d²K “UN'« «c¼ Âb²¹
i???F???Ð w??? ¨p???– l??? ÆW???O???zU???Ðd???N???J???« W??U??D??«
WIDID« s Ÿu½ Àb×¹ Ê« sJ1 ¨«—UO«
q¦ ÀËbŠ WUŠ w Æ»užd*« dOž ZO−C« Ë«
i¹—Q²« ·dÞ qË« ¨p–
WOHKš w œułu*«WOHKš w œułu*«
WOHKš w œułu*«WOHKš w œułu*«
WOHKš w œułu*«
“UN'«“UN'«
“UN'«“UN'«
“UN'«…—UO« qJO¼ l ©qOu²« rÝ— dE½«®
q¦ ¨pLÝ«Ë dB« „öÝ« «b²Ý« WDÝ«uÐ
w? Æw?ÝU?O?I? p?KÝ Ë« ‰Ëb:« ”U×M« pKÝ
vłd¹ ¨ZO−C« Ë« WIDID« nuð ÂbŽ WUŠ
«—U?OK WOðuB« …eNłô« ¡öË …—UA²Ý«
W—U
JVCÆ
•¹−?V? «Ê ¹Ju?Ê «(b? «ôB?v b?šq? «?LU?ŽU?
«¦d? s µ¥ Ë«◊ K?LUŽU? «)KHO?W Ë µ¥ Ë«◊
KLUŽU «ôUOW¨ l 2U½FW Ð5
¥¥
¥¥
¥
««
««
«
vv
vv
v
∏∏
∏∏
∏
««
««
«
ËË
ËË
Ë
ÂÂ
ÂÂ
ÂÆ
•
Æ…—UO« qJO¼ l “UN'« i¹—Qð s bQðÆ…—UO« qJO¼ l “UN'« i¹—Qð s bQð
Æ…—UO« qJO¼ l “UN'« i¹—Qð s bQðÆ…—UO« qJO¼ l “UN'« i¹—Qð s bQð
Æ…—UO« qJO¼ l “UN'« i¹—Qð s bQð
•bFÐ «bł WMšUÝ …—«d(« iHš W×OH `³Bð
Ÿe?½ b?MŽ UN²ö ÂbŽ s bQð Æ«b²Ýô«
Æ“UN'«
°“√‡™◊ËÕ¡‚¥¬„™È ‰øøÈ“
‡æ◊ËÕªÈÕß°—π‰øøÈ“≈—¥«ß®√ ‡√“¢Õ·π–π”„Àȧÿ≥‡Õ“¢—È«
≈∫·∫µ‡µÕ√’ËÕÕ°°ËÕπ·≈–∑”°“√‡™◊ËÕ¡‚¥¬„™È‰øøÈ“∑ÿ°®ÿ¥°ËÕπ∑’Ë®–µ‘¥µ—Èß
™ÿ¥ª√–°Õ∫ ∂È“§ÿ≥‰¡Ë·πË„®«Ë“µ‘¥µ—Èß™ÿ¥ª√–°Õ∫π’È∂Ÿ°µÈÕßÀ√◊Õ‰¡Ë
„ÀÈÀ“™Ë“ߺŸÈ‡™’ˬ«™“≠‡ªÁπºŸÈµ‘¥µ—Èß
À¡“¬‡Àµÿ :
™ÿ¥ª√–°Õ∫π’ȉ¥È√—∫°“√ÕÕ°·∫∫¡“‡æ◊ËÕ„™Èß“π°—∫√–∫∫°√–
·‰øøÈ““¬¥‘π¢—È«≈∫°√–·µ√ß
12 ‚«≈∑Ï
À“°√∂¬πµÏ¢Õߧÿ≥‰¡Ë‰¥È„™È√–∫∫π’È
µÈÕß„™È‡§√◊ËÕß·ª≈ß°√–·‰ø™Ë«¬
´÷Ëß“¡“√∂À“´◊ÈÕ‰¥È®“°√È“π¢“¬‡§√◊ËÕ߇’¬ß√∂¬πµÏ JVC
ë „™Èæ‘°—¥®”‡æ“–·∑πø‘«Ï À“°ø‘«Ï¢“¥∫ËÕ¬
„ÀȪ√÷°…“√È“π¢“¬‡§√◊ËÕ߇’¬ß√∂¬πµÏ
JVC
ë À“°‡’¬ß¡’ª—≠À“...
™ÿ¥ª√–°Õ∫™ÿ¥π’È¡’‡§√◊ËÕß°√Õ߇’¬ß„π«ß®√°”≈—ß
(Power Circuit)
լ˓߉√°Á¥’„π√∂¬πµ ∫“ߧ—π°ÁÕ“®‡°‘¥‡’¬ß∑’ˉ¡Ëæ÷ߪ√“√∂π“¢÷Èπ‰¥È
À“°ª—≠À“π’ȇ°‘¥¢÷Èπ „ÀȵËÕ¢—È«“¬¥‘π¥È“πÀ≈—ߢÕß™ÿ¥ª√–°Õ∫
(¥Ÿ·ºπ¿Ÿ¡‘°“√µËÕ‡™◊ËÕ¡) ‡¢È“°—
∫‡™´‘¢Õß√∂¬πµÏ‚¥¬„™È“¬‡§‡∫‘≈∑’Ë—Èπ·≈–Àπ“°«Ë“ ‡™Ëπ
“¬‰ø‡§√◊ËÕß«—¥À√◊Õ“¬ª√–“π∑Õß·¥ß ‡ªÁπµÈπ À“°¬—ß
¡’‡’¬ßÕ¬ŸËÕ’° „ÀȪ√÷°…“√È“π¢“¬‡§√◊ËÕ߇’¬ß√∂¬πµÏ
JVC
ë °”≈—߉ø‡¢È“Ÿßÿ¥¢Õß≈”‚æ߉¡Ë§«√‡°‘π 45 «—µµÏ”À√—∫≈”‚æßµ—«À≈—ß
·≈–
45 «—µµÏ”À√—∫ ≈”‚æßµ—«ÀπÈ“ ·≈–¡’§Ë“§«“¡µÈ“π∑“πµËÕ‰øøÈ“
°√–·≈—∫
4 ‚ÕÀÏ¡ ∂÷ß 8 ‚ÕÀÏ¡
ë µ√«®Õ∫„ÀÈ¥’«Ë“‰¥ÈµËÕ™ÿ¥ª√–°Õ∫™ÿ¥π’È≈ß„π‡™´‘√∂¬πµÏ·≈È«
ë ·ºËπ√–∫“¬§«“¡√ÈÕπ®–√ÈÕπ¡“°À≈—ß®“°„™È √–¡—¥√–«—ßլ˓‰ª—¡º—
‡¡◊ËÕ∂Õ¥™ÿ¥ª√–°Õ∫π’È
InstalKS-FX711_511-Final 1/9/02, 3:48 PM2