


4
Other external component / Autre appareil extérieur
*
9
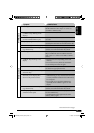
AUX Input Adapter KS-U58 (not supplied for this unit)
*
9
Adaptateur d’entrée AUX KS-U58 (non fourni avec cet autoradio)
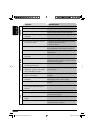
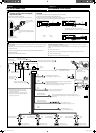
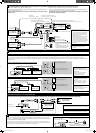
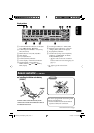
Connecting the external amplifiers and/or subwoofer / Connexion d’amplificateurs extérieurs et/ou d’un caisson de grave
You can connect amplifiers to upgrade your car stereo system.
• Connect the remote lead (blue with white stripe) to the remote lead of the other equipment so that it
can be controlled through this unit.
•
Disconnect the speakers from this unit, connect them to the amplifier. Leave the speaker leads of
this unit unused.
*
3
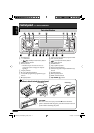
Firmly attach the ground wire to the
metallic body or to the chassis of the
car—to the place not coated with paint (if
coated with paint, remove the paint before
attaching the wire). Failure to do so may
cause damage to the unit.
*
3
Attachez solidement le fil de mise à la masse
au châssis métallique de la voiture—à un
endroit qui n’est pas recouvert de peinture
(s’il est recouvert de peinture, enlevez d’abord
la peinture avant d’attacher le fil). L’appareil
peut être endommagé si cela n’est pas fait
correctement.
Vous pouvez connecter des amplificateurs pour améliorer votre système stéréo.
• Connectez le fil de commande à distance (bleu avec bande blanche) au fil de commande à distance de
l’autre appareil de façon qu’il puisse être commandé via cet appareil.
• Déconnectez les enceintes de cet appareil et connectez-les à l’amplificateur. Laissez les fils
d’enceintes de cet appareil inutilisés.
Rear speakers
Enceintes arrière
JVC Amplifier
JVC Amplificateur
Remote lead
Fil d’alimentation à distance
Y-connector (not supplied for this unit)
Connecteur Y (non fourni avec cet autoradio)
Remote lead (Blue with white stripe)
Fil d’alimentation à distance (Bleu avec bande blanche)
To the remote lead of other equipment or power aerial if any
Au fil de télécommande de l’autre appareil ou à l’antenne automatique s’il y en a une
• Set “EXT IN” for the external input setting (See page 17 of the INSTRUCTIONS.)
/
Choisissez “EXT IN” pour le réglage de l’entrée extérieure (Voir page 17 du MANUEL D’INSTRUCTIONS.)
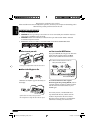
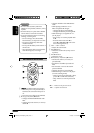
Connecting to the steering wheel remote controller / Connexion de la télécommande de volant
If your car is equipped with the steering wheel remote controller, you can operate this unit using the controller.
To do it, a JVC’s OE remote adapter (not supplied) which matches with your car is required. Consult your JVC
IN-CAR ENTERTAINMENT dealer for details.
Si votre voiture est munie d’une télécommande de volant, vous pouvez commander cet autoradio en utilisant la
télécommande. Pour le faire, un adaptateur pour télécommande au volant JVC (non fourni) correspondant à votre
voiture est nécessaire. Consultez votre revendeur d’autoradio JVC pour les détails.
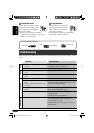
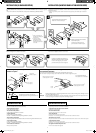
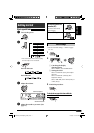
CD changer, DAB tuner, Apple iPod®, or JVC D. player / Changeur de CD, tuner DAB, iPod‚ Apple® ou lecteur D. JVC
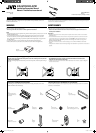
CAUTION / PRECAUTION:
• Before connecting the external
components, make sure that the unit
is turned off.
• Avant de connecter les appareils
extérieurs, assurez-vous que
l’appareil est hors tension.
Steering wheel remote input
Entrée de la télécommande de volant
OE remote adapter (not supplied)
Adaptateur pour télécommande au volant (non fourni)
Steering wheel remote controller (equipped in the car)
Télécommande de volant (installée dans la voiture)
You can connect these components in series as illustrated below. The iPod*
6
or D. player can be connected using an interface adapter (not supplied)—KS-PD100 (for iPod) or KS-PD500 (for D. player).
Vous pouvez connecter ces appareils en série comme montrée sur l’illustration. Le iPod*
6
ou le lecteur D. peut être connecté en utilisant un adaptateur d’interface (non fourni)—KS-PD100 (pour iPod) ou KS-PD500
(pour le lecteur D.).
*
7
Connecting cord supplied for your CD
changer or DAB tuner
*
7
Cordon de connexion fourni avec votre
changeur CD ou tuner DAB
Connecting the external components / Connexion des appareils extérieurs
*
4
Signal cord (not supplied for this unit)
*
4
Cordon de signal (non fourni avec cet
autoradio)
External component
Appareil extérieur
3.5 mm stereo mini plug
Mini fiche stéréo de 3,5 mm
*
6
iPod is a trademark of Apple Computer,
Inc., registered in the U.S. and other
countries.
*
6
iPod est une marque de commerce
d’Apple Computer, Inc., enregistrée aux
États-Unis et dans les autres pays.
C
Front speakers
Enceintes avant
D
or
ou
External component
Appareil extérieur
E
• Set “CHANGER” for the external input setting (See page 17 of the INSTRUCTIONS.)
/
Choisissez “CHANGER” pour le réglage de l’entrée extérieure (Voir page 17 du MANUEL D’INSTRUCTIONS.)
CD changer jack
Prise du changeur de CD
Apple iPod
(separately purchased)
iPod Apple (vendu séparément)
JVC D. player
(separately purchased)
Lecteur D. JVC (vendu séparément)
JVC DAB tuner
Tuner DAB JVC
CD changer jack
Prise du changeur de CD
JVC CD changer
Changeur CD JVC
JVC DAB tuner
Tuner DAB JVC
CD changer jack
Prise du changeur de CD
JVC CD changer
Changeur CD JVC
or
ou
or
ou
Apple iPod
(separately purchased)
iPod Apple (vendu séparément)
JVC D. player
(separately purchased)
Lecteur D. JVC (vendu séparément)
*
8
Line Input Adapter KS-U57 (not supplied for this unit)
*
8
Adaptateur d’entrée de ligne KS-U57 (non fourni avec cet autoradio)
JVC Amplifier
JVC Amplificateur
Front speakers (see diagram )
Enceintes avant (voir le diagramme )
Rear speakers
Enceintes arrière
*
5
Cut the rear speaker leads of the car’s
ISO connector and connect them to the
amplifier.
*
5
Coupez les fils des enceintes arrière
du connecteur ISO de la voiture et
connectez-les à l’amplificateur.
JVC Amplifier
JVC Amplificateur
Subwoofer
Caisson de
grave
Connection 1 (integrated connection) / Connexion 1 (connexion intégrée)
Connection 2 (alternative connection) / Connexion 2 (connexion alternative)
Instal3-4_KD-G722_010A_f.indd 4Instal3-4_KD-G722_010A_f.indd 4 12/9/05 12:00:48 PM12/9/05 12:00:48 PM