ENGLISH
‰∑¬
B
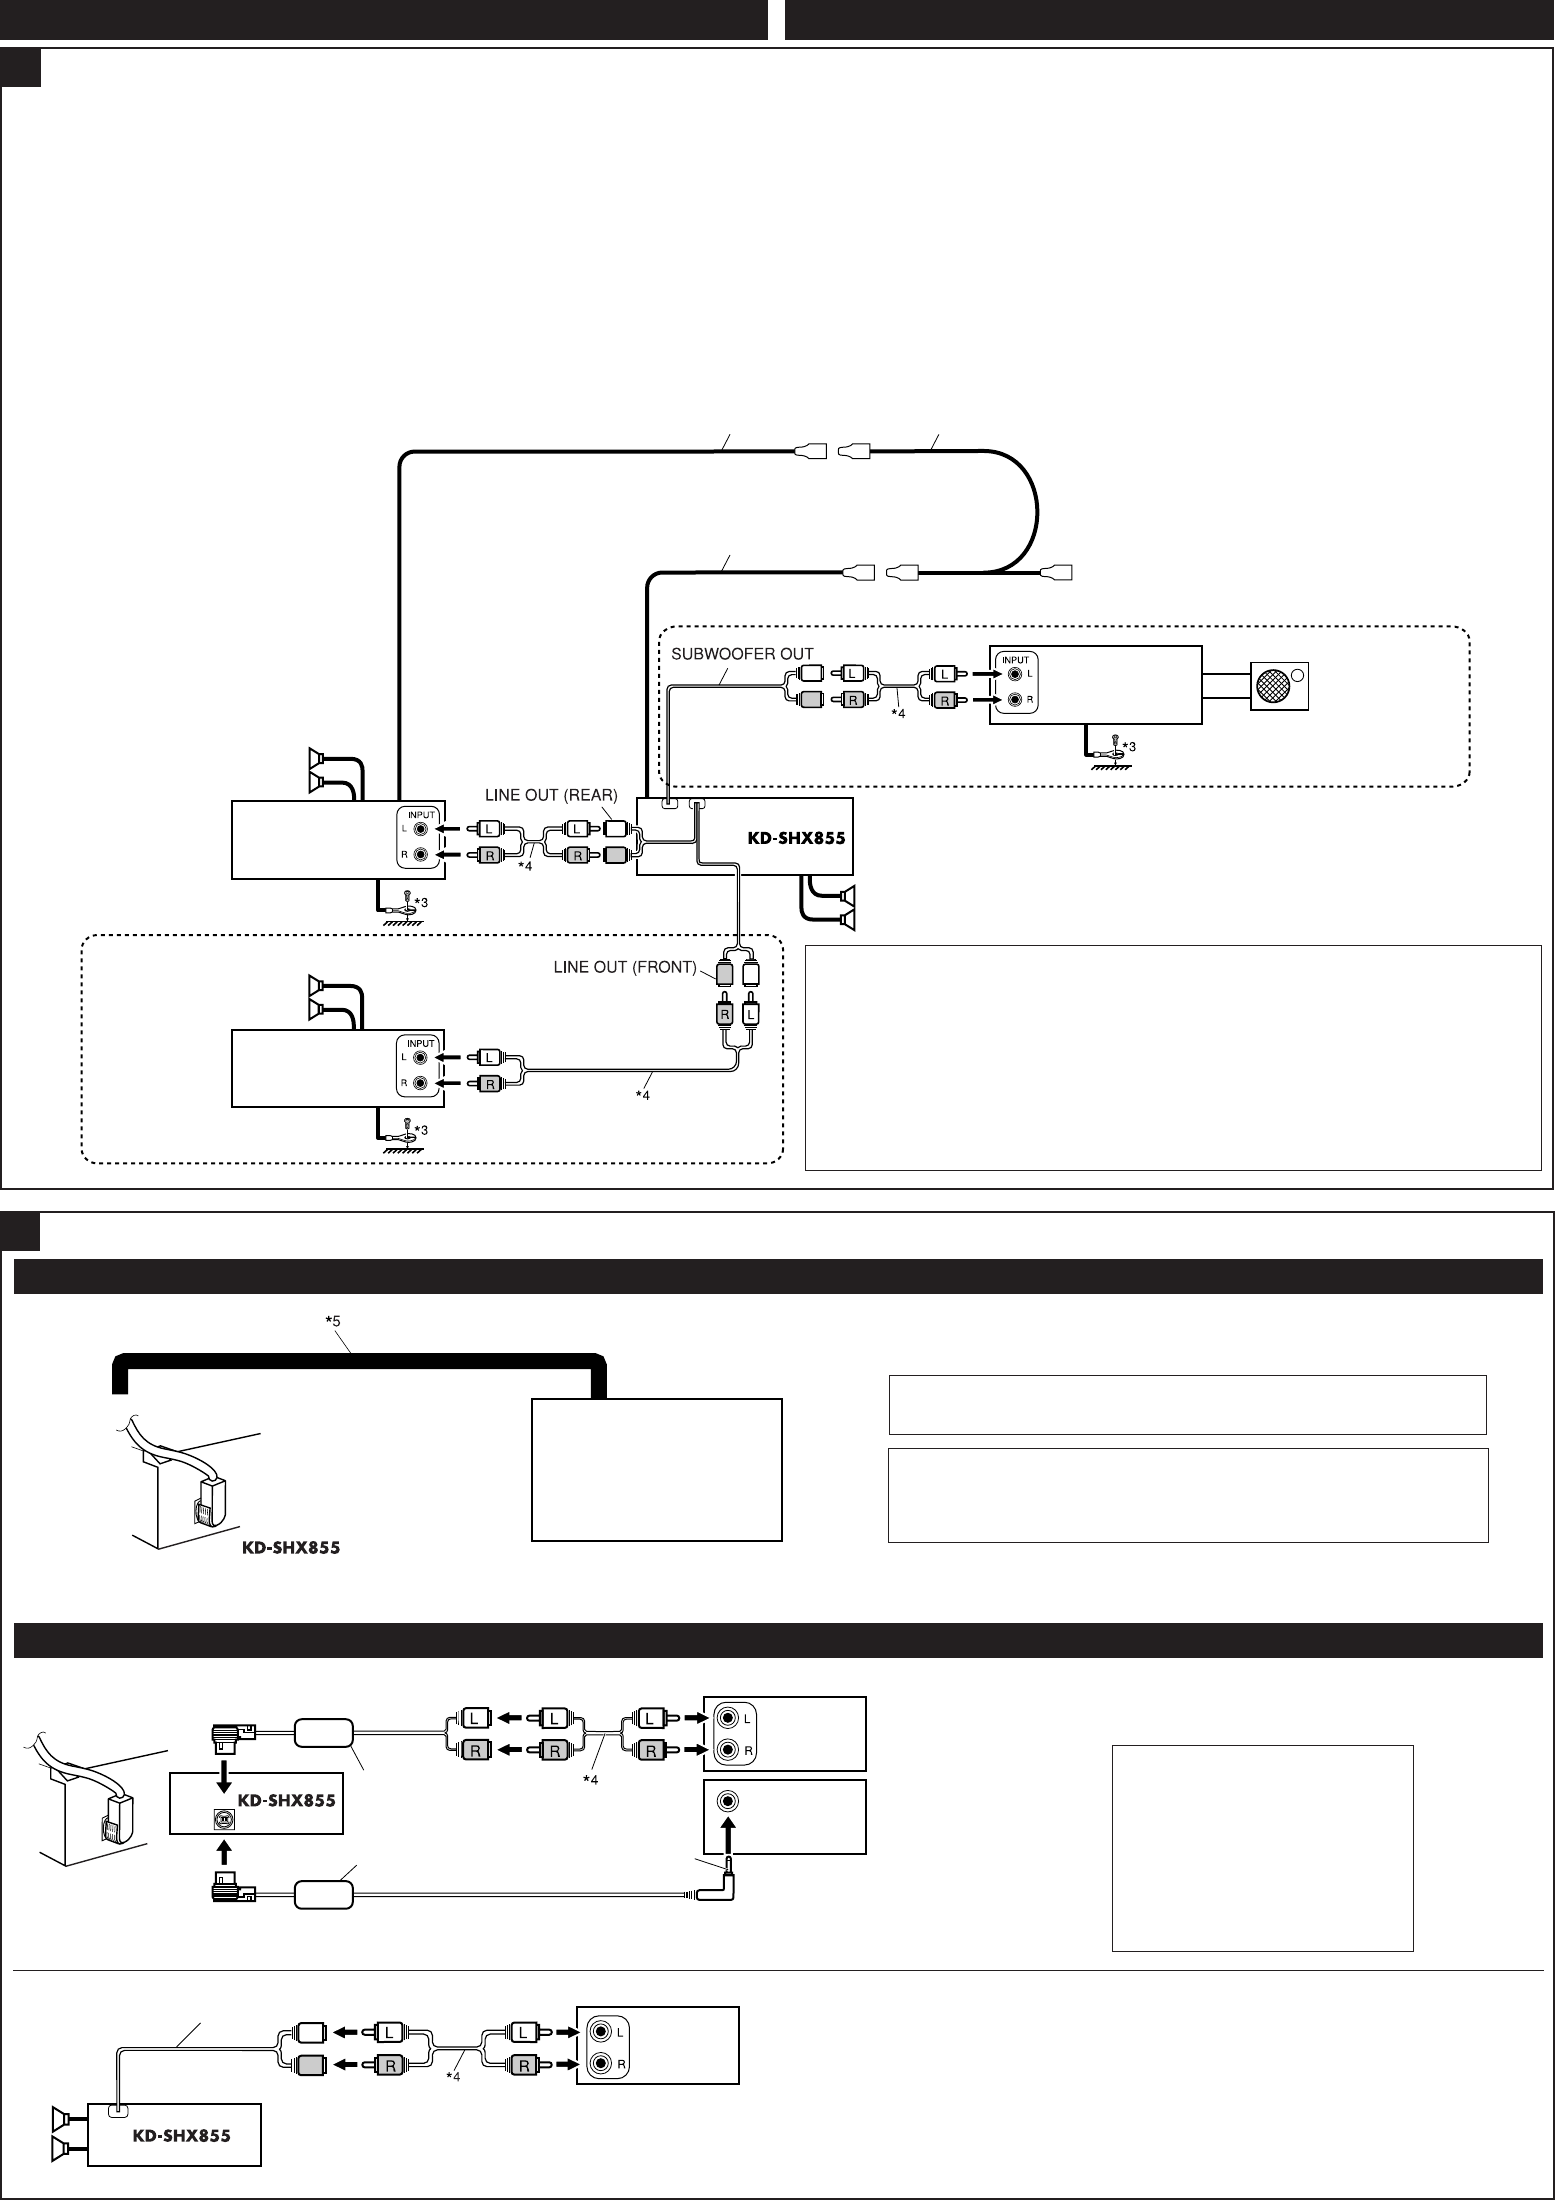
Connecting the external amplifiers / °“√µËÕ‡æ‘Ë¡‡µ‘¡‡¢È“°—∫Õÿª°√≥ÏÕ◊Ëπ
You can connect amplifiers to upgrade your car stereo system.
• Connect the remote lead (blue with white stripe) to the remote lead of the other equipment so
that it can be controlled through this unit.
• For amplifier only:
– Disconnect the speakers from this unit, connect them to the amplifier. Leave the
speaker leads of this unit unused.
– You can switch off the built-in amplifier and send the audio signals only to the external
amplifier(s) to get clear sounds and to prevent internal heat built-up inside the
unit (see
page 39 of the INSTRUCTIONS).
– The line output level of this
unit is kept high to maintain the hi-fi sounds reproduced from
this unit.
When connecting an external amplifier to this
unit, turn down the gain control on the
external amplifier to obtain the best performance from this
unit.
Remote lead
“¬µ–°—Ë«•–¬–‰°•
Y-connector (not supplied for this unit)
¢ÈÕµËÕ√Ÿªµ—« Y (‰¡Ë‰¥È„ÀÈ¡“°—∫™ÿ¥ª√–°Õ∫π’È)
Remote lead (blue with white stripe)
“¬µ–°—Ë«•–¬–‰°• (’πÈ”‡ß‘π≈“¬¢“«)
To the remote lead of other equipment or auto antenna if any
µËÕ“¬°—∫Õÿª°√≥ÏÕ◊ËπÀ√◊Õ‡“Õ“°“»Õ—µ‚π¡—µ‘∂È“¡’
JVC Amplifier
‡§√◊ËÕߢ¬“¬‡’¬ß
JVC
Front speakers
≈”‚æßÀπÈ“
Subwoofer
´—∫«Ÿ‡øÕ√
*
3
Firmly attach the ground wire to the metallic body or to the chassis of the car—to the
place uncoated with paint (if coated with paint, remove the paint before attaching the
wire). Failure to do so may cause damage to the unit.
*
3
µËÕ≈«¥
“¬¥‘π„ÀÈ·πËπ‡¢È“°—∫µ—«∂—߇À≈Á° À√◊Õµ—«∂—ß√∂
—
µ√ß
Ë«π ∑’ˉ¡Ë¡’
’‡§≈◊Õ∫ (À“°¡’
’‡§≈◊Õ∫Õ¬ŸË „ÀÈ¢Ÿ¥
’ÕÕ°°ËÕπ
°ËÕπµËÕ≈«¥
“¬¥‘π) À“°‰¡ËªØ‘∫—µ‘µ“¡§”·π–π”π’È ‡§√◊ËÕßÕ“®™”√ÿ¥À√◊Õ‡
’¬À“¬‰¥
*
4
Signal cord (not supplied for this unit)
*
4
“¬‡§‡∫‘≈—≠≠“≥ (‰¡Ë‰¥È„ÀÈ¡“°—∫™ÿ¥ª√–°Õ∫π’È)
JVC Amplifier
‡§√◊ËÕߢ¬“¬‡’¬ß
JVC
Front speakers
≈”‚æßÀπÈ“
JVC Amplifier
‡§√◊ËÕߢ¬“¬‡’¬ß
JVC
Rear speakers
≈”‚æßÀ≈—ß
§ÿ≥“¡“√∂µËÕ°—∫·Õ¡æ≈‘ø“¬‡ÕÕ√Ï ·–Õÿª°√≥ÏÕ◊òπʉ¥ô ‡æ◊ËÕ‡æ‘Ë¡§ÿ≥ ¿“懒¬ß„ÀÈ°—∫√–∫∫‡µÕ√‘‚Õ¢Õß√∂¬πµÏ
• µËÕ“¬µ–°—Ë«√–¬–‰°≈ (’πÈ”‡ß‘π≈“¬¢“«) ‡¢È“°—∫“¬µ–°—Ë«√–¬–‰°≈¢ÕßÕÿª°√≥ÏÕ◊Ëπ Ê ‡æ◊ËÕ®–“¡“√∂§«∫§ÿ¡‚¥¬™ÿ¥ª√–
°Õ∫π’ȉ¥
• ≈”À√—∫·Õ¡æ≈‘ø“¬‡ÕÕ√χ∑Ë“π—Èπ:
– ∂Õ¥≈”‚æßÕÕ°®“°™ÿ¥ª√–°Õ∫π’È ·≈È«µËÕ‡¢È“°—∫‡§√◊ËÕߢ¬“¬ ∑‘Èß“¬µ–°—Ë«≈”‚æߢÕß™ÿ¥ª√–°Õ∫π’ȉ«
– ∑Ë“π“¡“√∂ª‘¥·Õ¡æ≈‘ø“¬‡ÕÕ√Ï ∑’˵‘¥µ—ÈßÕ¬ŸË„π‡§√◊ËÕß ·≈È«Ëß—≠≠“≥‡’¬ß‰ª¬—ß ·Õ¡æ≈‘ø“¬‡ÕÕ√Ï¿“¬πÕ°
‡æ’¬ßլ˓߇¥’¬«‰¥È ‡æ◊ËÕ„Àȇ’¬ß∑’ˉ¥È§¡™—¥ ·≈–ªÈÕß°—π‡§√◊ËÕ߉¡Ë„ÀÈ√ÈÕπ (¥ŸÀπÈ“ 39 §”·π–π”)
– ≈—≠≠“≥ÕÕ°®“°‡§√◊ËÕß®–¬—ߧßÕ¬ŸË„π√–¥—∫≈Ÿß ‡æ◊ËÕ„Àȇ≈’¬ß∑’ˉ¥È‡ªÁπ‡≈’¬ß‰Œ-‰ø ‡¡◊ËÕµËÕ°—∫·Õ¡æ≈‘ø“¬‡ÕÕ√Ï¿“¬πÕ°
„ÀȪ‘¥ªÿË¡§«∫§ÿ¡Õ—µ√“¢¬“¬ ∑’Ë·Õ¡æ≈‘ø“¬‡ÕÕ√Ï¿“¬πÕ° ‡æ◊ËÕ„Àȇ§√◊ËÕß¡’ª√–≈‘∑∏‘¿“æ°“√∑”ß“π≈Ÿß≈ÿ¥È
External component / Õÿª°√≥Ï¿“¬πÕ°
JVC CD changer / JVC CD ‡™π‡®Õ√Ï
CAUTION / ¢ÈÕ§«√√–«—ß:
• Before connecting the CD changer, make sure that the unit is turned off.
• °ËÕπ®–‡™◊ËÕ¡µËÕ CD ‡™π‡®Õ√Ï °√ÿ≥“µ√«®Õ∫„ÀÈ·πË„®«Ë“ª‘¥‡§√◊ËÕßÕ¬ŸË
*
5
Connecting cord supplied for your JVC CD changer
*
5
µËÕ“¬∑’Ë„ÀÈ¡“”À√—∫ JVC CD ‡™π‡®Õ√Ï
C
Connecting the external components / °“√µËÕ‡æ‘Ë¡‡µ‘¡‡¢È“°—∫Õÿª°√≥ÏÕ◊ËπÊ
KS-U57
*
6
or
À√◊Õ
KS-U58
*
7
JVC CD changer
JVC CD
‡™π‡®Õ√Ï
CD changer jack
™ËÕ߇’¬∫µËÕ¢Õ߇§√◊ËÕ߇≈Ëπ CD
External component
Õÿª°√≥Ï¿“¬πÕ°
*
6
Line Input Adapter KS-U57
(optionally purchased)
*
6
Õ·¥ª‡µÕ√Ï “¬—≠≠“≥‡¢È“ KS-U57
(Õÿª°√≥χ√‘¡”À√—∫´◊ÈÕ‡æ‘Ë¡)
*
7
Aux Input Adapter KS-U58
(optionally purchased)
*
7
Õ–·¥ª‡µÕ√Ï√—∫—≠≠“≥ Aux KS-U58
(
Õÿª°√≥χ√‘¡”À√—∫´◊ÈÕ‡æ‘Ë¡)
LINE IN
External component
Õÿª°√≥Ï¿“¬πÕ°
3.5 mm stereo mini plug
ª≈—Í°‡µÕ√‘‚Õ‡≈Á° 3.5 ¡¡
3
Install3-4_SHX855_006A_3.indd 3 4/8/05 2:46:35 PM


