


1
2
3
4
5
6
7
8
9
10
11
12
13
14
15
16
51
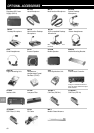
12 OPERATOR CONVENIENCES
COMPUTER CONTROL
By connecting this transceiver to a computer, you can
change the computer into an electronic console from
which you can remotely control functions of the
transceiver. This capability makes possible remote
operation of your transceiver from across the room,
from another room, or, when coupled with other
commercially available products and where lawful, from
another city, state, or country via a telephone
connection.
Note:
◆
You can use the front panel controls while using computer
control. Settings done from the front panel are effective
immediately.
◆
After the computer is disconnected or turned off, all values and
settings on the front panel are restored.
SETTING UP
■ Equipment Needed
• Computer equipped with an RS-232C serial port.
• One straight cable
This cable must have a 9-pin RS-232C female
connector at one end, and at the other end a 9-
pin or a 25-pin RS-232C female connector that
mates with the RS-232C port of your computer.
• Transceiver control application
To design your programs consult “APPENDIX”
{page 70} for the necessary information.
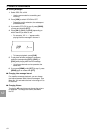
■ Connections
Connecting the transceiver to the computer is easy.
See the diagram given in “CONNECTING
PERIPHERAL EQUIPMENT” {page 60}.
Note: Before connecting this transceiver to the computer,
switch OFF the power to the transceiver and the computer.
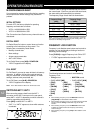
COMMUNICATION PARAMETERS
In order to control the transceiver by computer, you
must first choose the communication parameters.
1 On the computer, configure your transceiver control
application for 8 data bits and no parity.
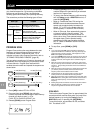
2 On the transceiver, select the appropriate transfer
rate and number of stop bits via Menu No. 35.
• The defaults are 9600 bps and 1 stop bit.
Note: To reliably use the 38400 or 57600 bps transfer rates, the
RS-232C port of the computer must support these high-speed
communications parameters.
1200
2400
4800
4800
9600
19200
38400
57600
1
1
1
2
1
1
1
1
12 – 1
24 – 1
48 – 1
48 – 2
96 – 1
192 – 1
384 – 1
576 – 1
Menu Setting
Transfer Rate
(bps)
Stop Bits
USING A TRANSVERTER
If you have a transverter that converts HF frequencies
to VHF/UHF frequencies, and vice versa, you can use
this HF transceiver as a VHF or UHF transceiver. For
more information, consult the instruction manual that
came with the transverter.
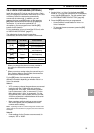
1 Connect the transverter to the ANT 1 or ANT 2
connector of this transceiver.
2 Select the operating frequency.
• The transverter will use this frequency as the
reference for converting frequencies.
• Normally set 1 kHz and lower digits to 0
(“0.00” on the display).
3 Access Menu No. 40, and select 50 MHz, 144 MHz
or 430 MHz, depending on which band you will use.
The default is OFF.
• Changing from the default (OFF) will
automatically set the transmit power to
approximately 5 W.
• The transceiver displays a frequency down to the
10 Hz digit for 50 MHz, or down to the
100 Hz digit for 144 MHz and 430 MHz.
Note:
◆
When using a transverter, not all the functions of this transceiver
are available.
◆
When using the optional VS-3 unit, the selected VHF or UHF
frequencies are not announced.