


TROUBLE SHOOTING
To solve the common problem, read the trouble shooting list. If you still can
not solve the problem, consult your nearest service dealer.
Symptom
No power
Disc cannot
be loaded
Cause
The fuse is blown
Presence of CD disc inside
the player
Inserting the disc in upside
down
Compact disc is extremely
dirty or defective
Temperature inside the
car is too high
Volume is in minimum
No sound
The operation
keys do not
work
Sound skips
The antenna cable is not
connected
the signals are too weak
Insert the antenna cable firmly
select a station manually
The radio does
not work
the radio
station
automatic
selection does
not work
1.The built-in microcomputer
is not operating properly
due to noise
2.Front panel is not properly
fix into its place
1. Press the RESET button
2. Reinstall the front panel
Wiring is not properly
connected
The installation angle
is more than 30 degrees
The disc is extremely
dirty or defective
Clean the compact disc/try to
play a new one
Adjust the installation angle
to less than 30 degrees
Adjust volume to a desired level
Check wiring connection
Cool off until the ambient
temperature returns to normal
Clean the disc or try to play a
new one
Insert the compact disc with
the label facing upward
Remove the disc in the player
then put a new upward
Replace the fuse
The car ignition is not on. If the power supply is properly
connected to the car accessory
switch the ignition key to " ACC "
Solution
3 8
Disc cannot
be read
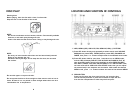
3. LCD (LIQUID CRYSTAL DISPLAY)
4. UP AND DN BUTTONS
1)In RADIO mode, press ^ or v button shortly and repeatedly to
manually tune up or down for the desired radio station with step by
step. Press ^ or v button hold for more than 0.5 seconds to
auto-matically tune up or down for the radio station of strong signal.
2)In CD mode, press ^ button to play next track. Press v button
once to play the current track from the beginning of the current
track, press v button twice continuously to play the last track.
Press ^ or v button hold to skip forward or backward.
5. AUTO-STORAGE/PRESET MEMORY SCAN BUTTON
In radio mode, press it to perform all stations memory for 5 seconds
each time, while memory digital and frequency will flash on LCD. If
the button is pressed for more than 2 seconds, it will seek station
on current band, then write to the preset memories. When the
auto-storage operation is completed, it will automatically perform
for 5 seconds each time. During the memory station performing,
press 1-6 digital buttons to select and stop scanning function.
6. BAND BUTTON
Press it repeatedly to select your desired radio band during RADIO
mode.
Press CLK button to display time on LCD, then press CLK button
hold until time flashes on LCD, thirdly press + or - button to adjust
HOUR or MINUTE.
8. SCAN BUTTON
Press it to scan up by one channel step with station detection. If a
valid signal has detected, the current frequency is blinked within 5
seconds, then press it again to stop scan and remain the current
frequency; otherwise, the unit continue to scan up by one channel
step with station detection 5 seconds later.
7. CLOCK BUTTON