


77
206-4235
Reference: Using the TV’s Zoning Features (Cont.)
Using the Wi-Fi Zoning Feature with Cloning Conguration
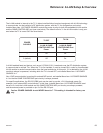
A location-specic Wi-Fi conguration / .tlx le may be saved (Learned) from an individual TV as part of a
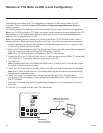
Master TV Setup and then be used during Teaching. First, the wireless network (i.e., the access point login
data) must be congured in the Master TV’s IP Environment Menu (see Wireless Network Connection” on
page 57). Then, a Wi-Fi Zone # must be set in the Master TV (see “Set the TV Zone # and/or Wi-Fi Zone #
in the TV” below). If desired, a TV Zone # may also be set in the Master TV.
For example, if the Wi-Fi Zone # is set to 4 and the TV Zone # is set to 5 before Learning is initiated, after
Learning is completed, the Master TV’s Installer Menu prole will be saved with the Zone 5 assignment, and
within that Installer Menu prole, the access point login data for wireless networking (i.e., SSID, security
type, and security key) will be saved with a Wi-Fi Zone 4 assignment. In order to congure the Target TVs
with the proper Installer Menu prole and access point login data, you must set both the TV Zone # and the
Wi-Fi Zone # in the Target TVs accordingly before transferring (Teaching) the Master TV Setup. See “Set the
TV Zone # and/or Wi-Fi Zone # in the TV” below. Also, see “Learning / Teaching a Master TV Setup using a
USB Memory Device / .tlx File” on pages 37 to 38 for additional information on the cloning processes. If the
Wi-Fi Zone # in the TV is set to 0 (default), the TV will not obtain access point login data from the Installer
Menu prole with which it is congured.
Set the TV Zone # and/or Wi-Fi Zone # in the TV
You can set the TV Zone # and/or the Wi-Fi Zone # in the EZ-Manager Wizard (see “EZ-Manager Wizard”
on pages 11 to 18) or, if the TV is in Pass-through Mode, via the TV’s setup menus as described below.
Note that the following procedure can only be performed while the TV is in Pass-through Mode. You will also
be able to specify a Label (North, South, East, West) and Room Number for this TV, if desired.
1. Turn ON the TV.
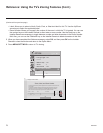
2. Press MENU SETTINGS on the Installer Remote, and use the arrow navigation keys to select/highlight
the OPTION menu option. Then, press OK.
3. Use the Up/Down arrows to select Zones & Room Number, and then press OK.
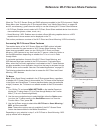
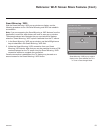
4. In the Zones, Label, and Room Number pop-up window, complete the appropriate elds as described
below. Use the Left/Right arrow keys on the Installer Remote to navigate between each of the elds.
• Wi-Fi Zone: Enables you to set a Wi-Fi Zone # so that the TV can be congured with a particular
access point’s login data for wireless networking. Login data (i.e., SSID, security type, and security
key) may be provided in a .tlx le to be used either for Teaching (cloning) or FTG Mode via CPU
conguration. If the Wi-Fi Zone # is set to 0, the TV will not be congured with login data from a .tlx
le.
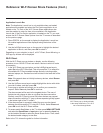
To assign a Wi-Fi Zone, navigate to the Wi-Fi Zone eld at the far left of the screen, and use the Up/
Down arrow keys to specify the desired Wi-Fi Zone # (1–99).
• TV Zone: Enables you to set a TV Zone # so that the TV can be congured with Installer Menu and/
or TV Setup Menu settings intended only for the assigned Zone. The Installer Menu and/or TV Setup
Menu settings may be provided in a .tlx le to be used either for Teaching (cloning) or FTG Mode via
CPU conguration. If the TV is being congured for FTG Mode via CPU, the TV Zone # setting also
allows the TV to omit channels that have been restricted in the FTG Channel Map.
To change the TV Zone, navigate to the TV Zone eld, and use the Up/Down arrow keys to specify
the desired TV Zone # (0–8).
(Continued on next page)