


7
CHAIN
Chain is to be kept clean and lubricated (See LUBRICATION,
page 9).Visually check chain every time hoist is used. Hoist
must not be operated when chain is twisted or kinked. An
important phase of hoist maintenance is chain inspection.
Check individual links and check for chain elongation.
1. Check the chain for overall wear or stretch by selecting an
unworn, unstretched length of chain (at the slack end for
example). Let the chain hang vertically with a light load
(about 20 pounds) on the chain to pull it taut. Use a large
caliper to measure the outside length of a convenient
number of links (about 12"). Measure the same number of
links in a used section of chain and calculate the percentage
increase in length of the worn chain.
2. If the length of the worn chain is more than 1½% longer than
the unused chain (0.015" per inch of chain measured), then
the chain should be replaced. If the chain is worn less than
1½%, check it at several more places along its length.If any
section is worn more than 1½%, the chain should be replaced.
Chain Replacement with Chain in Hoist
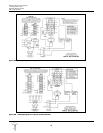
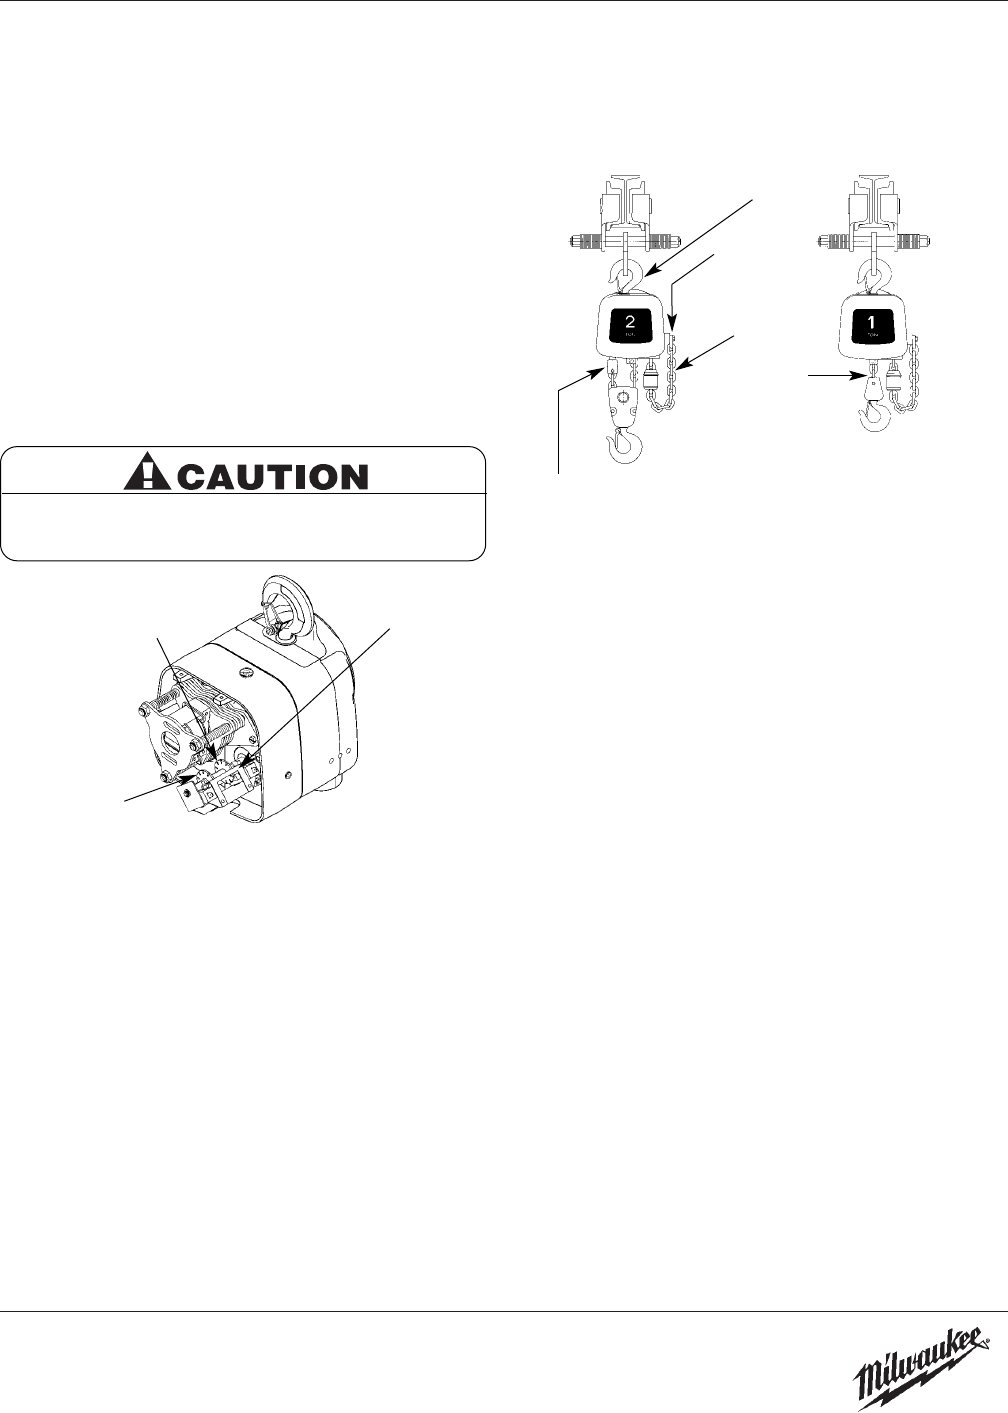
Refer to Figures 3 & 4.
1. Run hook up to its top limit.
2. DISCONNECT HOIST FROM POWER SUPPLY and
remove the electrical cover.
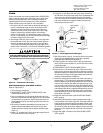
3. Using a screwdriver, pry the spring guide plate out of the
slots in the limit switch nuts (See Figure 3).Turn the slotted
nut nearest you, the gold nut, back to about the center of
the threaded screw. Do not disconnect the wires from the
limit switches.
4. Remove the load block assembly from the old chain. On
double-chained hoists detach the chain from the chain
support and pull it through the load block assembly (See
Figure 4).
5. Make a “C” shaped chain link by grinding through the end
link on the load end of the old chain.
6. Using the “C” link, attach the new chain to the load end of
the old chain. Be sure that the welds of the upstanding links
of the new chain will face outward from the load sheave.
The end links must be oriented for attachment to the dead-
end screw and the chain support (double-chained only)
without any twist in the chain.
7. With the electrical cover off, connect the hoist to the power
supply. Be sure that the green ground wire is properly
grounded (See INSTALLATION, page 4).
8. Carefully jog the “UP” button and run the joined pieces of
chain into the hoist until about 15" of the new chain comes
out the other side.
9. DISCONNECT HOIST FROM POWER SUPPLY.
10. Remove the “C” link and the old chain. Remove the chain
stop from the old chain by prying off its retaining ring with a
flathead screwdriver.If attached, remove the old chain from
the side of the hoist by removing the dead-end screw and
washers (note placement of washers).
11. Attach the chain stop to the slack end of the new chain by
capturing the 12
th
link with the two stop halves positioned
with their tapered ends pointing towards the hoist. Slide the
sleeve over the halves and attach the retaining ring. If you
are not using a chain container, attach the slack end of the
new chain to the side of the hoist using the dead-end screw
and washers.With factory supplied hardware there should
be six washers between the hoist and chain link and two
washers between the chain link and screw head. DO NOT
allow twists in the chain.
12. Adjust the lower limit switch (See ADJUSTING LOWER
LIMIT, page 8).
13. Attach the bottom block on single-chained hoists using a
new load block screw (See Figure 20).On double-chained
hoists, feed the chain through the load block (welds of the
upstanding links will be in towards the sheave) and fasten
the end of the chain to the chain support using a new chain
support pin (See Figure 20). Be sure there are no twists in
the chain.
14. Adjust the upper limit switch (See ADJUSTING UPPER
LIMIT, page 8).
Milwaukee Electric Tool Corporation
13135 West Lisbon Road
Brookfield, Wisconsin 53005
TEL: (800) 729-3878
Figure 3 — Limit Switch Assembly
Silver Nut
(Down)
Gold Nut
(Up)
Spring
Guide Plate
Single-chained
Hoist
Double-chained
Hoist
Chain Support
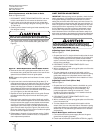
Figure 4 — Chain Replacement Diagram
TON TON
Dead-End
Screw
Slack End
Load End
The chain used on this hoist has very carefully
controlled dimensions and has been heat treated. Do
not attempt to substitute other manufacturer’s chain.
Note Position
of Hook