


E
N
G
L
I
S
H
CQ-DF501/DF301W
19
Installation Guide
E
N
G
L
I
S
H
9
CQ-DF501/DF301W
18
Remote Control Unit Preparation
E
N
G
L
I
S
H
10
1
1
1
1
1
1
1
1
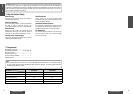
No. Item Diagram Q’ty
WARNING
This installation information is designed for experienced installers and is not in-
tended for non-technical individuals. It does not contain warnings or cautions of po-
tential dangers involved in attempting to install this product.
Any attempt to install this product in a motor car by anyone other than qualified in-
staller could cause damage to the electrical system and could result in serious per-
sonal injury or death.
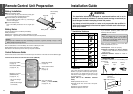
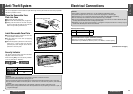
❐ Installation Hardware
If you encounter problems, please consult your
nearest professional installer.
6
7
8
Mounting collar
Hex. nut (5 mm·)
Rear support strap
Tapping screw
(5 mm·a16 mm)
Mounting bolt (5 mm·)
Power connector
Removable face plate
case
Trim plate
1
2
3
4
5
❐ Overview
12 V DC
Test bulb
Electrical
tape
Side-cut
pliers
❐ Required Tools
You’ll need a screwdriver, a 1.5 V AA battery, and
the following:
❐ Dashboard Specifications
Thickness
Min. 4.75 mm
Max. 5.56 mm
53 mm
182 mm
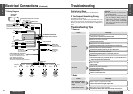
This product should be installed by a professional.
However, if you plan to install this product yourself,
your first step is to decide where to install it. The
instructions in these pages will guide you through
the remaining steps:
(Please refer to the “WARNING” statement
above.)
≥Identify and label the car wires.
≥Connect the car wires to the wires of the power
connector.
≥Install the unit in the dashboard.
≥Check the operation of the unit.
Caution:
≥This unit operates with a 12 V DC negative
ground auto battery system only. Do not at-
tempt to use it in any other system. Doing so
could cause serious damage.
Before you begin installation, look for the items
which are packed with your unit.
≥Warranty Card…Fill this out promptly.
≥Panasonic Servicenter for Service Directory
…Keep for future reference in case the product
needs servicing.
≥Installation Hardware…Needed for in-dash in-
stallation.
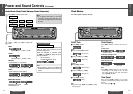
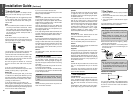
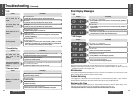
Battery Installation
1 Remove the battery holder.
Pull the holder by the position B while pushing posi-
tion A in the direction indicated by the arrow.
2 Install the battery on the battery holder.
Set a new battery properly with its (i) side facing up
as shown in the figure.
3 Insert the battery holder.
Push in the battery holder back into its original posi-
tion.
Battery Notes
Remove and dispose of an old battery immediately.
Battery Information:
≥Battery type: Panasonic lithium battery (CR2025) (included)
≥Battery life: Approximately 6 months with normal use (at room temperature)
Back side
Lithium battery
(included)
Battery holder Position A
Position B
≥Do not disassemble or short the battery. Do not throw a battery into a fire.
≥Keep batteries away from children to avoid the risk of accidents.
≥Be careful to the local disposal rules when you dispose of batteries.
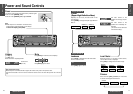
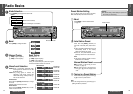
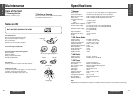
Control Reference Guide
Buttons of the remote control function in the same way as the controls on the main unit of the reference page.
Point the remote control unit at the main unit’s sensor (REMOTE).
Mute button (MUTE)
(➡ page 10)
Volume control buttons
(VOL " #)
(➡ page 10)
Tune, Track buttons
(TUNE % $, TRACK 65)
(➡ pages 14, 16)
Power button (PWR)
(➡ page 10)
Mode button (MODE)
(➡ pages 14, 16)
Caution:
≥Improper use of batteries may cause overheating, an explosion or ignition, resulting in injury or a fire.
Battery leakage may damage the unit.
PWR
MODE
PRG
TUNE
TRACK
Car Audio
BAND/DISC UP
VOL
MUTE
(ATT)
Band/Disc up* button
(BAND/DISC UP*)
(➡ pages 14, 17)
*Only for CD changer
control
(When the CD changer
is connected.)