


E
N
G
L
I
S
H
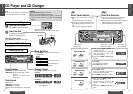
CQ-DF501/DF301W
23
E
N
G
L
I
S
H
13
CQ-DF501/DF301W
22
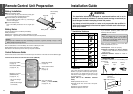
Installation Guide (Continued)
E
N
G
L
I
S
H
14
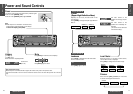
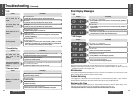
Remove the removable face plate.
1 Press [OPEN]. The removable face plate will
be opened.
2 Push the face plate to the left.
3 Pull it out toward you.
1
2
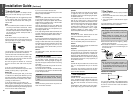
Remove the Unit
Lock lever
Lock lever
Screwdriver
8 Trim plate
REP
OSFET 45W
X
4
RANDOM
OPEN
PWR
Remove the trim plate 8 with a screwdriver.
Pull out the unit while pushing down the lock
lever with a screwdriver.
Remove the unit pulling with both hands.
1
2
3
4
1 Open
2 Push
3 Pull out
Contact
Main unit
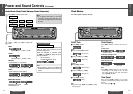
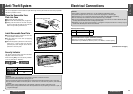
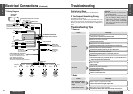
Switch off the power of the unit.
First complete the electrical connections, and
then check them for correctness. (➡ pages
25, 26)
6 Power connector
Lock lever (§)
Mounting tabs
5 Mounting bolt
❐ Installation Procedures
Insert mounting collar 1 into the dashboard, and
bend the mounting tabs out with a screwdriver.
Make sure that the lock lever (§) is flush with the
mounting collar 1 (not projecting outward).
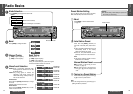
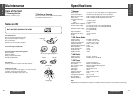
(a) Using the rear support strap 3
4 Tapping screw
(5 mm·a16 mm)
2 Hex. nut
(5 mm·)
3 Rear support
strap
5 Mounting bolt
(5 mm·)
1 Mounting collar
Fire wall of car
3 mm·
(b) Using the rubber cushion (option)
5 Mounting bolt
(5 mm·)
1 Mounting collar
Rear support bracket
(provided on the car)
Rubber cushion (option)
Lock lever (§)
1
Secure the rear of the unit.
After fixing mounting bolt
5
and power connector
6
, fix the rear of the unit to the car body by either
method (a) or (b) shown below.
Insert trim plate 8.
After installation, reconnect the negative - bat-
tery terminal.
2
3
4