


LX1250TI User Manual 10
No cables or power supply are shipped with this monitor, they are available as accessories for order
separately.
Electrical & SW Installation:
Prior to end unit installation verify display works with computing system.
1. Power up display:
a. Display requires 9-32V DC with a maximum of 1.88A
2. Test touch functionality. Connect cable to display and apply power.
3. Connect Display to a computer.
4. Display should auto sync to source signal. Ensure source meets supported display resolutions
(XGA, SVGA, VGA).
5. Connect USB touch screen to display.
a. If Windows PC, PC should auto detect and configure touch sensor as HID compliant
device.
6. Verify touch response and accuracy.
a. If Touch alignment is reversed install Touch calibration tools
NOTE: Touch screen is calibrated at factory. Some computer interfaces may require recalibration at
installation. Regular Calibration is not required.
7. Once monitor is verified working with PC proceed to mechanical installation.
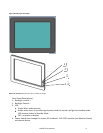
Mechanical Installation:
Display may be mounted in several configurations.
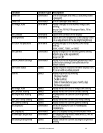
a) Panel mounting
b) VESA 100 or 75mm
c) RAM 34.5mm x 40mm Triangle mount.
If Vibration is a concern, consider mounting display using vibration dampening mount.
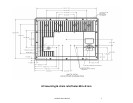
1 Choose mounting option & Location
2 Refer to dimensions figure for mounting holes and locations.
3 Attach display to mounting hardware.
4 Rout cable.
NOTE: GlenAir cable should be mounted with strain relief to avoid excessive loading or
torquing of the cable connectors. Improper cable installation will void warranty.