


7
8
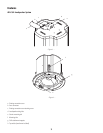
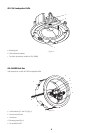
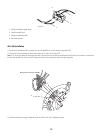
AD-C821 Installation
Tools and Parts Required for Installation
1. #2 Phillips head screwdriver
2. Torque driver
3. Wire stripping tool
4. Soldering equipment
5. Tool for cutting loudspeaker mounting hole in ceiling. Must be able to cut a circular hole through the ceiling without damaging the structural
integrity of the ceiling.
6. Small flat-tip screwdriver for securing wires in Euro-style connector.
7. Wire Clamp Fitting to install in the cover plate loudspeaker wiring hole to protect and stabilize the loudspeaker wires. This can be a standard
electrical conduit wire clamp, or something similar. The hole is 1.1" ( 28.3 mm).
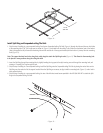
8. Cable for Seismic Support bracket. The cable must be:
a. Strong enough to support ten times the weight of the loudspeaker (15 lbs / 6.8 kg). Consult local building code requirements.
b. Long enough to reach from a structural part of the building, such as a beam, to just below the ceiling to provide enough room to attach it
to the Seismic Support bracket, prior to installing the loudspeaker.
c. Made of material that does not burn and is not easily cut. For example, a steel cable.
9. Fastener for attaching seismic support cable to a structural support of the building. The fastener must be strong enough to hold ten times the
weight of the loudspeaker system. Consult local building code requirements.
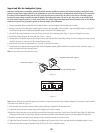
Installation
There are two methods for installing the AD-C821 loudspeaker system into the ceiling: using the Mounting Clamps with or without the Split Ring or
using the Suspended-ceiling Tile Rails with the Split Ring.
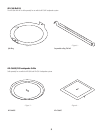
• The Split Ring with Suspended-ceiling Tile Rails is recommended for suspended ceilings with 24" (600 mm) wide panels. The support brackets,
along with the ceiling cross-supports, provide necessary support.
• The Mounting Clamps, with or without the Split Ring, are recommended for non-suspended ceilings that can support the weight of the AD-C821
Loudspeaker System without additional support.
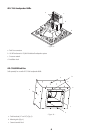
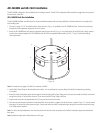
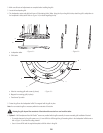
Cut Mounting Hole in Ceiling
The following steps are for any of the AD-C821 installation methods except where noted.
1. Make sure there is at least 12" (305 mm) clearance above the suspended ceiling at the spot where the AD-C821 is to be installed.
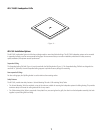
2. Use the outer edge of the Mounting Hole Template or the Split Ring inner edge as a pattern to mark the suspended-ceiling panel for the mounting
hole cutout. If you are not using Mounting Hole Template or Split Ring, the hole diameter should be 11.7" (297 mm).
3. Use a suitable tool to cut the mounting hole in the suspended-ceiling panel. While cutting the hole, be sure not to stress the mounting surface to
prevent cracking and weakening the structural integrity.
4. Insert the AD-C821 into the mounting hole to make sure the loudspeaker system fits properly. Remove the loudspeaker system.
5. Pull the facility’s loudspeaker signal wires through the mounting hole.