


7
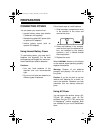
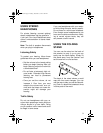
Follow these steps to power your receiv-
er from your vehicle’s battery power.
1. Set the adapter’s voltage switch to
3V.
2. Connect the Adaptaplug to the
adapter’s cord with TIP set to
+POS.
3. Insert the adapter's barrel plug into
the receiver’s
DC 3V
jack. This dis-
connects the internal batteries.
4. Plug the other end of the adapter
into your vehicle’s cigarette-lighter
socket.
SETTING THE TIME
The receiver has a dual time clock so
you can set the primary clock for your lo-
cal time and the secondary clock for an-
other time zone. You can select a 12- or
24-hour clock display format.
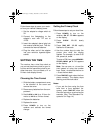
Choosing the Time Format
1. Slide the battery compartment cover
in the direction of the arrow and
remove the cover.
2. Remove any batteries from the com-
partment.
3. Set
CLOCK
to
12H
for a 12-hour for-
mat or to
24H
for a 24-hour format.
4. Replace the batteries.
5. Replace the cover.
6. Press
POWER
to turn on the
receiver and activate the format
change.
Setting the Primary Clock
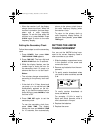
Follow these steps to set your local time.
1. Press
POWER
to turn on the
receiver.
FM 87.50 MHz appears
on the display.
2. Press
CLOCK
. 12:00 slowly
flashes.
3. Press
TIME SET
. 12:00 rapidly
flashes for 60 seconds.
4. Use the number keys to enter the
correct time while the display
flashes. For example, to enter 9:30
AM, press
9
,
3
, and
0
.
To enter a PM time, press
MEMORY/
STORE AM/PM
. pm 9:30 appears
on the display.
Note:
You can use
>
or
<
to set the
time instead of using the number
keys. Press
>
to advance the time or
<
to set the time back.
5. Press
TIME SET
again when the time
shows correctly. The display stops
flashing, and the clock starts.
Notes:
• If you set the time using the time
tone from a time standard fre-
quency, press
TIME SET
when the
time tone sounds to synchronize the
seconds. (See “Time Standard Fre-
quencies” on Page 14.)
20-226.fm Page 7 Tuesday, December 7, 1999 1:48 PM