


5. Linux Operating System
To execute X-Window, you need to make the X86Config file, which is a type of system setting file.
1. Press Enter at the first and the second screen after executing the X86Config file.
2. The third screen is for
setting your mouse
.
3. Set a mouse for your computer.
4. The next screen is for
selecting a keyboard
.
5. Set a Keyboard for your computer.
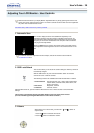
6. The next screen is for
setting your monitor
.
7. First of all, set a
horizontal frequency
for your monitor. (You can enter the frequency directly.)
8. Set a
vertical frequency
for your monitor. (You can enter the frequency directly.)
9. Enter the
model name of your monitor
. This information will not affect the actual execution of X-
Window.
10. You have
finished
setting up your monitor.
Execute
X-Window after setting other requested hardware.
4. Microsoft
®
Windows
®
NT 4.0 Operating System
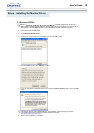
1. Click
Start
,
Settings
,
Control Panel
, and then double-click
Display
icon.
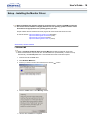
2. In Display Registration Information window, click Settings Tab and then click
All Display Modes
.
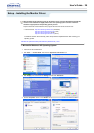
3. Select a mode that you wish to use (Resolution, Number of colors and Vertical frequency) and then
click
OK
.
4. Click
Apply
button if you see the screen working normally after clicking Test. If the screen is not
normal, change to a different mode (lower mode of resolution, colors or frequency).
If there is no Mode at
All Display Modes
, select the level of resolution and vertical frequency by
referring to the Preset Display Modes in the user guide.
3. Microsoft
®
Windows
®
Millennium Operating System
1. Click "
Start
" , "
Setting
" , "
Control Panel
".
2. Double click "
Display
" icon.
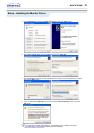
3. Select the "
Settings
" tab and click "
Advanced Properties
" button.
4. Select the "
Monitor
" tab.
5. Click the "
Change
" button in the "
Monitor Type
" area.
6. Choose "
Specify the location of the driver
".
7. Choose "
Display a list of all the driver in a specific location..
" then click "
Next
" button.
8. Click the "
Have Disk
" button
9. Specify A:\(D:\driver) then click "
OK
" button.
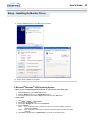
10. Select
"Show all devices"
and choose the monitor that corresponds to the one you connected to
your computer and click
"NEXT"
. Click
"NEXT"
again and
"FINISH"
to complete installation.
11. Continue choosing
"CLOSE"
button and
"OK"
button until you close the Display Properties
dialogue box.
(You may get a screen with a warning or other message, just click the appropriate option for your
monitor.)
6. Choose "
Display a list of the known drivers for this device so that I can choose a specific
driver
" then click "
Next
" and then click "
Have disk
".
7. Click the "
Browse
" button then choose A:(D:\Driver).
8. Click the "
Open
" button, then click "
OK
" button.
9. Choose your monitor model and click the "
Next
" button then click "
Next
" button.
10. Click the "
Finish
" button then the "
Close
" button.
If you can see the "
Digital Signature Not Found
" window then click the "
Yes
"button. And
click the "
Finish
" button then the "
Close
" button.
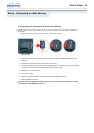
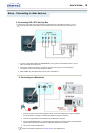
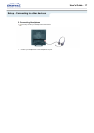
Setup - Installing the Monitor Driver
User's Guide T 23