


13
MZ-E707
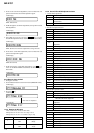
5-4-3. Vl PWM Duty adjustment method
1. Set the Manual mode and set the item No. to 764.
LCD display
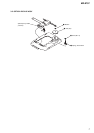
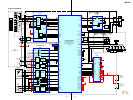
2. Connect a digital voltmeter to TP917 (VL) on the main board
and adjust + key (Voltage up) and – key (Voltage down) on
the remote control.
Adjustment value:2.23V
Standard value:2.22 to 2.235V
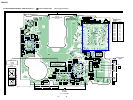
MAIN BOARD (SIDE A)
3. Press X key to write the adjustment value.
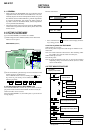
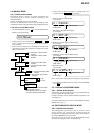
5-5. OVERALL ADJUSTMENT MODE
5-5-1. Overall adjustment mode structure
Note: The overall adjustments should be always performed in the
sequence of CD t MO adjustments.
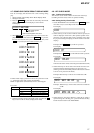
5-5-2. Overall CD and MO adjustment method
1. Set the TEST MODE and press – key to set the Overall Ad-
justment mode.
LCD display
2. Insert CD disc in the set, and press . key to set the Overall
CD Adjustment mode.
Automatic adjustments are made.
LCD display
XXX: Item No. for which an adjustment is being executed.
764 VlPWM XX
000 Assy11
030 Ofst**
030 OfstOK
TEST MODE
(Display Check Mode)
Overall Adjustment
Title Display(ASSY**)
CD overall
Adjustment
.
key
VOLUME – key
key
x
MO overall
Adjustment
> N
key
> N
key
key
x
Electrical offset
Adjustment key
DISPLAY key
key
x
key
x
Power Supply
Adjustment
PLAY MODE key
XXX CD RUN
000 Assy11
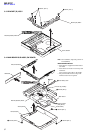
D901
D902
C903
C901
L902
TP917
(VL)
digital voltmeter
TP917
(VL)
5-4-4.Electrical offset adjustment method
Note: Doing adjustment by the state that a disc does not enter.
1. Confirm the power voltage is 1.5V.
2. Set to the test mode.
3. Press the – key activates the overall adjustment mode.
LCD display
4. Press the DISPLAY key.
LCD display
5. If result of electrical offset adjustment is OK,the following dis-
play appears.
LCD display