


Instruction Manual
8
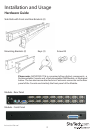
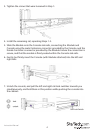
Connecting computers to the module
Attach each of your managed computers to your StarView KVM console’s PC ports
using ultra-thin KVM cables. The Module is capable of using either 2-in-1 USB or 3-in-1
PS/2 cables. Use the cables to connect one of the PC ports on the back of the switch to
the computer’s keyboard, mouse, and video ports. Note: These instructions are for a
single KVM switch only.
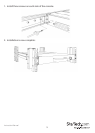
Following this, plug the 12V DC power adapter into the power port on the KVM
module, and turn on the computers that will be controlled by the console.
Please Note: After the initial power up, you can hot-plug additional computers or
slave KVM switches without having to power down your KVM.
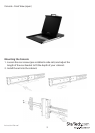
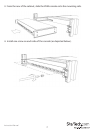
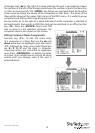
Cascade Conguration
You can connect a second level of KVMs to one or more of your Master KVM console’s
PC ports. The KVM switches connected to the Master console are known as Slaves.
Once connected, the KVM switches will automatically congure themselves as either
Masters or Slaves.You can only connect an equal or “smaller” KVM to the Master KVM.
For example, a 16-port Master KVM switch can have both 16-port and 8-port slaves. An
8-port Master KVM switch can only have 8-port (or fewer) KVM slaves.
The 16-port KVM can support 136 computers, with 8 16-port Slave KVMs, each
connected to 16 computers. The Slave KVM’s must be connected to the 1~8 ports, not
the A~H ports.
To cascade your KVMs, use a 3-in-1 PS/2 KVM cable to connect one of your Master
switch’s PC ports to the Slave switch’s console ports. When turning on your cascaded
switches, turn on the Master switch before turning on any of the others.