


pg. 4 of 12 AM16629-1 Rev. C
Tools Required
• An electrical drill, drill bits 1/4”(6 mm))
• Taps-1/4-20 and #6-32 (M6 and M3).
• Common hand tools.
Reference
• QL 420 User’s Guide
• The RCLI-DC Mobile Charger Installation Guide
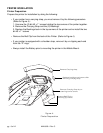
Contents of the Package
• The Mobile Mount Bracket Assembly
• The Lift Truck Mounting Bracket
• The Fanfold Bin
•A plastic bag containing mounting hardware, and the Fanfold Spacer
• This Guide
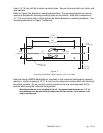
INTRODUCTION TO INSTALLATION
The MMQ4 Mobile Mount allows you to mount a QL 420 printer into virtually any vehicle.
The RCLI Mobile Charger (supplied separately from this kit) can provide a source of power
to run and charge the printer’s battery from the vehicle’s electrical system.
Installation of the Mobile Charger is covered in the RCLI-DC Mobile Charger Installation
Guide supplied with each charger.
In all installations, the power cable is wired to the vehicle’s battery power system indirectly
through a power take-off point.
CAUTION: Under no circumstances should the equipment be attached directly to
the vehicle’s battery or an AC power sourcewithout a proper fuse.
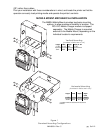
Since each situation or equipment type may pose unique requirements, mounting hardware
selection and mechanical installation shall be the responsibility of the installer. Zebra
recommends using self-locking (ESN) nuts, bolts, and/or lock washers for installing the
mount. The mount is pre- drilled for 1/4” (M6) hardware.
NOTE: Hardware used to secure the Mobile Mount to the vehicle is not supplied in
the kit. Recommended fasteners are 1/4” (6 mm) diameter hex head or socket
head bolts with flat washers, lock washers, nuts and/or locking nuts.
Your tasks are to:
• Mechanically install the MMQ4 Mobile Mount
• Install the Mobile Charger (if used in this installation) according to the RCLI-DC
Mobile Charger Installation Guide
• Connect the Data I/O cable from the data terminal (if used) and the output cable
from the Mobile charger.
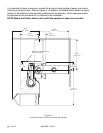
Decide where you will mount the printer, then proceed with the following instructions.
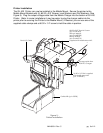
Installing a Terminal
You most likely will be installing a terminal at the same time. Follow the terminal
manufacturer’s instructions for installing his unit. The printer and terminal usually are linked
together with a data cable which typically is no longer than six (6) feet (183 cm).
Some installations may require the terminal and printer to communicate via radio frequency