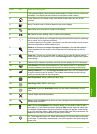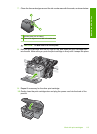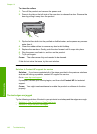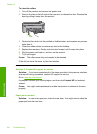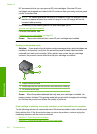
3. Press the down arrow button to highlight Paper Type, and then press OK.
4. Press the down arrow button until the appropriate paper type appears, and then press
OK.
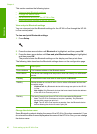
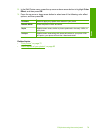
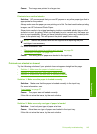
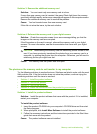
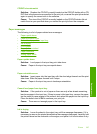
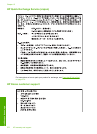
Refer to the following table to determine which paper type setting to choose based
on the paper loaded in the input tray.
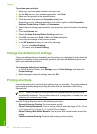
Paper type Control panel setting
Copier paper or letterhead Plain Paper
HP Bright White Paper Plain Paper
HP Premium Plus Photo Paper, Glossy Premium Photo
HP Premium Plus Photo Paper, Matte Premium Photo
HP Premium Plus 10 x 15 cm (4 x 6 inch)
Photo Paper
Premium Photo
HP Photo Paper Photo Paper
HP Everyday Photo Paper Everyday Photo
HP Everyday Photo Paper, Semi Gloss Everyday Matte
HP Premium Paper Premium Inkjet
Other inkjet paper Premium Inkjet
HP Professional Brochure & Flyer Paper
(Glossy)
Brochure Glossy
HP Professional Brochure & Flyer Paper
(Matte)
Brochure Matte
HP Premium or Premium Plus Inkjet
Transparency Film
Transparency
Other transparency film Transparency
Plain Hagaki Plain Paper
Glossy Hagaki Premium Photo
L (Japan only) Premium Photo
Advanced Photo Paper Advanced Photo
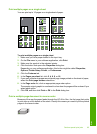
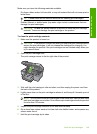
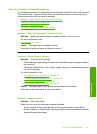
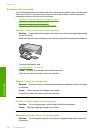
Change copy speed or quality
The HP All-in-One provides three options that affect copy speed and quality:
• Best produces high quality for all paper and eliminates the banding (striping) effect
that sometimes occurs in solid areas. Best copies slower than the Normal or Fast
quality settings.
• Normal delivers high quality and is the recommended setting for most of your
copying. Normal copies faster than Best and is the default setting.
• Fast copies faster than the Normal setting. The text is comparable to the quality of
the Normal setting, but the graphics might be lower quality. The Fast setting uses
less ink and extends the life of your ink cartridges.
Chapter 10
88 Use the copy features
Copy