


1/2
Service Technical Information
MODEL NO.
TV SE141 K,EH−
/SE211 K,EH
SUBJECT
No power(Notes on replacing EEPROM) REF.No. :G A0 089 E1−− −
DATE :30. JAN. 2001
REVISION : Additional description in Countermeasure
<CONTENTS>
Take the following measures with regard to complaints that the power shuts off or cannot be
turned on in relation to the model above.
<COUNTERMEASURE>
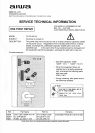
1. Check the condition of the TV set (whether it is in the protection mode against a power supply
error) by the following steps a e.∼
a. Check that the power cannot be turned on from either the power button on the TV set or the
remote controller (stand-by: a red LED goes on).
b. Press the "TEST" key on the jig remote controller to see if the power comes on (if it does not
come on, the microprocessor may be broken).
If the protection function is on during power supply error detection, pressing the "TEST" key
makes the LED flash in green and an AGING display is shown.
Pressing the keys on the remote controller in the following order instead of pressing the
"TEST" key will also bring up the AGING display.
"ENTER" "AV MODE" "SLEEP" "MENU" "POWER"
c. Once the AGING display is shown, press the "TEST" key to erase the AGING display and
disconnect the power supply cord.
If you have had no problem in operation up to this point, there is no problem with the∗
microprocessor and the EEPROM.
d. Connect the power supply cord.
Check that the power is turned on by pressing the "Power" button on the TV set / remote
controller (complete the procedure by performing steps 2 and 3 below).
e. If the TV-set is still in stand-by status, the protection function is on during detecting an error,
so check if there is a problem with the power supply system.
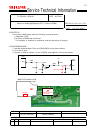
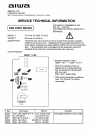
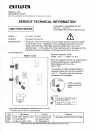
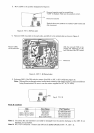
2. Check the R617 resistance (when the resistance is excessive or OPEN, a power supply error is
detected).
SerialWhen R617 is 1/8 W, change it to 1/4 W (this has already been changed for models with
or later).No.S 0C∗∗∗∗ ∗∗∗∗∗
When replacing the EEPROM (IC3), refer to the "Description" in the table below to select an∗
appropriate EEPROM. Different models/specifications require different EEPROMs.
Refer to the NOTE below.
NOTE
Turning on the power after replacing EEPROM activates data writing between
microcomputer and EEPROM. (The writing takes approximately 1 minute.)
After completion of data writing, power is automatically turned on.(Do not disconnect the AC
cable while data is being written.)
After replacing EEPROM, readjust and verify electrical adjustment to the service manual.
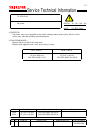
Ref. Parts Code Description Remarks
−−− − −R617 88 130 394 080 RES,390K 1/4W J
−−− −D9 87 A40 235 080 ZENER,MTZJ9.1C
−−− − − −IC3 SV T00 102 010 IC,SLA24C04 D(TV SE211 K)
−−− − − −IC3 SV T00 103 010 IC,SLA24C04 D(TV SE141 K)
−−− − − −IC3 SV T00 104 010 IC,SLA24C04 D(TV SE211 EH)
−−− − − −IC3 SV T00 105 010 IC,SLA24C04 D(TV SE141 EH)
G R Code No. Access Code Modified Ser. No. Parts Schedule
−− − − − −