


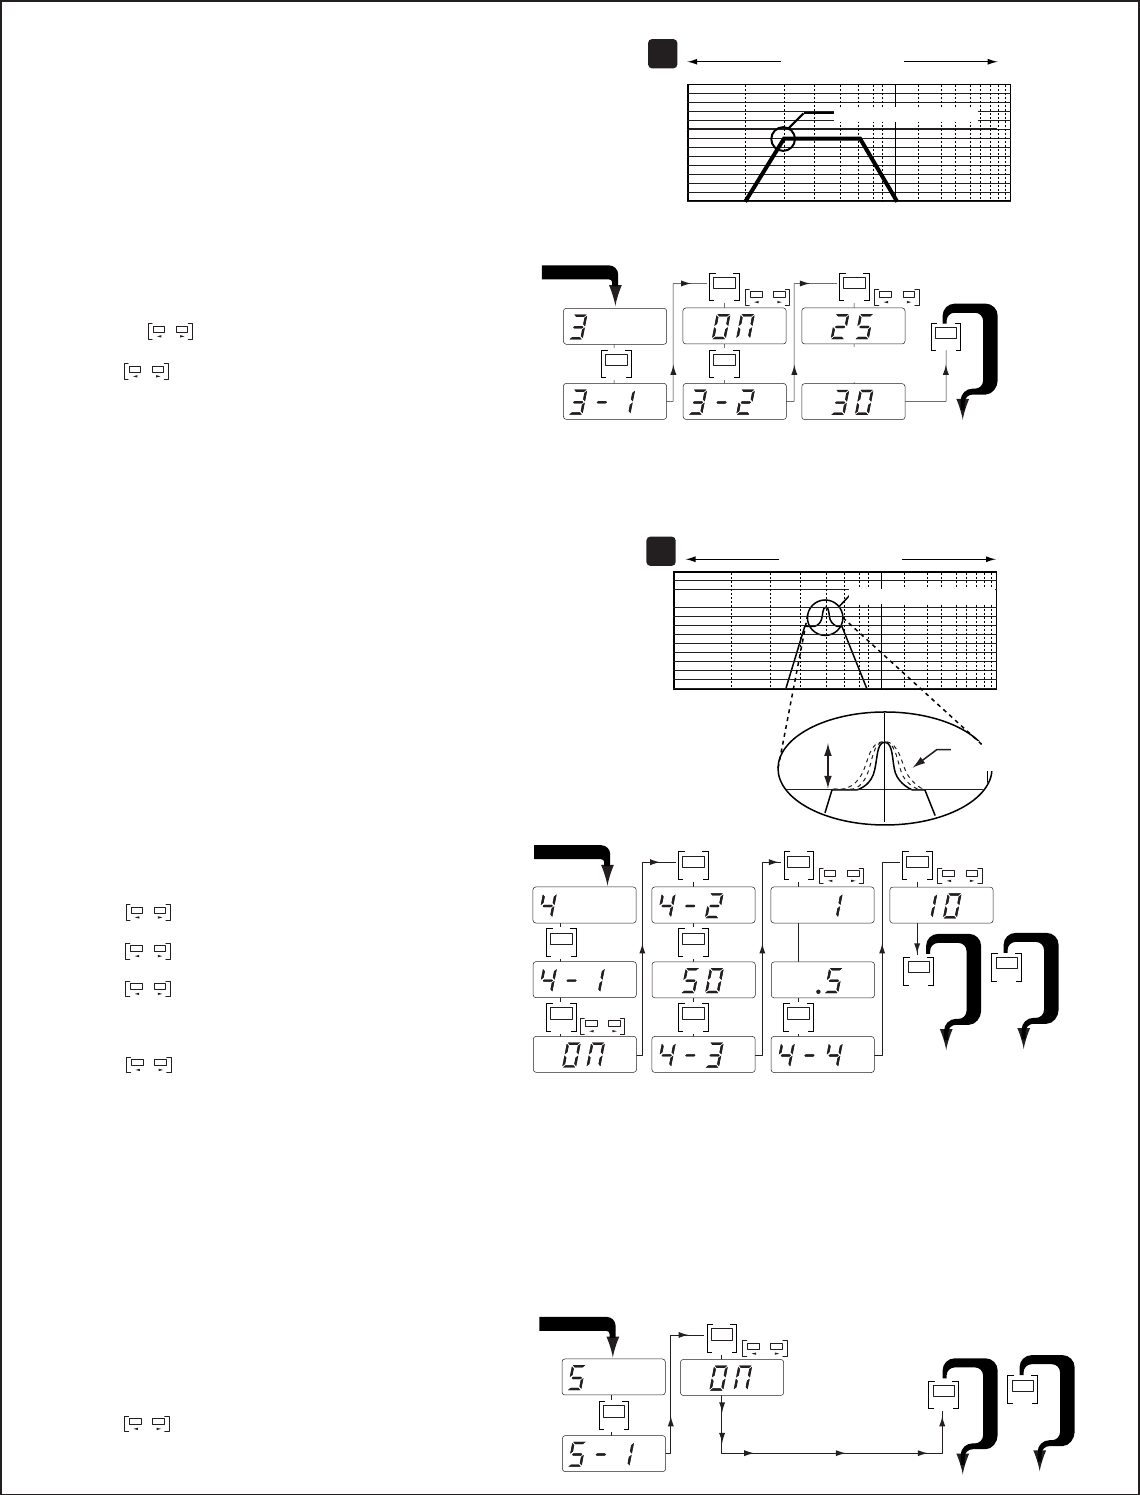
STEP 5. (5) BASS COMP. (Bass Compensation)
Digital Bass Compensation utilizes Alpine's exclusive
MediaXpander
TM
processing technology to enhance bass definition
and output. This is an especially useful feature in restoring bass
quality lost with compressed media such as MP3's.
• You should be in mode "5" (BASS COMP.) now
from the previous step.
• Push "ENT" and push "ENT" again to select "5-1" (ON/OFF).
• Toggle to "ON".
• Press "MODE" to advance to step 6 or "DISP" to exit.
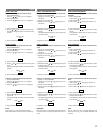
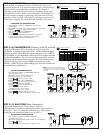
SETTING BASS COMPENSATION
Mode
T
O
S
T
E
P
6
Toggle
ENT
ENT
START HERE
T
O
E
X
I
T
DISP
OR
5
Lower Frequency (LP) Higher Frequency
0dB
10 50 100 500 1K 5K 10K 20K20Hz
50Hz Sample Adjustment
2
Lower Frequency (LP) Higher Frequency
3
Level
Variable Width
Adjustment
NOTE: When adjusting the selected frequency's
width setting, "0.5 or 1" will represent a "WIDE"
band width and "5" will represent a "NARROW"
bandwidth.
0dB
20 30 40 60 100K 1000K10Hz
50Hz Sample Adjustment
dB
Hz
MODE
Toggle
Toggle
OR
For MRD-M300
For MRD-M500
ENTENT
ENT ENT
Toggle
ENT
ENT ENT ENT
• You should be in mode "4" (PARAMETRIC EQ) now
from the previous step.
• Push "ENT" to enter the adjustment menu.
• Push "ENT" to enter "4-1" (ON/OFF).
• Toggle to "ON" and push "ENT"
• Push "ENT" to enter "4-2". (FREQUENCY)
• Toggle to desired freq. and push "ENT".
• Push "ENT" to enter "4-3". (WIDTH)
• Toggle to attain the desired width
(note: a lower Q Value= Wider,
a higher Q value = more narrow)
• Push "ENT" to enter "4-4". (LEVEL
• Toggle to desired level (boost or cut)
• Press "MODE" to advance to step 5 or "DISP" to exit.
SETTING THE PARAMETRIC EQ
START HERE
T
O
S
T
E
P
5
T
O
E
X
I
T
DISP
OR
STEP 4. (4) PARAMETRIC EQ (Frequency, Width (Q), and Level)
Using the Parametric EQ is a good way to fine tune your
subwoofer or adjust for personal taste. Unlike traditional bass
boost or graphic EQ's, both the center frequency and width of
the EQ band is user selectable, allowing it to be custom tailored
for the desired effect. As you can see in example [3], with the
subsonic and low pass filters engaged, you can enhance your
sound by focusing on a high energy bass response in the
vehicle. When set to its widest setting, this can also function as
an overall gain adjustment.
• You should be in mode "3" (SUBSONIC) now from the
previous step.
• Push "ENT" to enter "3". Push "ENT" to enter "3-1" (ON/OFF).
• Toggle to "ON" setting and push "ENT".
• Push "ENT" to enter "3-2" (FREQUENCY).
• Toggle to desired frequency.
• Typical settings include 25Hz for sealed box, and 30Hz
or higher for ported box. (depending on tuning freq.)
• Press "MODE" to advance to step 4 below.
ADJUSTING THE SUBSONIC FILTER
Toggle Toggle
MODE
OR
ENTENT
Hz
ENT ENT
Hz
For Sealed
For Ported
START HERE
T
O
S
T
E
P
4
STEP 3. (3) SUBSONIC (Subsonic Filter)
Subsonic filters are commonly used to minimize over excursion at
very low frequencies, or to optimize output power by only amplifying
frequencies that can be effectively reproduced. This feature is
essentially a high pass filter with a very low frequency range, and is
selectable from 15Hz to 50Hz in 5Hz increments. Please make sure
that the frequency selected is significantly lower than that of the low
pass filter, unless you have a very specific performance goal in mind.
To the right is example [2], which illustrates the effect of a subsonic
Lower Frequency (LPF) Higher Frequency
2
0dB
20 30 40 60 100K 1000K10Hz
30Hz Sample Adjustment
To find out more, visit www.alpinetechcenter.com