


To find out more, visit www.alpinetechcenter.com
STEP 6. (6) TIME CORR. (Time Correction)
Due to the wide variety of installation and system design possibilities available, bass performance may not always
be optimized as a result of speaker placement relative to the listening position. Sound waves may not reach the
listener's ear at the same time as other speakers, especially in a multiple subwoofer configuration. Such differences
in phase can result in muddy (unclear) bass or even a complete cancellation in the frequency response. Therefore,
both the MRD-M300 and MRD-M500 are equipped with Digital Time Correction, making it possible to realign
subwoofer(s) in time. Proper use of this function will result in clear, powerful bass with a smooth transition to the
other speakers in the system. It is recommended to use the calculation formula provided in the owner's manual as a
starting point for this adjustment.
STEP 7. (7) PHASE
Phase control allows you to flip the polarity of the subwoofer without actually reversing the physical connections.
This convenient feature is useful when the subwoofer is in a position that could result in some cancellation, causing
diffused, unclear bass. It is recommended to try both settings (0°/180°) to determine which is best for your
particular system.
STEP 8. (8) AMP SET (Amplifier ID No. /Turn-On Delay)
The Amp Set menu performs two functions. Firstly, by setting the amplifier ID number (1-8), it allows the optional
RACC (RUX-4280 Remote Amplifier Control Center) to identify each amplifier individually and in a specific order.
Secondly, it provides a variable turn-on delay that can be used to minimize inrush current in large multi-amp
systems, or to eliminate any turn-on “pop”.
STEP 0. (0) MEMORY
Memory Mode allows you to store all amplifier settings in an auxiliary backup memory. Once stored, additional
tweaks or adjustments can be made while retaining the ability to recall the original settings at a later time. Note:
This is simply a convenience feature, since all settings are saved in real time as adjustments are made, and will
remain even if power is lost during setup.
STEP 9. (9) SAFE MODE (Output Disable)
SAFE MODE provides a simple way to safely adjust the all DSP functions with the amplification circuit turned off,
eliminating the possibility of speaker damage during setup. When SAFE MODE is set to “ON”, it literally shuts
down the high current draw output stage of the amplifier, and is essentially an “output disable” function. This is
the only amplifier function that does not engage/disengage in real time, but requires the remote lead to be cycled
off/on. Therefore, if it is accidentally set to “ON” during programming, there will be no output the next time the
amplifier is activated. Additional uses include: bench setup with very small or low current DC supply, amp valet,
and system troubleshooting.
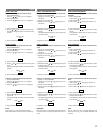
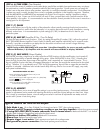
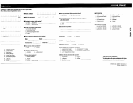
DISP
Toggle
ENT
ENT
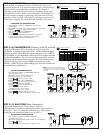
• Press and depress the "MODE" button until you are
in mode "9" (SAFE MODE).
• Push "ENT" and push "ENT" again to select "9-1" (ON/OFF).
• Toggle until "OFF" is displayed.
• Push "DISP" to exit.
Note: This setting will not take effect until the amp is
turned off and then on again.
SETTING SAFE MODE TO "OFF"
START HERE
F
I
N
I
S
H
1) Safe Mode is on: Go to Step 9 (Mode 9 on the amp) and set to “OFF”, then cycle amp power.
2) Subsonic and LPF frequency selections overlap or are too close together: Adjust the crossover properly
3) If using RUX-4280 (RACC) remote subwoofer level is turned down : Make sure the RACC is in normal
display mode (voltage or temperature) and adjust the level control.
4) Defective or broken RCA cables): Replace RCA connectors
5) Blown fuse: Replace Fuse with proper value
6) Remote trigger is not active: Check remote turn-on lead with a voltage meter
7) Bad ground or power connection: Check and replace ground connector
Typical causes for little or no output
NOTE: If using a RUX-4280 (RACC) with more than 1 AccuClass-D amplifier, be sure to set each amplifier with a
different ID Number (1-8). Amplifiers with the same ID will cause the RACC to display "NO AMP."