


18
CD/DVD CHANGER CONTROL
When a CD or DVD changer is connected to this unit with the 8 pin DIN cable, AV3 mode
will change to DISC CHANGER mode and the DISC CHANGER control menu is displayed
on the screen.
1. Press the MODE button to select DISC CHANGER (AV3) mode. Each time you press
this button, the display changes as follows.
RADIO -> AV1 -> AV2 -> AV3 (CD or DVD CHANGER) -> AV4 (TV)
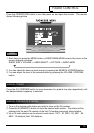
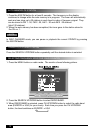
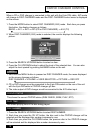
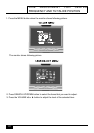
2. When DISC CHANGER (AV3) mode is selected, the monitor displays the following
picture.
CD/DVD STATUS
This shows the current CD/DVD status (DISK CHECK, SEEK, PLAY, ETC)
PLAY TIME
This shows playing time of the disc being played.
NOTE
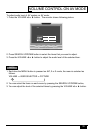
3. Press the SEARCH UP/DOWN button to select an item.
4. Press the CH UP/DOWN button to adjust the level of the selected item. You can also
adjust the level upward by pushing the BAND button on the unit.
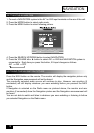
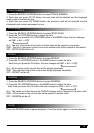
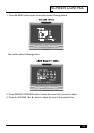
1. Each time the MENU button is pressed on DISC CHANGER mode, the menu displayed
on the screen changes as follows.
DISC CHANGER -> VOLUME -> USER SELECTOR -> PICTURE -> OSD OFF
2. CD or DVD changer must be connected to the 8 pin DIN socket on the rear of the unit
with the 8 pin DIN cable in CD/DVD changer gift box.
3. The video output of DVD changer much be connected to the AV3 video input.
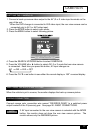
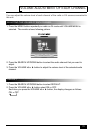
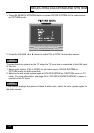
DISC NUMBER
1. Press the SEARCH UP/DOWN button to select DISC NUMBER.
2. Each time you press the CH UP button, the disc next in the CD/DVD changer will be
selected and the displayed disc number increases by one.
3. Each time you press the CH DOWN button, the previous disc in the CD/DVD changer
will be selected and the displayed disc number decreases by one.