


7
© 2002 Directed Electronics, Inc.
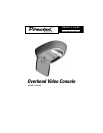
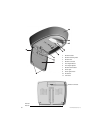
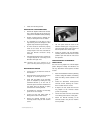
MONITOR OPERATION
OPEN/CLOSE THE MONITOR DOOR
■■
To Open - Press the monitor door release
button (7); the monitor door will lower
into the viewing position.
■■
To Close - Place your hand on the bottom
center of the monitor door (3) and push it
upward into the video console until a click
is heard.
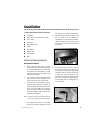
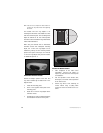
INSTALLING THE MONITOR
■
Open the monitor door to the viewing
position.
■
Hold the monitor with the top tilted away
from the monitor door, and then place the
bottom of the monitor into the two mount-
ing hooks at the bottom of th monitor door.
■
Push the top of the monitor toward the
monitor door until a distinctive click is
heard. the wiring connector at the rear of
the monitor is self guiding and will auto-
matically complete the connection.
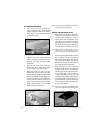
REMOVING THE MONITOR
■
With the monitor door in the viewing
position, press the monitor release button
(1). At the same time, gently tilt the top of
the monitor away from the monitor door
then lift the monitor up and out of the
mounting hooks.
ADJUSTING THE VIEWING ANGLE
The viewing angle can be adjusted by sliding the
view angle adjuster from side to side.
■
Open the monitor door to its current
viewing angle.
■
Pull the bottom of the monitor door
toward the rear of the car and slide the
view angle adjuster all the way to the left,
then release the monitor door. The monitor
should now be at its maximum view angle.
■
Pull on the monitor door until it reaches
the desired view angle and hold it.
■
While still holding the monitor door, slide
the view angle adjuster to the right until
it stops. This will set the monitor door at
the desired view angle.
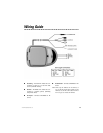
HP050 WIRELESS HEADPHONES
OPERATION
■
The headphones automatically turn on
when placed on your head.
■
Adjust the volume to the desired level
using the volume dial.
■
The headphones must be in line of sight of
the IR lens (10) on the OHC100 to receive
an audio signal.
BATTERY REPLACEMENT
Remove the slide door on the inside of the head-
phones to access the batteries. Replace with
standard AAA batteries making sure the batter-
ies are inserted according to the polarity marked
on inside of the headphone case.
DOME LIGHT OPERATION
If the OHC100 has a built-in dome light (8) that
can be used if the factory dome light must be
removed to accommodate the installation. The
built-in dome light has a three-position switch
(9) - OFF, DOOR, and ON.
Basic Operation