


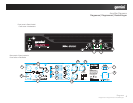

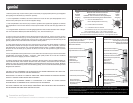


bridge operation. Always make sure that this switch is
in the correct position and that all speaker connections
have been made correctly for the mode of operation you
wishtousebeforepoweringuptheamplier.
LEDdemodopuente:elLEDpuente(17)seiluminará
cuando haya seleccionado en la parte trasera del panel
el selector de modo de operación (11) para operación
monopuente.Asegúresesiempredequeésteinterruptor
estáenlaposicióncorrectayquetodaslasconexiones
de altavoces se han hecho correctamente en el modo de
operaciónquedeseautilizarantesdeencenderelampli-
cador.
LED bridge:la LEDbridge (17) s’allumerauniquement
si vous avez positionné le commutateur de mode de
fonctionnement (11) sur bridge. Toujours vérier que
la position de ce commutateur soit compatible avec le
nombred’enceintes etleurconnexionavant demettre
l’amplicateursoustension.
Bridge LED:Die LED“Bridge” (17)leuchtet, wenn Sie
den Moduswahlschalter (11) auf der Rückseite auf “mono
ridge” (mono gebrückt) geschaltet haben. Prüfen Sie
stetsdiekorrekteStellungdiesesSchaltersunddiejew-
eilige Anschlussweise Ihrer Lautsprecher bevor Sie den
Verstärkereinschalten.
SignalLED:thesignalLED(18)foreachchannelshow
when a signal is present.
LEDde Señal: ElLEDdeSeñal (18)paracada canal
muestraunaseñalcuandoestápresente.
LEDsignal:laLEDsignal(18)dechaquecanals’allume
enprésenced’unsignalaudio.
SignalLED:DieSignal-LED(18)zeigtfürjedenKanalan,
ob ein Signal anliegt.
ClipLED:theamplierhastrueclipLED(19)tohelpyou
properlycontroltheamplier’s outputandachieveun-
distorted sound. The clip LED (19) for each channel light
when your signal level is so strong that the distortion
reaches 1% THD. The clip LED (19) should not remain
constantlyonorashrepeatedlyduringoperation.For
clean sound reproduction, the clip LED (19) should only
light occasionally for an instant. If the LED remains on
orashesrepeatedly,youwillheardistortedsoundthat
can be damaging to your speaker systems. If this oc-
curs, reduce the signal level by lowering the input level
control for the channel that is clipping or reduce the level
at the source. If the clip LED (19) lights when no signal is
present, it may indicate a DC level on the output which
may cause damage to speakers (the DC level will not be
audible). Please note that when you are using the ampli-
erinthemonobridgemode,bothclipLED(19)ofthe
bridged channels will operate simultaneously.
LEDdeClip:elamplicadortieneunLEDdeClip(19)
para ayudarle a controlar adecuadamente la salida del
sonido del amplicador y lograr un sonido sin distor-
siones. El LED de Clip (19) para cada canal se ilumina
cuandoelniveldeseñalestanfuertequeladistorsiónal-
canza el 1% THD. El LED de Clip (19) no debe permanec-
er encendido o parpadeando durante el funcionamiento.
Para una reproducción clara del sonido, el LED de Clip
(19) sólo debe iluminarse ocasionalmente un instante. Si
el LED permanece encendido o parpadeando repetida-
mente,oiráelsonidodistorsionadoyesopuededañarsu
sistema de altavoces. Si eso ocurre, reduzca el nivel de
señal reduciendo el control de entrada de nivel del canal
saturadooreducirelniveldelafuentedelamplicador.
SielLEDdeClip(19)seiluminacuandolaseñalnoestá
presente,puedeindicarqueelniveldesalidadedeci-
belios puede dañar los altavoces (el nivel de decibelios
noseráaudible).Porfavor,tengaencuentaquecuando
utilice el amplicador en modo mono puente, ambos
LEDdeClip(19)deloscanalespuentefuncionaránsi-
multáneamente.
LEDclip:l’amplicateurpossède2LEDstémoinsdesatu-
ration/surcharge(Clip)permettantuncontrôleinstantané
delaqualitéaudio.Celles-cipréviennentdel’apparition
de distorsion & permettent de garantir un signal audio en
sortiedequalitéoptimale.LesLEDsdeclip(19)clignoter-
ontlorsqueleniveaudedistorsionatteindra1%(Distor-
sionharmoniquetotale).LesLEDsdeclip(19)nedoivent
jamaisresterconstammentallumées.Pourunereproduc-
tionaudiodequalité,cesLEDsnedoiventclignoterque
defaçonoccasionnelle.SilesLEDsrestentalluméescon-
stammentouclignotentdefaçonrépétée,vousrisquez
d’endommagervosenceintes.Sitelestlecas,baissezle
niveaud’entréeàl’aidedespotentiomètresrotatifssitués
enfaceavantouréduisezleniveausurvotreconsolede
mixage.SilesLEDsdeclip(19)s’allumentenl’absence
designalaudio,celapeutsignierlaprésencedecou-
rantcontinu(DC)dansl’installationquiconduiraitàune
détériorationdesenceintes(ATTENTION:laprésencede
courantcontinu n’estpasdétectable àl’écoute).Vous
noterez,qu’enmodebridge,lesLEDsdeclipfonction-
nerontdefaçonstrictementidentique.
ClipLED:DerVerstärkerverfügtübereineechteClip-LED
(19),welcheIhnenhilft,denVerstärkeroptimaleinzustel-
lenundohneVerzerrungen zubetreiben.DieClipLED
leuchtetjeKanalauf,wenndasSignalsostarkist,dass
dieVerzerrungen1%THDerreicht.DieClipLEDsollte
im Betrieb weder dauerhaft leuchten noch regelmäßig
blinken.ZuroptimalenSoundqualitätsolltedieClipLED
höchstensseltenkurzaueuchten.WenndieLEDdauer-
haft leuchtet oder regelmäßig blinkt hören Sie verzerrten
Sound, welcher Ihre Lautsprecher beschädigen kann.
Sollte dies auftreten vermindern Sie die Lautstärke mit
dem Lautstärkedrehregler des jeweiligen Kanals oder
vermindern Sie die Lautstärke derSoundquelle. Sollte
die Clip LED leuchten wenn kein Signal eingespeist wird
könnte dies auf eine Gleichspannung am Ausgang hin-
weisen, welche Ihre Lautsprecher beschädigen kann (die
Gleichspannungistnichthörbar).WennSiedenVerstärk-
er im Modus “mono-gebrückt” betreiben arbeiten beide
Clip-LEDs simultan.
Connections and System Control
ConexionesyControldesistema•Connexions&Utilisation•AnschlüsseundSystemeinstellungen
10